The Chronology of Apartheid: 1652 – 1952
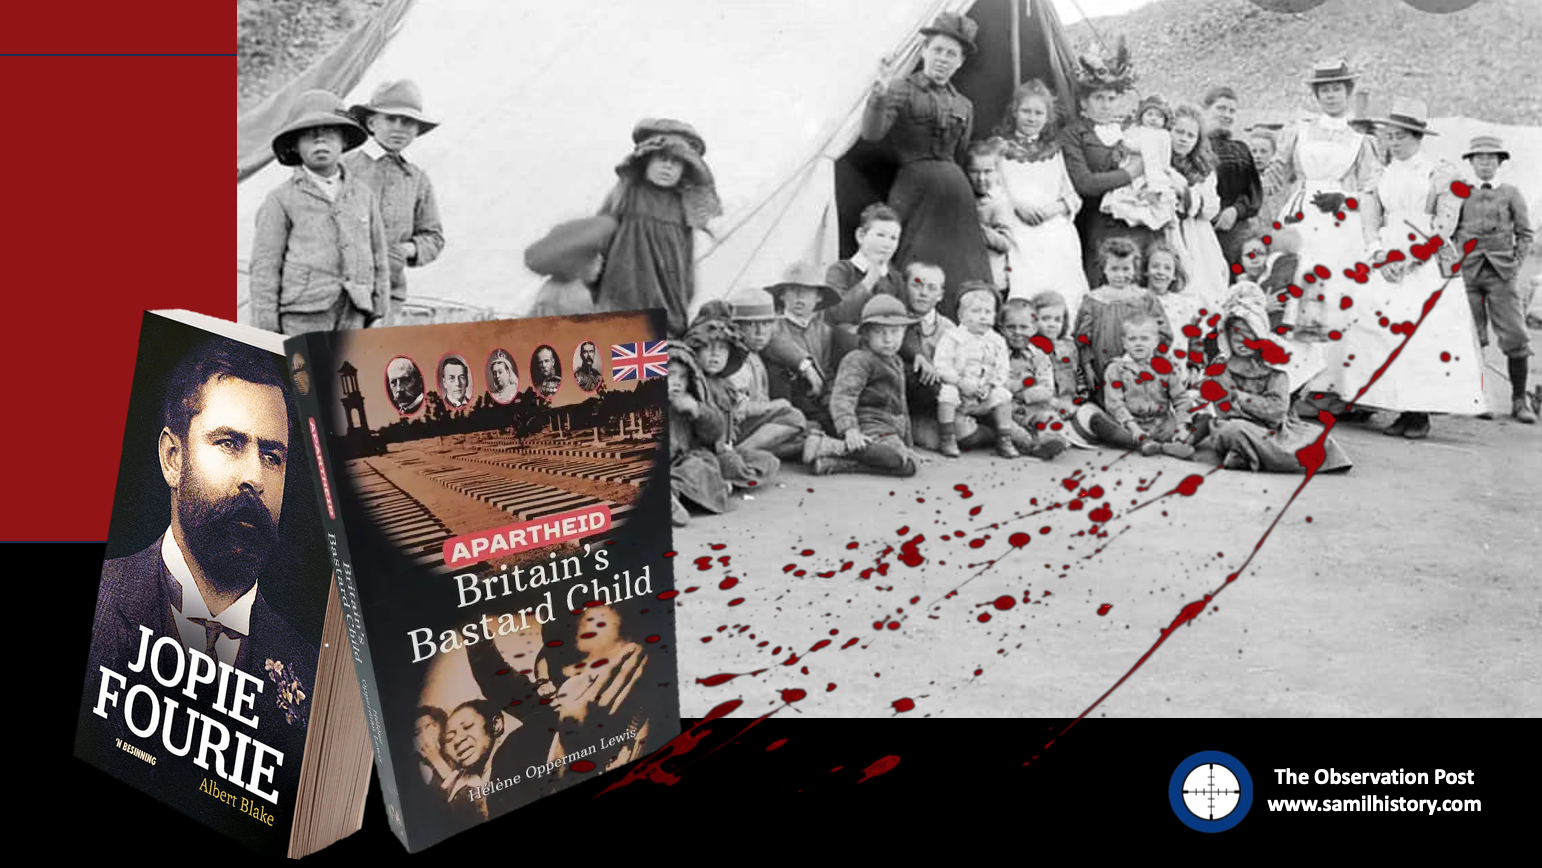
In 2017 Hélène Opperman Lewis released a “psychology” book titled “Apartheid: Britain’s Bastard Child”, the name and cover image of a Boer child emancipated by disease in a concentration camp kicked off a latent voice of Afrikaner Apartheid apologists who held it up as proof positive – the British ‘invented’ Apartheid. She has been joined lately by Albert Blake, who in 2024 in his book on Jopie Fourie used a similar argument of a latent psychological trauma the British imparted on the Afrikaner nation as the raison d’exister for Apartheid.
Despite Opperman Lewis facing serious criticism on trying to peddle a psychological book using the trauma and victim argument to claim ‘her people’ were unwittingly led to commit the crime of Apartheid – detractors noting that her argument was completely unhinged from nearly every history discipline – from historical sweep, the historical method, the chronological method, the archeological record all the way to simple economic history statistics. Despite this, these Neo Afrikaner Nationalists pointed to British Imperialism, Victorian paternal attitudes to “developing civilisations”, petty colonial segregation policies and trauma caused by British warmongering as the causes of Apartheid – not the fault of Afrikaners, the British did it – don’t you see!
Some even going as far as ignoring history completely and stating that Apartheid existed “unofficially” before 1948 anyway, and the only sin of Afrikaner Nationalists did in 1948 was simply to put down onto paper what was already there and define it as law – no foul, no harm, they just propagated what the “British started”.
So, let’s put Hélène Opperman Lewis and Albert Blake and their acolytes aside for a second, and do some proper historical sleuthing, come up with the “who done it”, who is really to blame for “Apartheid”. The chosen method is the basic historical method – the chronological method, and by using dates we will map the progression of Apartheid – from its origins to its final legal manifestations. Follow what the historians like to call “the golden thread” – the string that links the causal history together. At the end we hope to find who exactly is holding this particular “bastard child” as their own.
Nearly every historian, including all the predominant ‘Afrikaner’ historians, put the origins of Apartheid at the origins of slavery in the Cape – so, from a chronological method – let’s start there:
Apartheid – A chronology
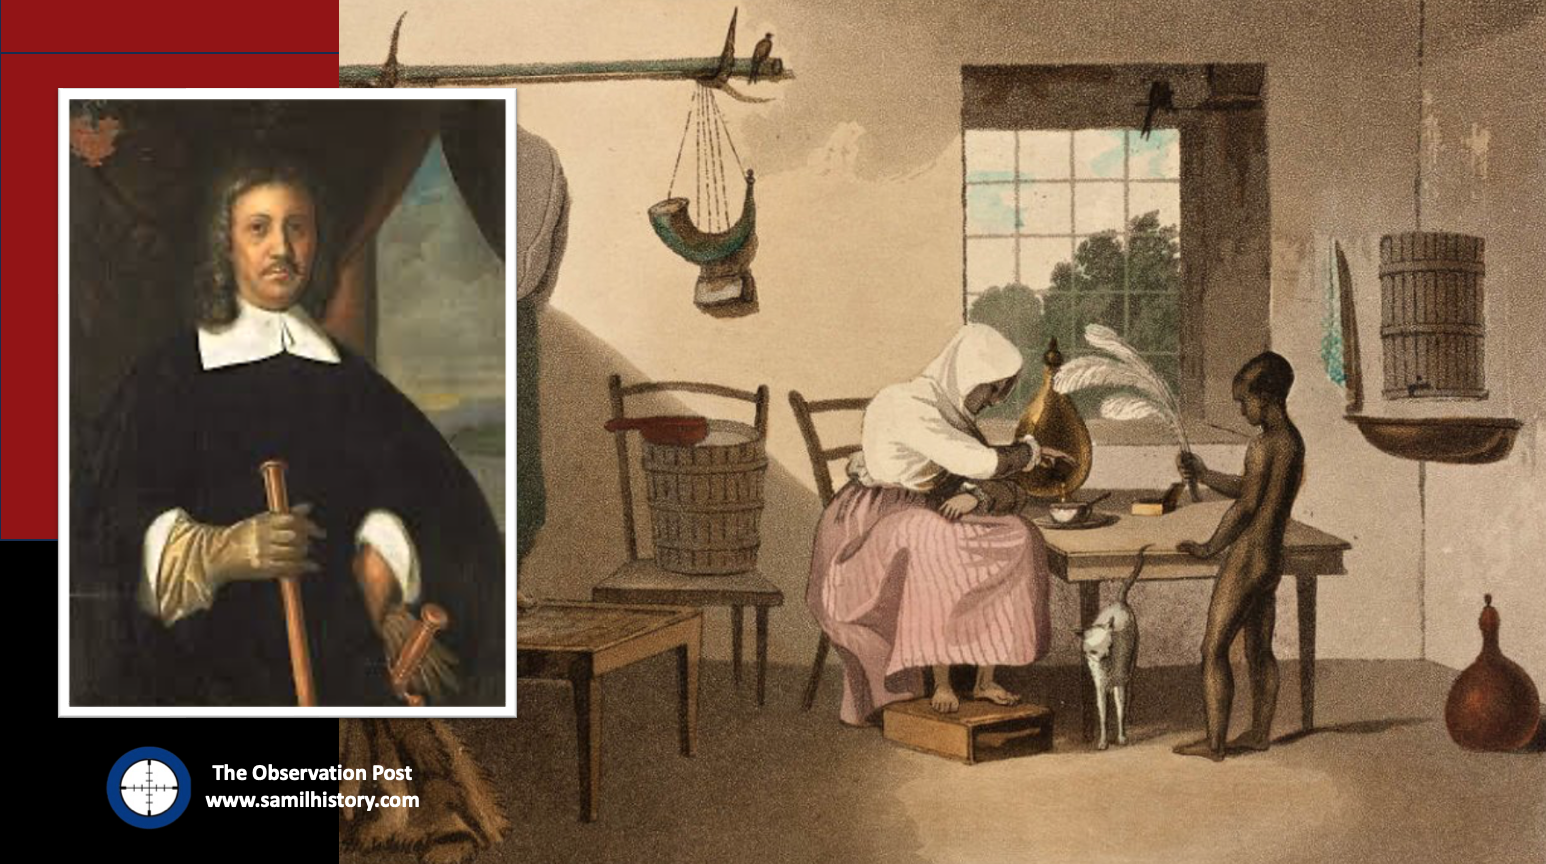
1652 – Dutch arrive and form the Cape Colony in 1652 to service VOC shipping. Jan van Riebeeck lands his ships in Table Bay on 6 April 1652 with a small contingent of settlers.
1653 – First slave arrives at the VOC settlement from Jakarta the very next year in 1653.
1659 – First Khoikhoi–Dutch War, by 1672 – Second Khoikhoi–Dutch War, by 1677 the region and its peoples are subjugated by the Dutch. The slave trade continues to expand in the VOC settlement for the next 100 years.
From the mid 1700’s the Dutch VOC implements the Inboekstelsil’ system on the outer borders of the Cape settlement – a policy of indentured slavery to initially capture Khoi and San children for an ‘apprenticeship’ period into adulthood – this done to fulfil demands for labour.
1795 – the French form the Batavian Republic and dispel with the Netherlands. The Cape Colony falls under Batavian rule. Slavery and Inboekstelsel systems in the colony continue.
The British occupy the Cape for the first time in response to activation of the Batavian Republic by the French – it’s short lived as the British settle a peace term with the Batavian vassal state and Napoleonic France – the Treaty of Amiens (1802) sees the British hand the colony back to Batavia.
1802 – Batavian rule again, slavery and indentured slavery practices in the Cape Colony continue.
1806 – The British attack the Batavian fort at their Cape Colony to forestall Napoleon’s troops strengthening the Cape Colony and the British re-occupy the colony as another Napoleonic War action (The Second Occupation of the Cape 1806).
1807 – British open their ban on slavery by banning slave trade between colonies in their empire. The Slave Trade Act 1807, officially an Act for the Abolition of the Slave Trade.
1814 – Dutch ‘Burghers’ dissatisfaction with the British occupation increases when the British specifically ban Dutch slave traders from entering any Cape port from 15th June 1814, squeezing labour supply.
1815 – Battle of Waterloo settles the matter of European control and occupied colonies, the Dutch sell their occupied Cape Colony to the British at the Congress of Vienna to aid in the re-establishment of their Dutch homeland in Europe for £6,000,000.1
1824 – The British negotiate territory from King Shaka to establish the Bay of Natal as a British trading post.
1829 – In the Cape Colony – the Dutch Reformed Church (DRC) or in Afrikaans the Nederduitse Gereformeerde Kerk (NGK) is now under British state authority. Puritan Burghers of Dutch/French and German decent formally request their DRC synod for separated black and white worship on he basis of a Puritan philosophy. It is denied by the DRC 1829 Synod who state:
‘Communion would be administered “simultaneously to all members without distinction of colour or origin.’
It is not a popular decision, Backhouse and Walker noted that in some parishes on the frontier:
‘the prejudices of the Dutch so strong, that some of them were much disturbed at the idea of the Hottentots coming into the “Kerk”; and they afterwards got up a protest against their being allowed to assemble there.’2
1834 – The British announced the full abolition of slavery, they also announced a universal qualified franchise vote putting a small number of ex-slaves and black male citizens who own property and have an education on the same footing as whites – some whites also find themselves on the same qualified footing as blacks. Due date – 1 Dec 1834. In the words of historian C.F.J. Muller:
‘The Afrikaans frontier farmer now got no satisfaction from Church and State.’3
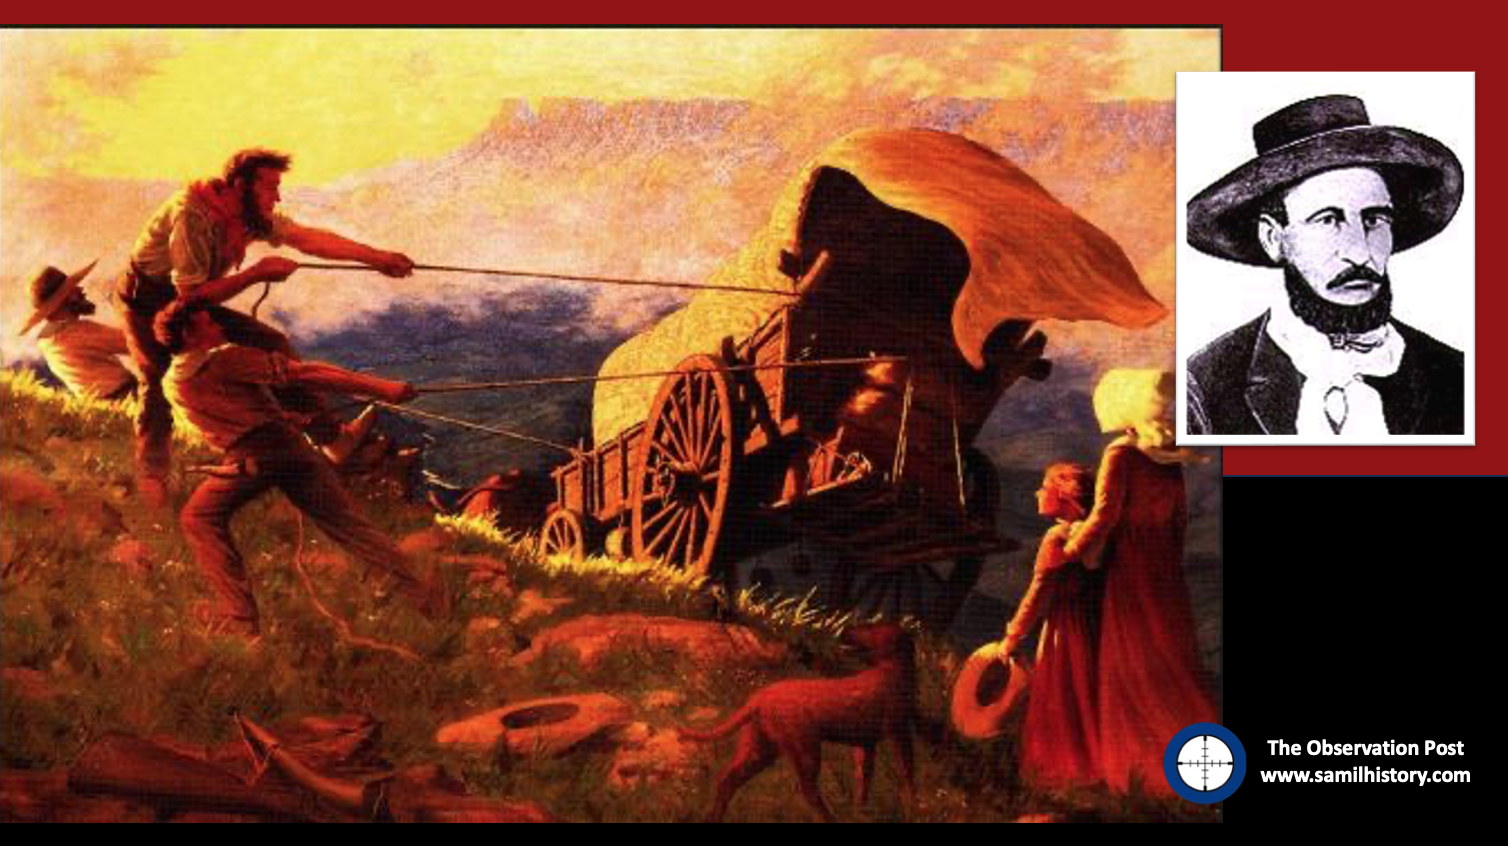
1835 – Louis Tregardt is the very first Voortrekker to leave the Cape Colony in protest against the British legislation ending slavery, he is also wanted for cattle theft and gun running with the Xhosa – he also has no intention of releasing his slaves and takes them with him, one escapes and reports his position to the British authorities forcing him to ‘ditch’ the rest of his slaves and to carry on trekking north – his trek is a failure and disbands.4
1837 – Piet Retief is the most famous of the Voortrekkers, in 1837 he leaves the Cape Colony – and his manifesto is published declaring discontent with the British for abolishing slavery, the terms of compensation thereof and for implementing a colour blind franchise. Included in their decision to “trek” from the colony is dissatisfaction with the colour blind worship and language status of their Dutch Reformed Church.
These frontier farmers remain ‘Puritans’ within a strict Calvinist dogma regardless of their Church’s position on race – and this sentiment of outrage is captured by this famous quote by Retief’s sister, Anna Steenkamp who writes:
‘and yet it is not (‘the slaves’) freedom that drives us to such lengths, as their being placed on an equal footing with Christians, contrary to the laws of God and the natural distinction of race and religion, so that it was intolerable for any decent Christian to bow down beneath such a yoke; wherefore we rather withdrew in order to preserve our doctrines in purity.’5
This quote can be regarded as the epicentre of Apartheid as it becomes defined in future.
The Dutch Reformed Church (DRC) i.e. the Nederduitse Gereformeerde Kerk (NGK) in the Cape Colony formally denounces the Voortrekkers – they leave anyway, The church’s next reaction is to refusal to permit of ‘any of its ministers to leave the colony with the Trekkers.’6
The DRC – also known as the ‘gaatjieponders’ splits over the matter of the Great Trek and the Nederduitsch Hervormde Kerk (NHK) known as ‘Stoepsitters’ forms on 21 May 1837 as a ‘sister church’ of DRC to care for the puritan white Voortrekkers spiritual needs.
1838 – 6 February 1838 – Piet Retief’s party of 67 Boers and 30 of their black servants are murdered by Dingaan whilst negotiating land for a Voortrekker Republic. Later in the year – 16 December 1838, The Battle of Blood River takes place and is a resounding Boer victory.
1839 – The ‘unrecognised’ Republic of Natalia is established by Boers on 12 Oct 1839 with Pietermaritzburg as its capital. It’s ‘het publiek’ constitutional policy dissolves the Republic into administrative chaos. At war with nearly all neighbouring tribes, Zulu, Pondo and Xhosa and the British in addition, the Republic descends into further chaos.
1843 – In an ungovernable state, the Republic of Natalia’s Volksraad turn to the British for voluntary annexation when officially on 23 April 1843 it consented to Natalia becoming a British colony, on 8 August 1843 the Volksraad unanimously finalise the terms proposed by Lord Stanley, the new British ‘Natal’ colony would incorporate the Port Natal settlement and the Drakensberg is set as the northern limit.
There is a fundamental British condition in the formation of this new colonial expansion of Natal, it reads:
‘that there should not be in the eye of the law any distinction or disqualification whatever, founded on mere difference of colour, origin, language or creed.’7
Once again in countenance to Puritan Voortrekker values, unsatisfied with the political state of things, the loss of their republic and with a general dose of both Anglophobia and Afrophobia, a large group of Natalia Voortrekkers trek again over the Drankensberg into ‘Transorangia’ and into what would eventually become the Transvaal.
1848 – The British declare the area of ‘Transorangia’ i.e. the modern Free State, the area between the Orange and Vaal Rivers a ‘British Sovereignty’ (a colony) calling it the Orange River Sovereignty. They also bring with them the ‘Colour Blind’ qualification franchise as specified in the Cape and the abolition of slavery.
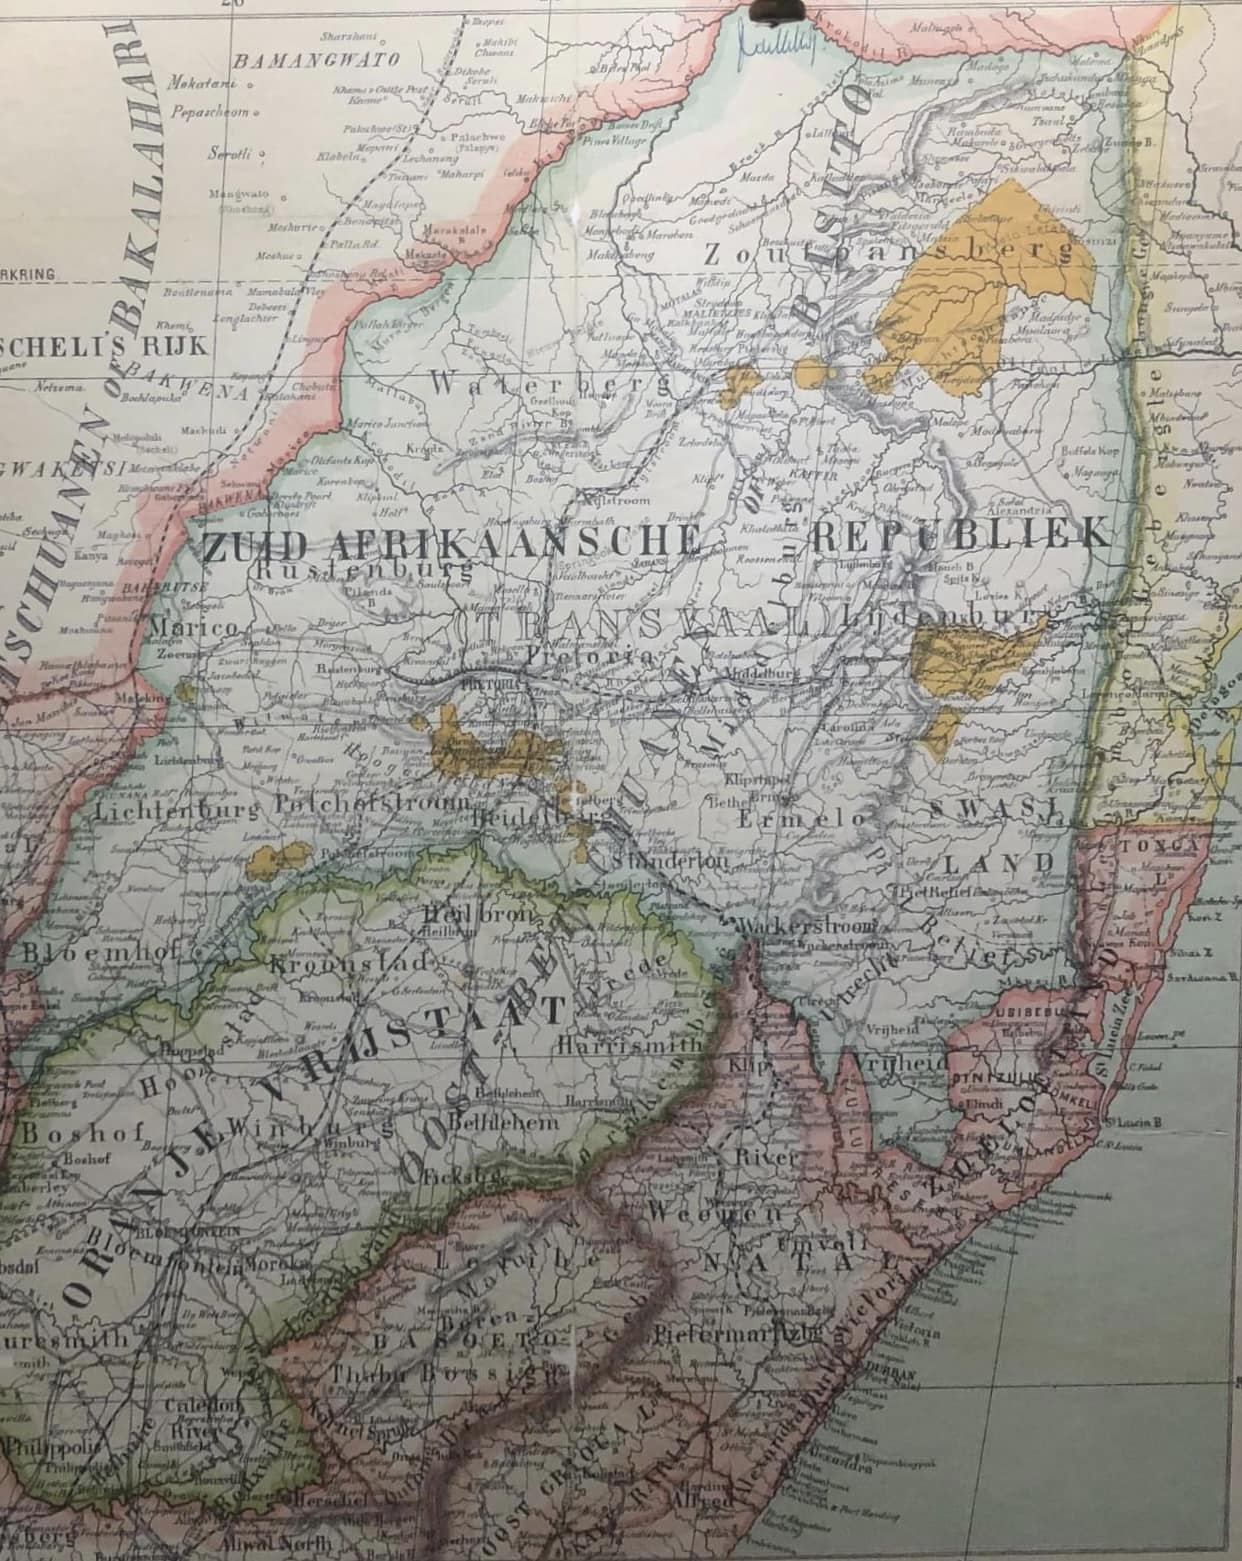
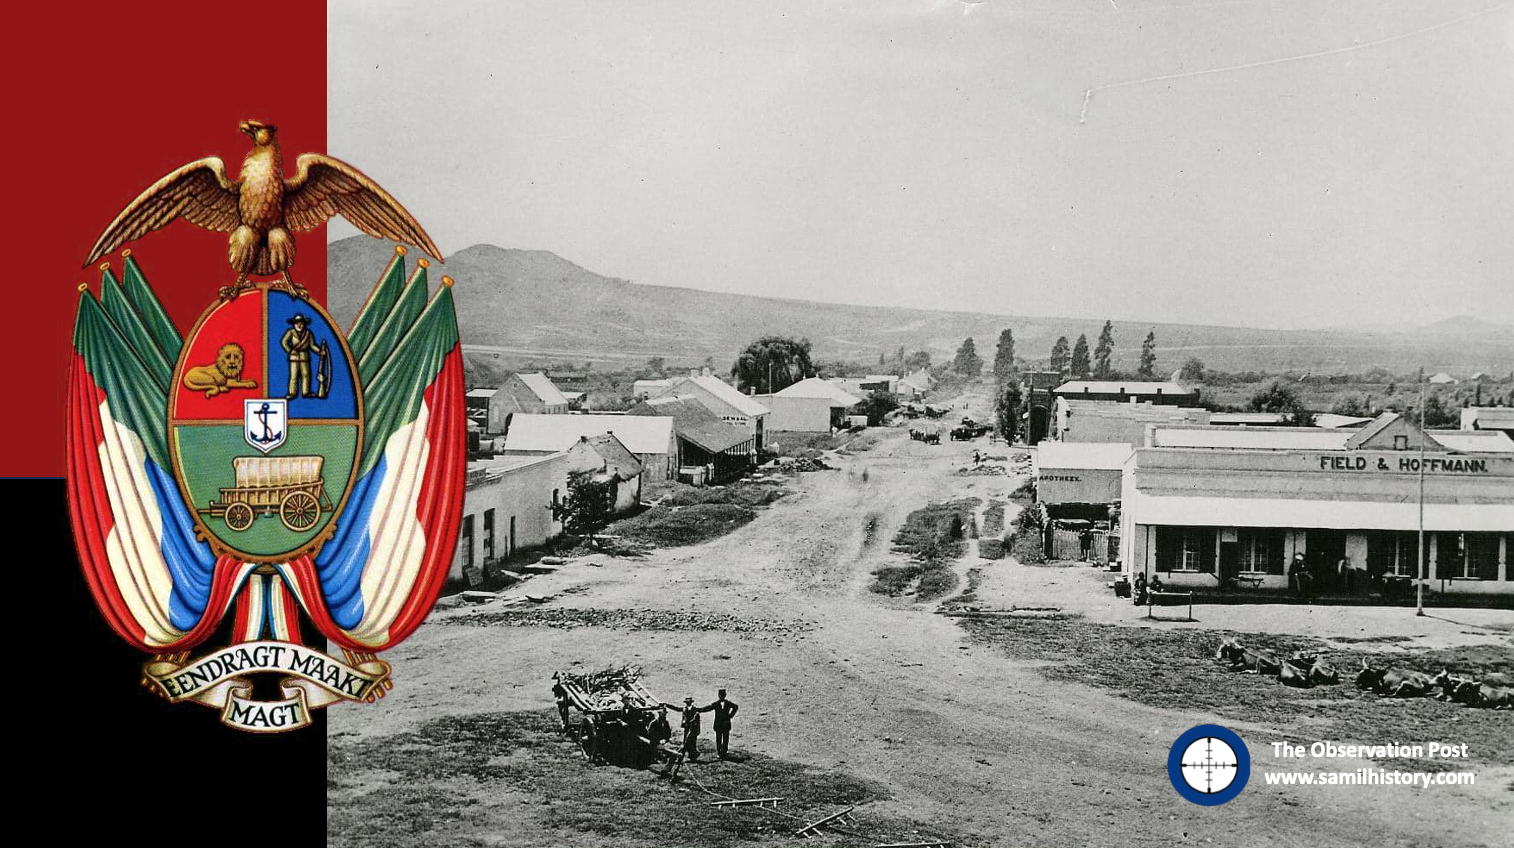
1852 – The Sand River Convention between the Boers and the British on 17 January 1852 establishes the Zuid-Afrikaansche Republiek (ZAR) – a combination of a number of small Voortrekker Republics in the region made up of migrating British colony citizens with varying constitutions now merged. The British delegation at the Sand River convention agree the formation of a fully independent ‘recognised’ ZAR Boer Republic on the proviso that they are not permitted to practice slavery.
The initial ZAR constitution is ratified and it legally forbids anyone who is not a member of the Dutch Reformed Church (and related ‘sister’ Churches) from holding a voting franchise. Only ‘white’ adult males aligned to the DRC and its sister churches are allowed to vote – people of colour are specifically excluded – so too are white Jews and white Catholics. People of colour are given no political representation whatsoever, cannot vote and cannot own land, marriages are not legally recognised and they are even forbidden in the constitution from entering the ZAR’s ‘Raad’ (parliament).
The ZAR also implements the old Dutch Inboekstelsel system of indentured slavery targeted at indigenous peoples to supplement their need for real slaves and boost labour requirements for expansive farming – the average Voortrekker farm is 6,000 aches of land, in all they occupy a land mass bigger than Great Britain using a ‘grab and hold’ strategy when encroaching on native land.8 Trading of these indentured slaves on the ZAR frontiers even becomes known as ‘black gold’.
A letter to Piet Joubert, who acquired many inboekstelsel slaves on his military campaigns as the ZAR Kommandant-General, summarises the brutality and manner of the inboekstelsel – sent to his wife it reads:
‘Please ask the General to let me have a little Malaboch kaffir, as of course there are some whose father and mother have been killed. I don’t mind if it’s a boy or a girl. I want one about seven years old, or any one that the General will give me’9
1854 – the Orange River Convention is held on 23 February 1854. Britain agrees to hand their “Orange River Sovereignty” over to Boer stewardship. The Boer Republic of the “Orange Free State” (OFS) was declared on the 23 February 1854, however a key condition for the establishment of the OFS is that it became a British Suzerainty (a British vessel or client state) – the conditions of the Suzerainty specify that the Boer Republic is ‘independent’ and responsible for its own ‘internal affairs’ in terms of self-governance whilst Britain has oversight for the ‘external affairs’ (foreign affairs) of the OFS. Issues of Black African emancipation, political representation and franchise are left to the OFS republicans to manage as an ‘internal affair’. Slavery is specified by the British as outlawed in the region and not permitted.
1856 – the ‘Colour Blind’ qualified Franchise as implemented in the Cape Colony by the British is now officially implemented by the British in the Natal Colony.10
1857 – The Dutch Reformed Church (DRC) holds a Synod in 1857 in the ZAR and makes allowances for separate worship – in a religious quandary it maintains conversion to Christianity as its goal for Black and Whites inclusively – however worship is separated on the basis of race – the “Groot Kerk” (Big Church for the Whites) and “Klein Kerk (Small Church for the Blacks). Sermons for both ‘Groot and Klein’ – Black and White services are run by the same white DRC Dominee. This decision was to have long-lasting ramifications. Unwittingly the church had provided:
‘An ecclesiological blueprint for the Nationalist policy of separate development of the races, or Apartheid’11
1858 – the ZAR State and DRC’s sister church, the Nederduitsch Hervormde Kerk (NHK) Church are synchronised as an Oligarchy on Theocracy lines.
1859 – the ‘Dopper’ Church – the Gereformeerde Kerke (GK) forms as an off-shoot of the Nederduitsch Hervormde Kerk (NHK) and a ‘sister’ church of both the Dutch Reformed Church and the NHK. Ultra Conservative – Paul Kruger is a Dopper.
1860 – The ZAR constitution makes clear the legalities of Black emancipation in its territory when it declares:
‘The people are not prepared to allow any equality of the non-white with the white inhabitants, either in church or state.’
In the same year the British begin an indentured labour program of their own and 342 Indians arrive on board the Truro on 16 November 1860. The fundamental difference between the British “Indentured Labour” and the Voortrekker Inboekstelsel “Indentured Slaves” lies in the use of slave “apprenticeship” policies.
The Voortrekker ZAR Inboekstelsel system allowed for the aggressive capturing of black indigenous African children and holding them in a slave/master “apprenticeship” relationship. Slave Apprenticeships for African females lasted until they were 21 years old and for males it was 25 years old, thereafter the Indentured Slave had the option of been released (although this was not observed in remote frontier districts).12
The inboekstelsel labourer on release could also remain on the farm as a contract or paid worker, and as most were displaced anyway, many indentured slaves remained on the Boer farms as a sub working class in separate ‘kraals’ with no political or property rights whatsoever. Some 10% of the ZAR population qualified as inboekstelsil.
The British Natal Indian Indentured labour system was a 5 year work contract primarily on sugar cane farms or coal mining with minimal wage under very strict and unfair labour policies – which allowed for no labour or political representation for the work contract period – the conditions of work varied and in many instances qualified as an exploitative relationship and a miserable existence for the labourer. Thereafter the labourer could leave his indentured employer and become a ‘free man’, remain in Natal and open his own business or enter employment. If having served 2 indentured work terms (10 years) the passage back to India was free of charge.13
1865 – in terms of the Cape and Natal colonies – the British Westminster Parliament issues the “Colonial Laws Validity Act 1865” which allowed the colonies to pass legislation different from that in Britain provided that it was not repugnant to any law expressly passed by the Imperial Parliament to extend to that colony. This had the effect of granting British colonies more autonomy, to legislate free of Britain, within their own ‘internal’ borders.
1869 – The DRC Synod resolves to condemn the practice of the Inboekstelsel apprenticeship slavery system and within two years (1871) the DRC concludes the system no longer exists in the Zuid-Afrikaansche Republiek (although this is not strictly true).14
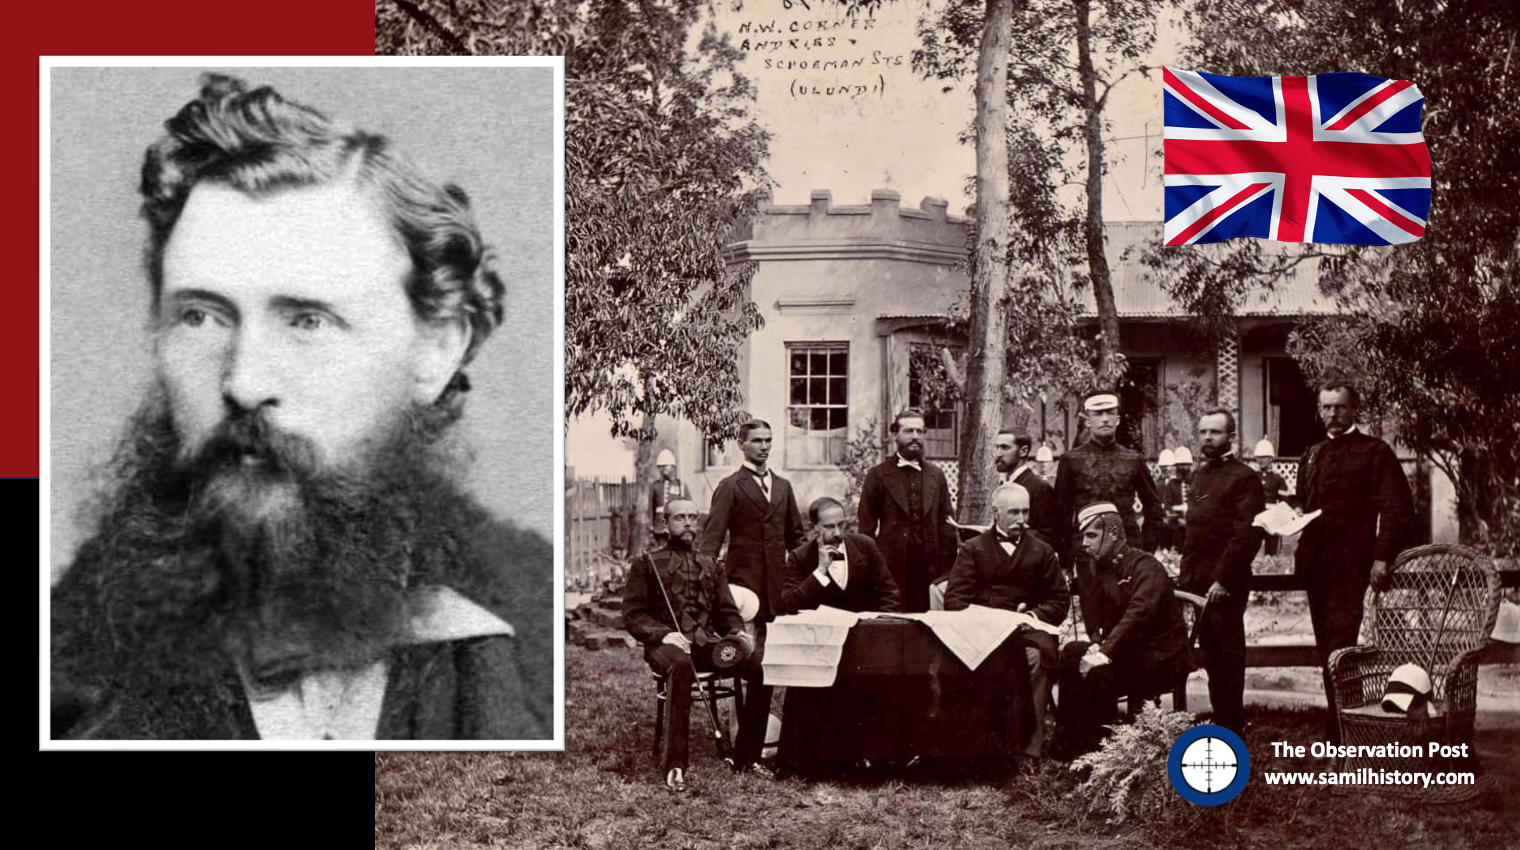
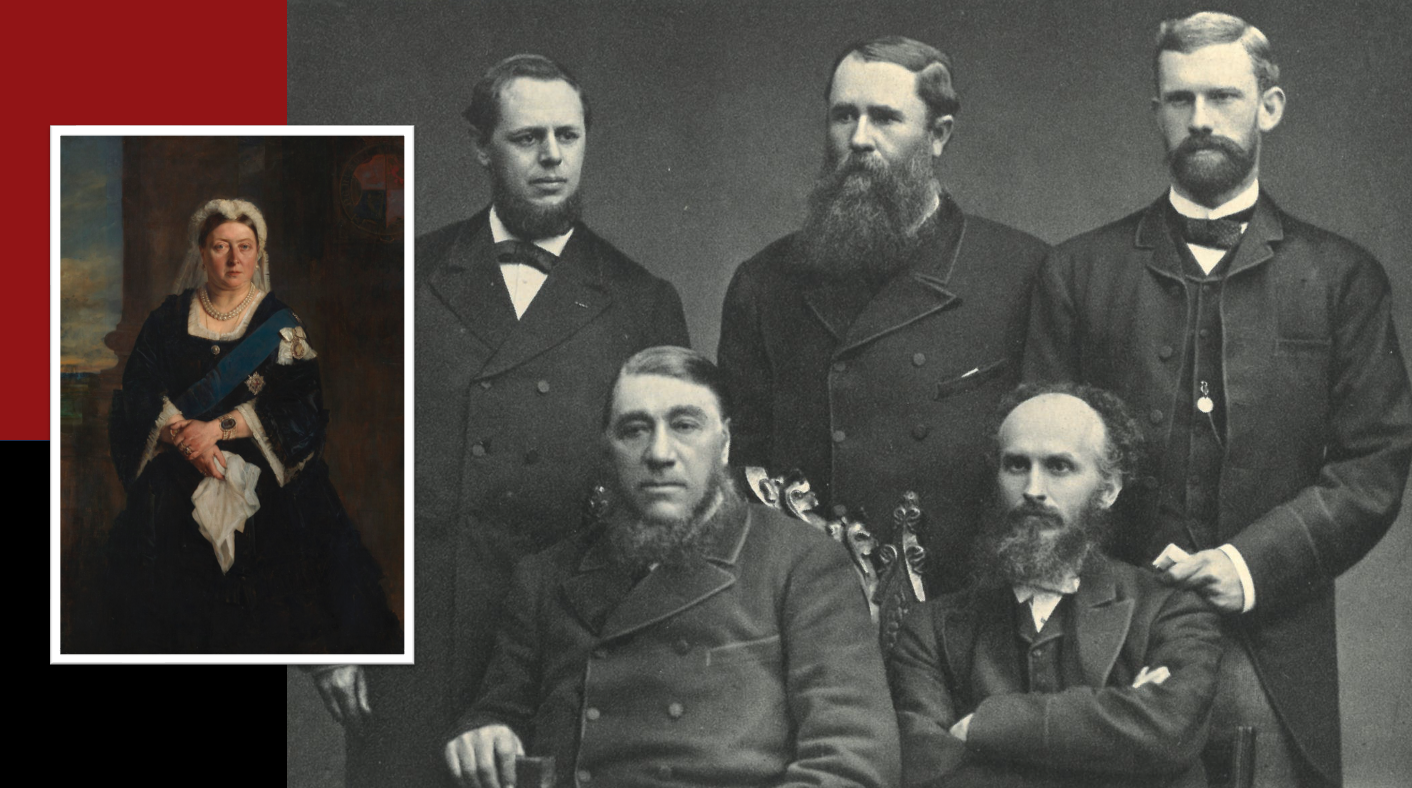
1876 – the ZAR heading into a financial crisis, facing bankruptcy due to a Voortrekker culture of non payment of taxes, and under threat from local African tribes. Led by Sekhukune I of the Pedi, a war in 1876 took place which is recorded as a Boer defeat. After losing the battle with the Pedi, the ZAR goes into confederation and protectorate negotiations with the British.
The ZAR President – Thomas Burgers and the British Representative – Sir Theophilus Shepstone, agree to the voluntary dissolving of the Republic and to the annexation of the territory by the British – the idea is a long standing British one of a Federation of loose states in Southern Africa under the British flag (paramountcy). In dissolving the ZAR ‘Raad’ Burgers points a finger at Paul Kruger and his cabal and cites the Inboekstelsil system and consistent conflict with indigenous tribes as the key causes for voluntary dissolution of the Boer republic and annexation and protection from Britain – he says:
‘It is you – you members of the Raad and the Boers – who have ruined the country, who have sold your independence for a drink. You have ill-treated the natives, you have shot them down, you have sold them into slavery, and now you have to pay the penalty.’15
1877 – the British annex the ZAR, re-naming it “The British Colony of The Transvaal” – they open up immigration to white British settlers who become known as the “Pretoria Loyalists” and embark on a number of reforms. However, importantly, they do not immediately implement their Cape and Natal ‘colour blind’ qualified franchise in their new British Transvaal Colony.
1879 – under ambitions for a British led Federation across the entire region, the British regional attentions switch to fighting the Anglo-Zulu war from 11 January – 4 July 1879, a British victory over the Zulu nation. The aftermath would see Zululand eventually annexed as part of Natal in 1897.
1880 – the Afrikaner Bond is established in 1880 to forward Afrikaner political ambitions. Within it lie the origins of Afrikaner Nationalism, which is a unification of Afrikaners across the all the states from the “Zambezi to the Cape” and calls for a Afrikaner led paramountcy16 in the region under the slogan:
‘Africa for the Africander’17
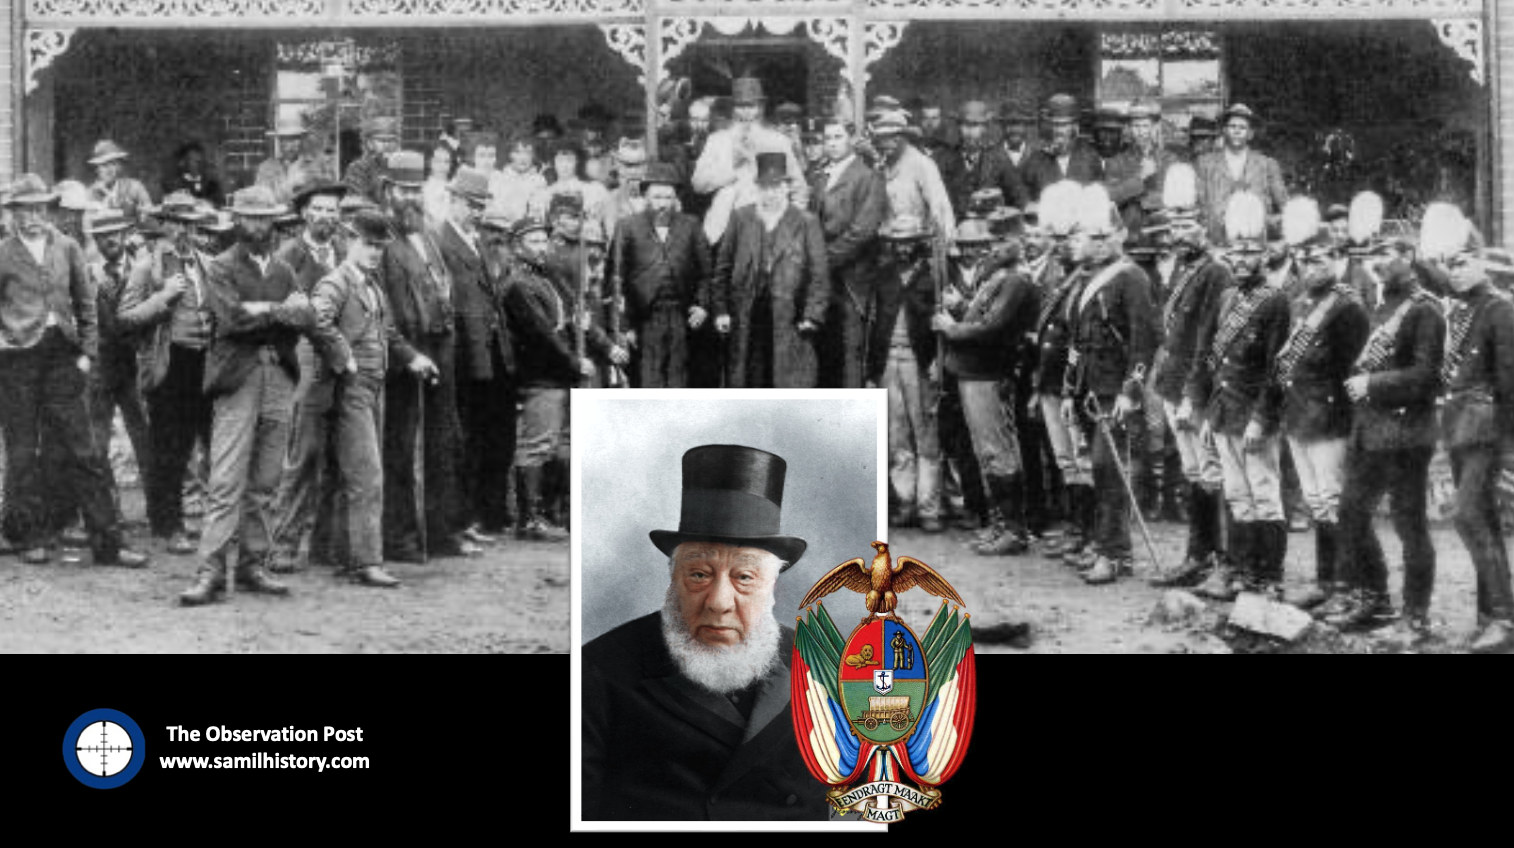
Later in the ZAR the “ox-wagon incident” takes place in November – an issue as to a Boer’s backdated tax, the incident brings up simmering Boer dissatisfaction with British rule. Led by Paul Kruger the Boers rise in a revolt on the 20 December 1880 and attack the British Garrison at Bronkhorstspruit. This marks the start of The Transvaal Rebellion (the first Boer War) in the British Colony of The Transvaal.
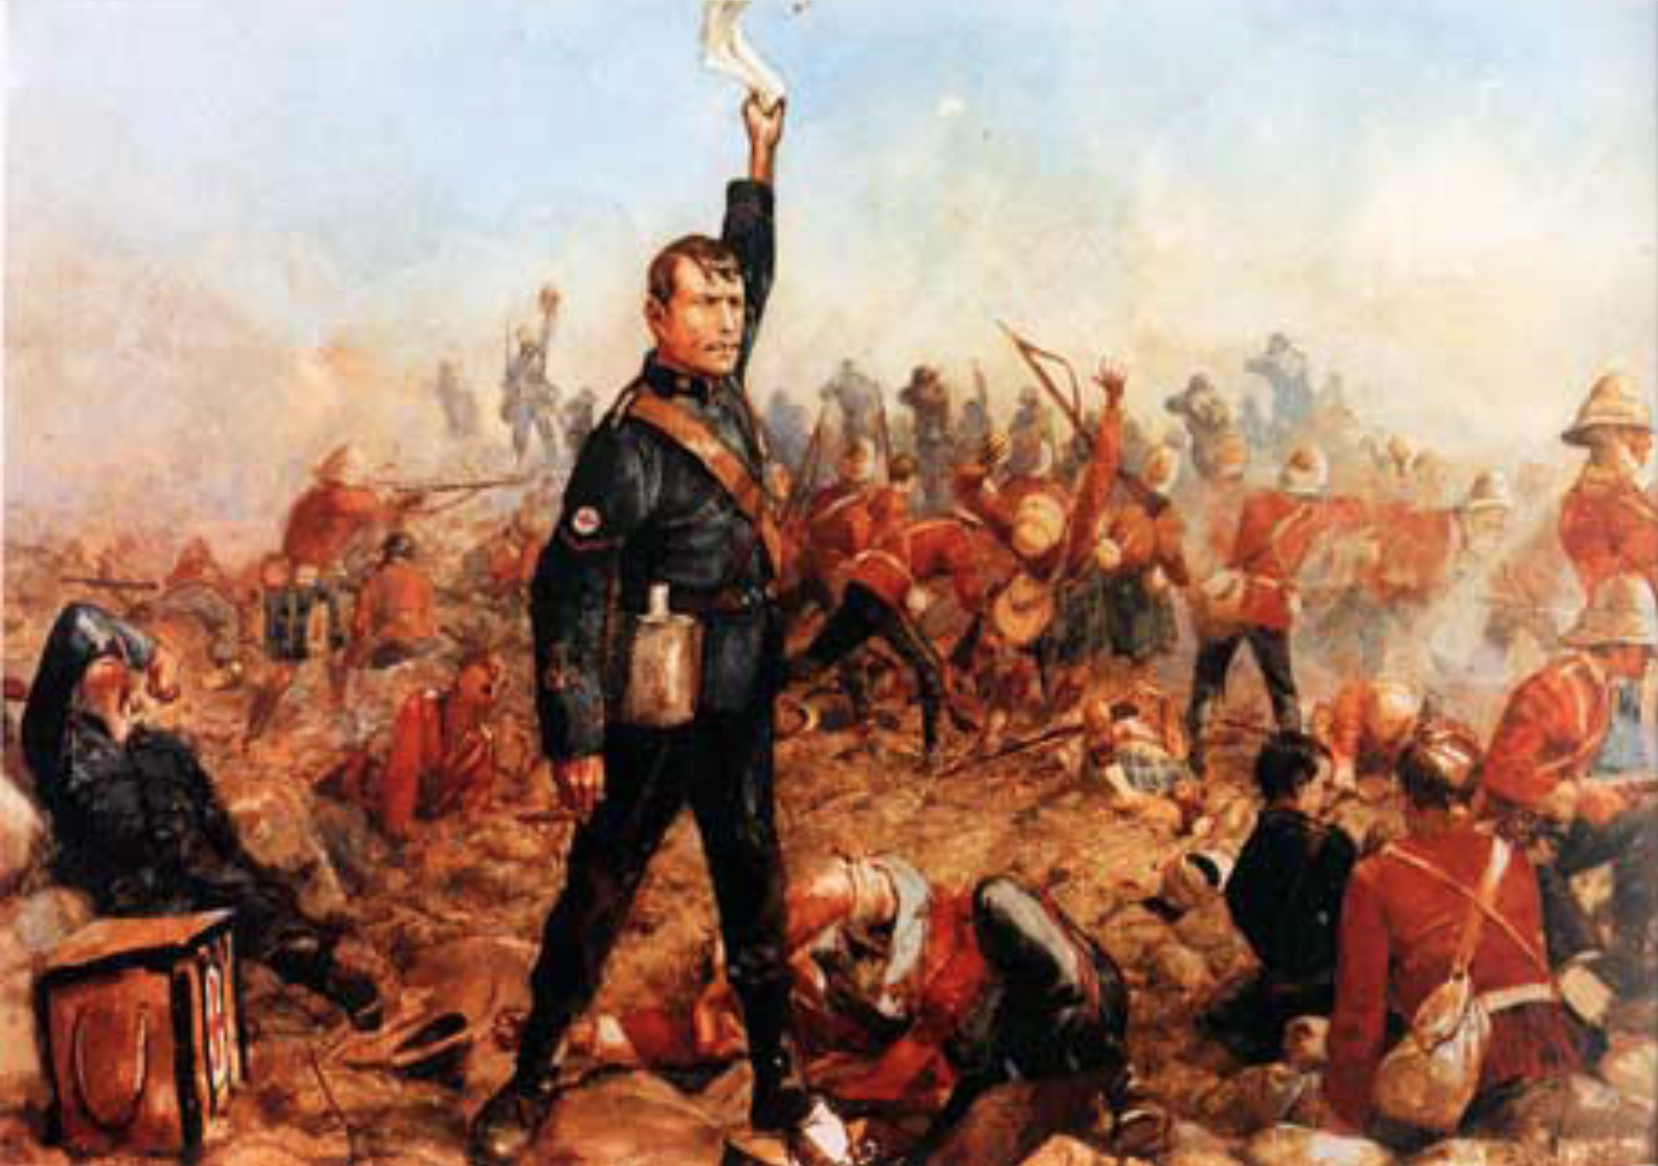
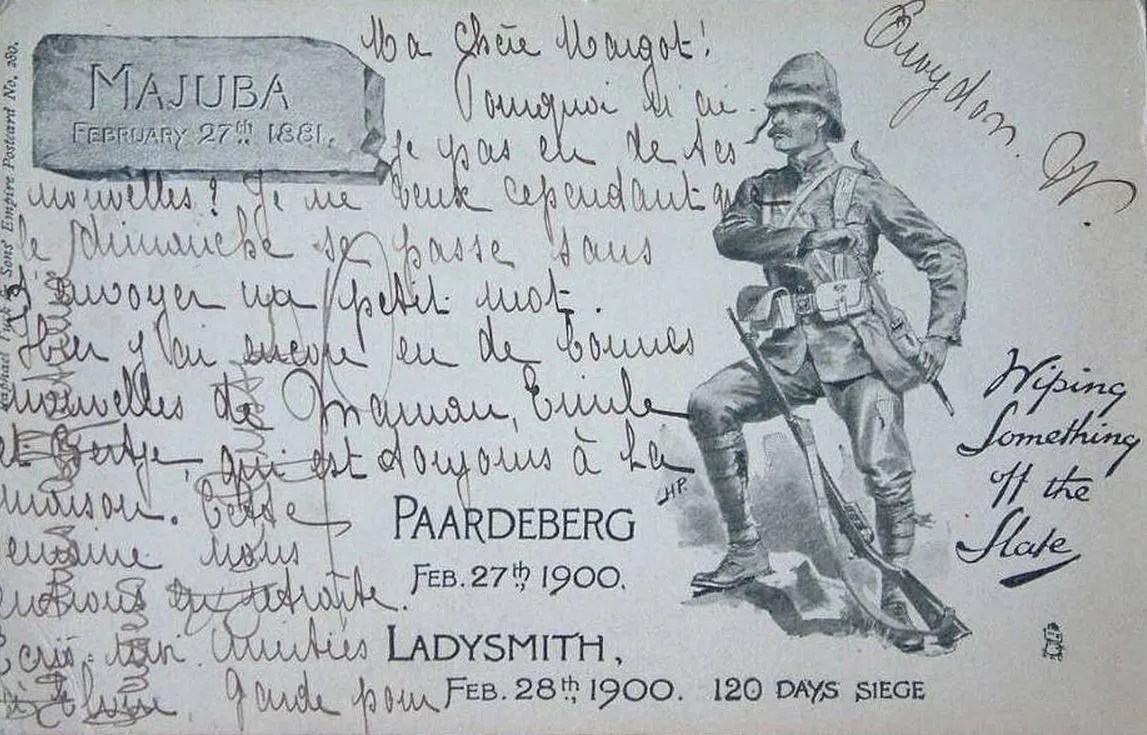
1881 – The Transvaal Rebellion ends with a resounding Boer victory over the British relief column at the Battle of Majuba on the 27 February 1881. With Pretoria’s garrisons still in the control of the British, the British sue for peace instead of a protracted rebellion.
A compromise is struck at the Pretoria convention, held on 3 August 1881, which re-established the Zuid-Afrikaansche Republiek (ZAR) re-named as The Transvaal Republic as a British Suzerainty state (a vassal or client state of Britain). The “Triumvirate’ Presidency” (shared Presidency) was officially recognised on 8 August 1881 by the British to oversee the running of the Transvaal Republic – it was made up of Paul Kruger, Piet Joubert and Marthinus Pretorius.
Under the conditions of the Suzerainty, the Transvaal Republic is permitted ‘independence’ to run all its own internal affairs as a Republic, however Britain remains in control of all the Transvaal Republic’s ‘external’ affairs (foreign affairs), its borders and enjoys a preferred status as to trade.
On the issue of Paramountcy and Federation, the Orange River Convention in 1854 specified upfront that the Orange Free State Republic was a British Suzerainty state, so British paramountcy was regionally assured with the Transvaal Republic becoming a Suzerainty state in addition.
On the issues of franchise and qualification, political rights are devolved to ‘internal affairs’ to be run by the Transvaal Republic.
1883 – Paul Kruger is elected as the President of the Transvaal Republic on 9 May 1883, ending the Triumvirate. He beats Joubert on election promises of increased Church involvement in State, an immigration policy in favour of the white Boer citizens, a cordial stance towards Britain and that the un-enfranchised majority of Black and Coloured citizens of the Transvaal Republic remain as:
‘obedient native races in their appointed districts.’18
From 1883 onwards, as President of the Transvaal Republic/ZAR, Paul Kruger comes to define a system of government and an ideology in the Transvaal known as “Krugerism”. Krugerism, extolled an anti-modernist social and economic order. Contemporary writers at the time almost unanimously conclude that Kruger himself headed this order:
‘as the Kommandant of a medieval oligarchy. Kruger was hemmed in by the “hurrying tide of civilisation”, leaving him and his following “rooted in the seventeenth century”.’19
Krugerism deepened the role of the Dutch Reformed Church and State as a Theocracy, whilst maintaining a white Protestant oligarchy in power. Franchise rights were still not afforded to Jews and Catholics and no political rights were afforded to ‘coloured’ or ‘native’ ZAR citizens whatsoever – even legally according to the constitution a ‘white’ man could not be tried in conjunction with a ‘black’ man in a ZAR court of law. Laws for each racial group were fundamentally separated as specified in the ZAR constitution. The language policy was ‘Dutch’ only in all facets of government and law.
Krugerism entailed compulsory “Commando” military commitments for all white Boer males per the constitution with “unusual” devolved powers to appointed “veldkornets” to marshal all white citizens – this, along with increased GDP focus on munitions, state intelligence services and state police (known as ZARPS) ensured the ZAR’s oligarchy was ensconced in power along the lines of a “Police State”.
Economically, Krugerism advocated ‘local’ (Boer) controlled monopolies to encourage manufacture called ‘konsensies’ (concessions).20 Concessions extended to all facets of economic production, including eventually the infamous “dynamite” monopoly on mining.
1884 – desirous of returning the name of the region to the Zuid-Afrikaansche Republiek (ZAR) and desirous of full sovereignty as an independent republic and the removal of the British Suzerainty, a Boer delegation, including Kruger, is sent to London to re-negotiate the terms of the Pretoria Convention.
The London Convention is signed on 27 February 1884, the Republic is re-named the ZAR, however the issue of Suzerainty becomes key – the word “Suzerainty” is dropped from the pre-amble as a sap to Paul Kruger and his report back to his ‘Raad’, however all the legal constructs of the Suzerainty remain unchanged – the ZAR is permitted self governance for its “internal affairs” only, and the British still have full oversight of all the ZAR’s “external affairs” (foreign affairs), its borders and its preferred trade with the British status – the only exception that is made is ZAR’s foreign relations with the OFS. The ZAR remains a British ‘vassal state’ and is still not fully “sovereign”.
On “internal affairs” the ZAR assures the British that white British citizens and white Boer citizens will enjoy the same equal rights status as they held in 1877 with no change – no such emancipation or political rights are specified for Black or Coloured citizens.
The London Convention was a poorly conceived compromise and the Suzerain unclear, the treaty would cause significant political abrasion and tension between Britain and the ZAR for the next 15 years.
1886 – Significant gold deposits are discovered along a reef known as the Witwatersrand in the ZAR, triggering a “gold rush” of large numbers of foreign miners – mainly British into the ZAR, but also significant numbers of migrant Black miners and labourers. Johannesburg is established and very quickly the demographic balance between white British settlers and white Boer settlers in the ZAR changes in favour of the British.
1895 – the Jameson Raid, 29 December 1895 to 2 January 1896 takes place – it’s a botched raid to enact regime change in the ZAR. The raid is made up of British privateers led by Starr Jameson with the support of ‘The Reform Committee’ led by mining Randlords on the ZAR’s gold reef. It is supported by the mining magnate and Cape Colony Premier – Cecil John Rhodes, and although the Raid takes place without the knowledge of the British foreign office and Westminster it leads to considerable souring of the British and Boer relationship. Kruger unsuccessfully attempts to have the 1884 London Convention and the Suzerain declared null and void because of what he sees as a breach of contract.
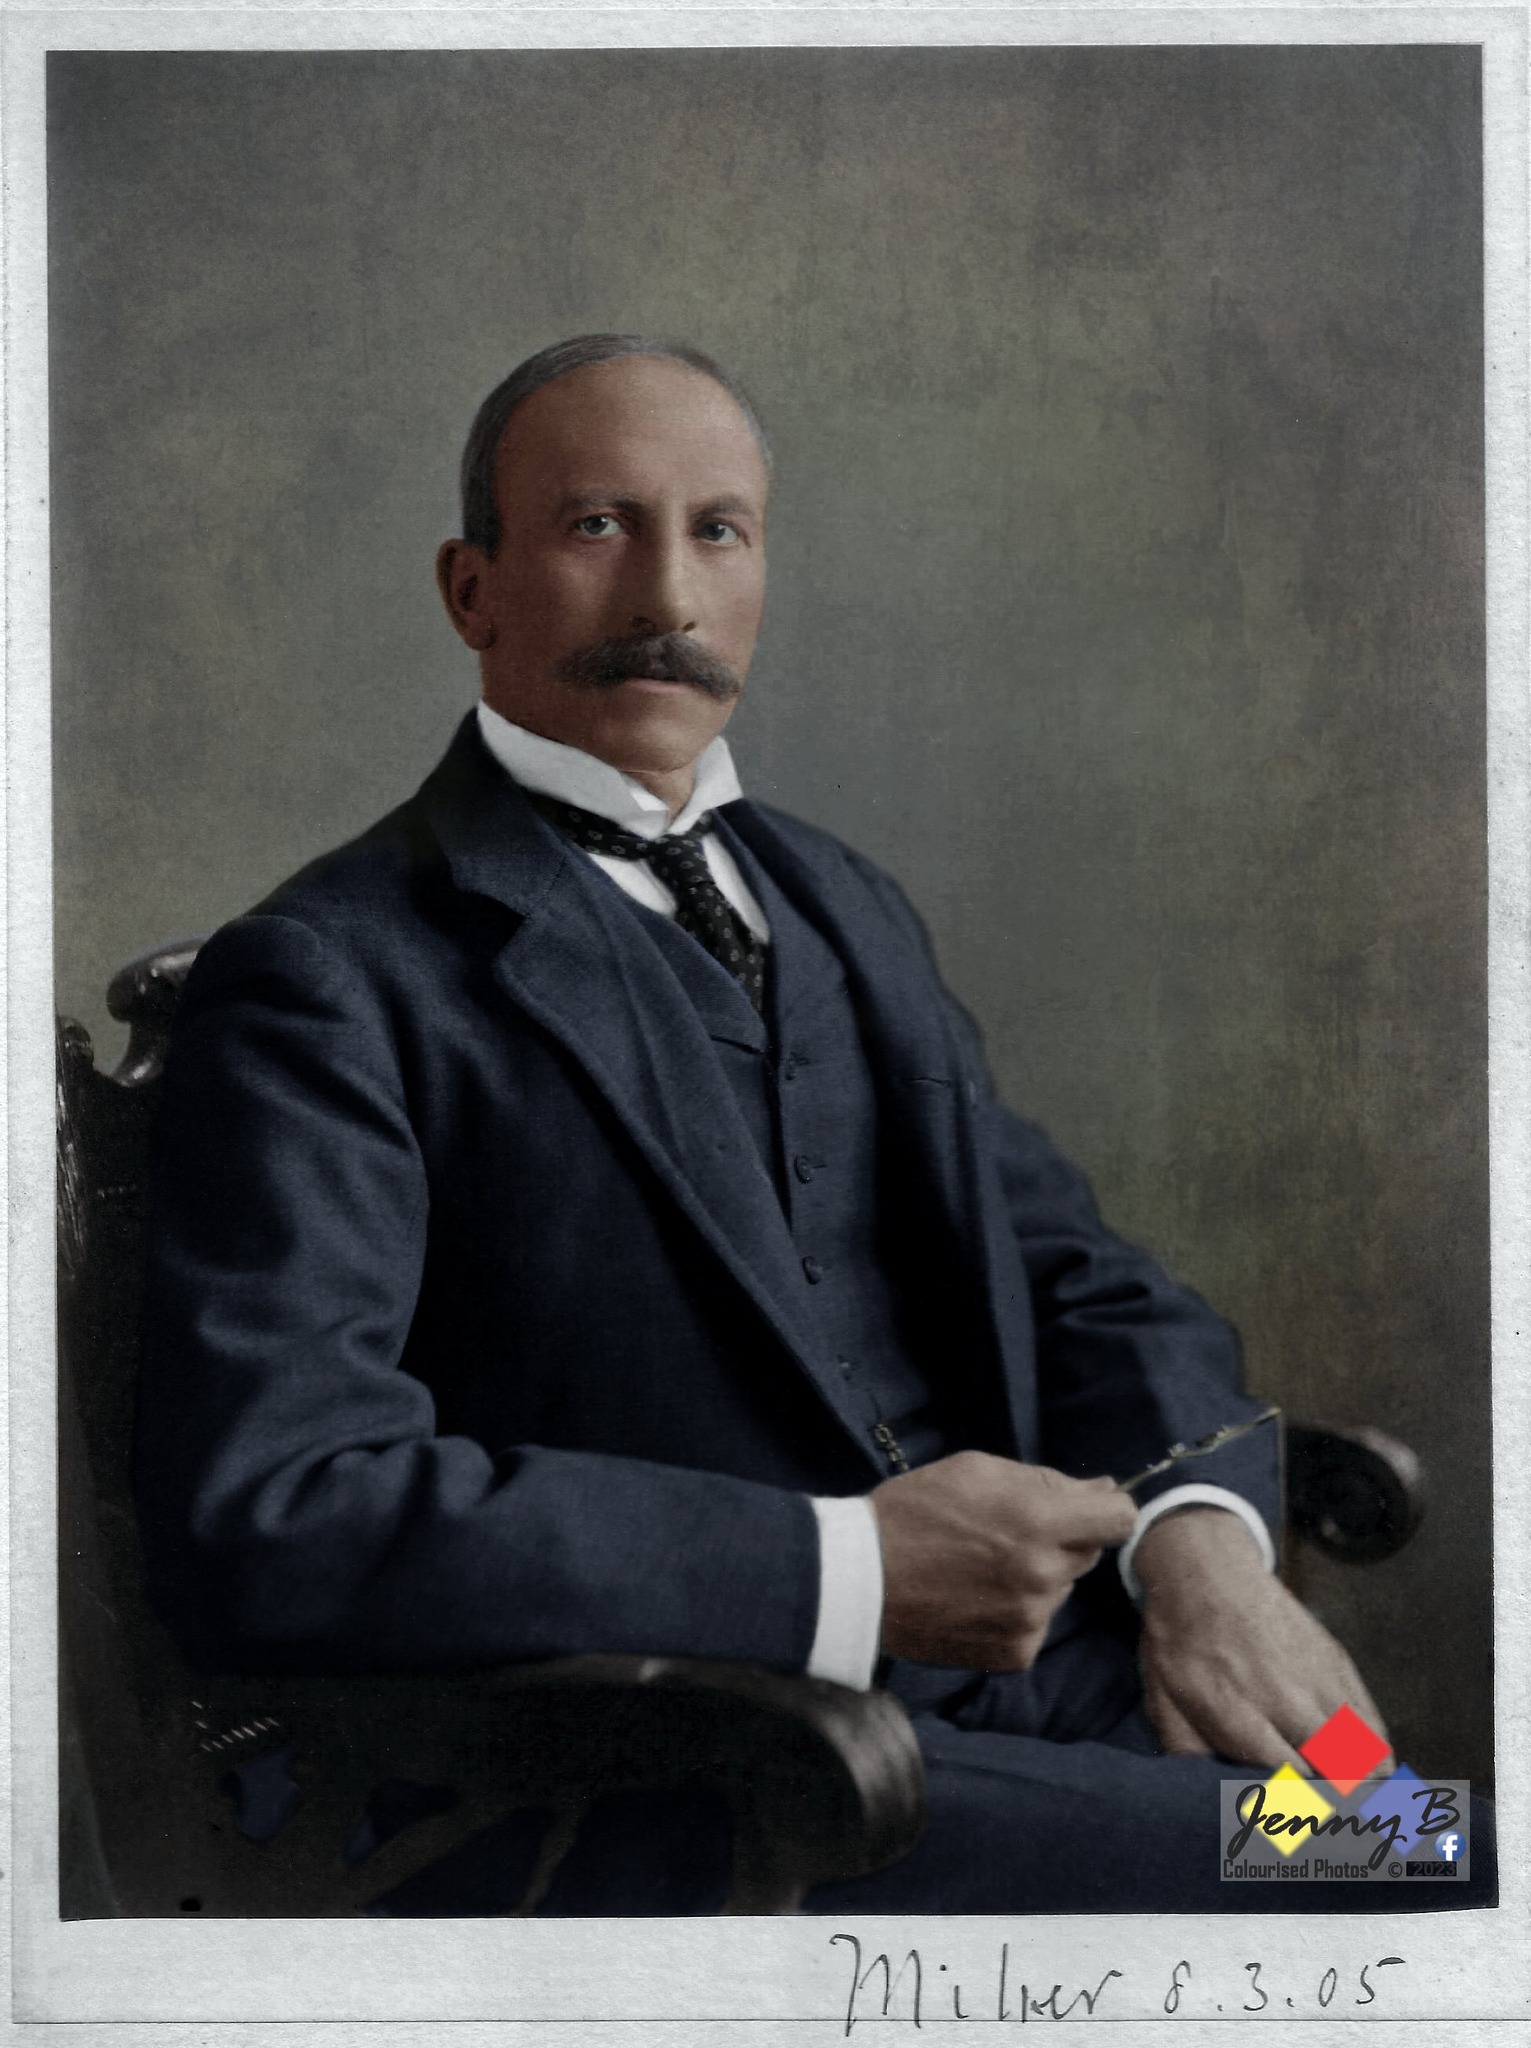
1897 – Alfred Milner is charged by the British with bringing matters to a head with Kruger and resolving the ZAR unrest situation, on the idea of implementing the colour blind ‘Cape Franchise’ in the ZAR, he writes to Herbert Asquith (a future Prime Minister) and says:
With your great two principles that (1) we seek to restore good relations between the Dutch (Boers) and the English and (2) we should secure for the natives … adequate and sufficient protection against oppression and wrong … the object No.2 is the principle obstacle to the attainment of object No.1 … I should feel quite confident of been able to get over the Dutch-English difficulty if it were not so horribly complicated by the native question.’21
In a letter to a friend, Milner would further lament on the complication of dealing with the ‘native question’ and the ZAR and says:
‘(If I did not have) some conscience about the treatment of blacks I personally could win over the Dutch in the Colony and indeed all the South African dominion without offending the English. You have only to sacrifice ‘the nigger’ and the game is easy. Any attempt to secure fair play for them makes the Dutch fractious and almost unmanageable’.22
Kruger flouts the 1884 London Convention restrictions on foreign affairs unilaterally approaching France and Germany for support and he challenges the suzerainty. On 6 March 1897 Joseph Chamberlain writes to Kruger to remind him that the ZAR is still a British suzerain, and he is also in violation of laws concerning emigration of foreigners – in contravention of Article 14 of the 1884 Convention.23
1898 – The British historian, Professor Andrew Roberts FRHistS FRSL would summarise Krugerism at this juncture. The ZAR, although a Republic in name was in no way a democracy. Jews and Catholics were forbidden to hold office, Johannesburg was not allowed a municipal council, English was banned in all official proceedings, the Judiciary was appointed by Kruger, Kruger controlled all the government monopolies, no open air public meetings were permitted, the freedom of the press was not guaranteed and …
‘Above all, full citizenship was almost impossible to gain for non-Boers. Pretoria ran a tight, tough, quasi-police state.’24
In terms of Church and State, although ZAR is a Oligarchy, Krugerism brings Dutch Reformed ‘Churches’ closer, so much so the ZAR at times resembles a Theocracy and the Raad busies itself with passing legislation that appeases God. An example was a debate in 1895 which forbid the firing of explosives into clouds to induce rain or firing a weapon into the sky as these actions were deemed as ‘being offensive to the Almighty’.25
1899 – With growing imbalance of voter demographics and tensions resulting in political instability in the ZAR, Paul Kruger would seek to consolidate power into Boer hands and unshackle the Suzerain preventing “full” Boer independence of Britain. He would do this through leveraging and denying of political rights and the franchise for white protestant British gold miners now making the ZAR their permanent domicile.
The issue of “political rights” for all the new ‘foreign’ settlers in the ZAR of all colours and creeds and “political freedom” from Britain for the Boers would play the pivot role in the Casus Belli of an upcoming war – the South African War (1899-1902).
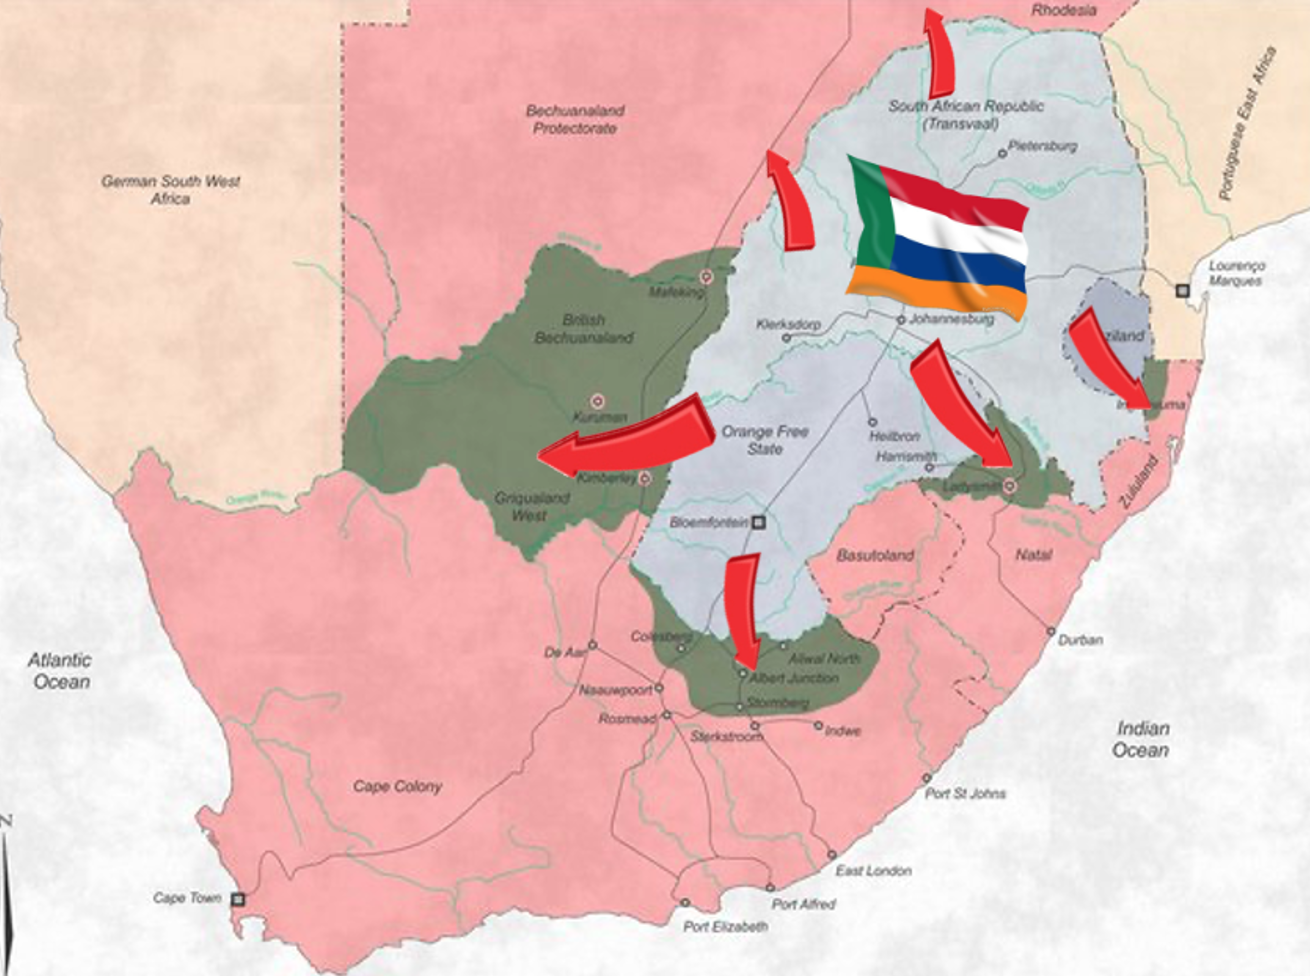
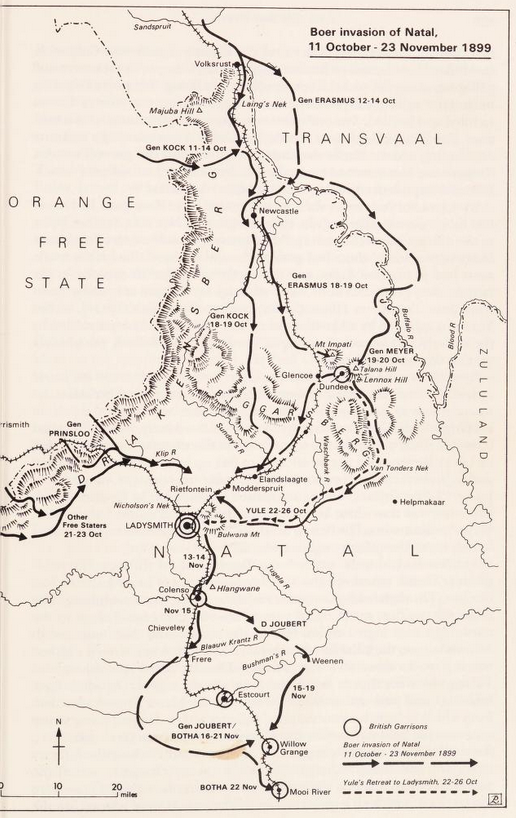
With tensions rising over the franchise qualification period and the Milner and Kruger negotiations and breakdown thereof from 30 May to 6 June 1899, both sides start to prepare for war. Whilst in a numerical advantage, the two Boer Republics declare war on Britain on 11 October 1899 by way of an ultimatum followed by a military invasion of all neighbouring British colonies.
F.W. Reitz issues ‘A Century of Wrong’ (in conjunction with Jan Smuts) as an explanation for the Boer Casus Belli – he concludes it with the Afrikaner Bonds nationalist slogan calling for an Afrikaner led paramountcy in Southern Africa. It reads:
As in 1880, we now submit our cause with perfect confidence to the whole world. Whether the result be Victory or Death, Liberty will assuredly rise in South Africa like the sun from out the mists of the morning, just as Freedom dawned over the United States of America a little more than a century ago. Then from the Zambezi to Simon’s Bay it will be: “AFRICA FOR THE AFRICANDER.”26
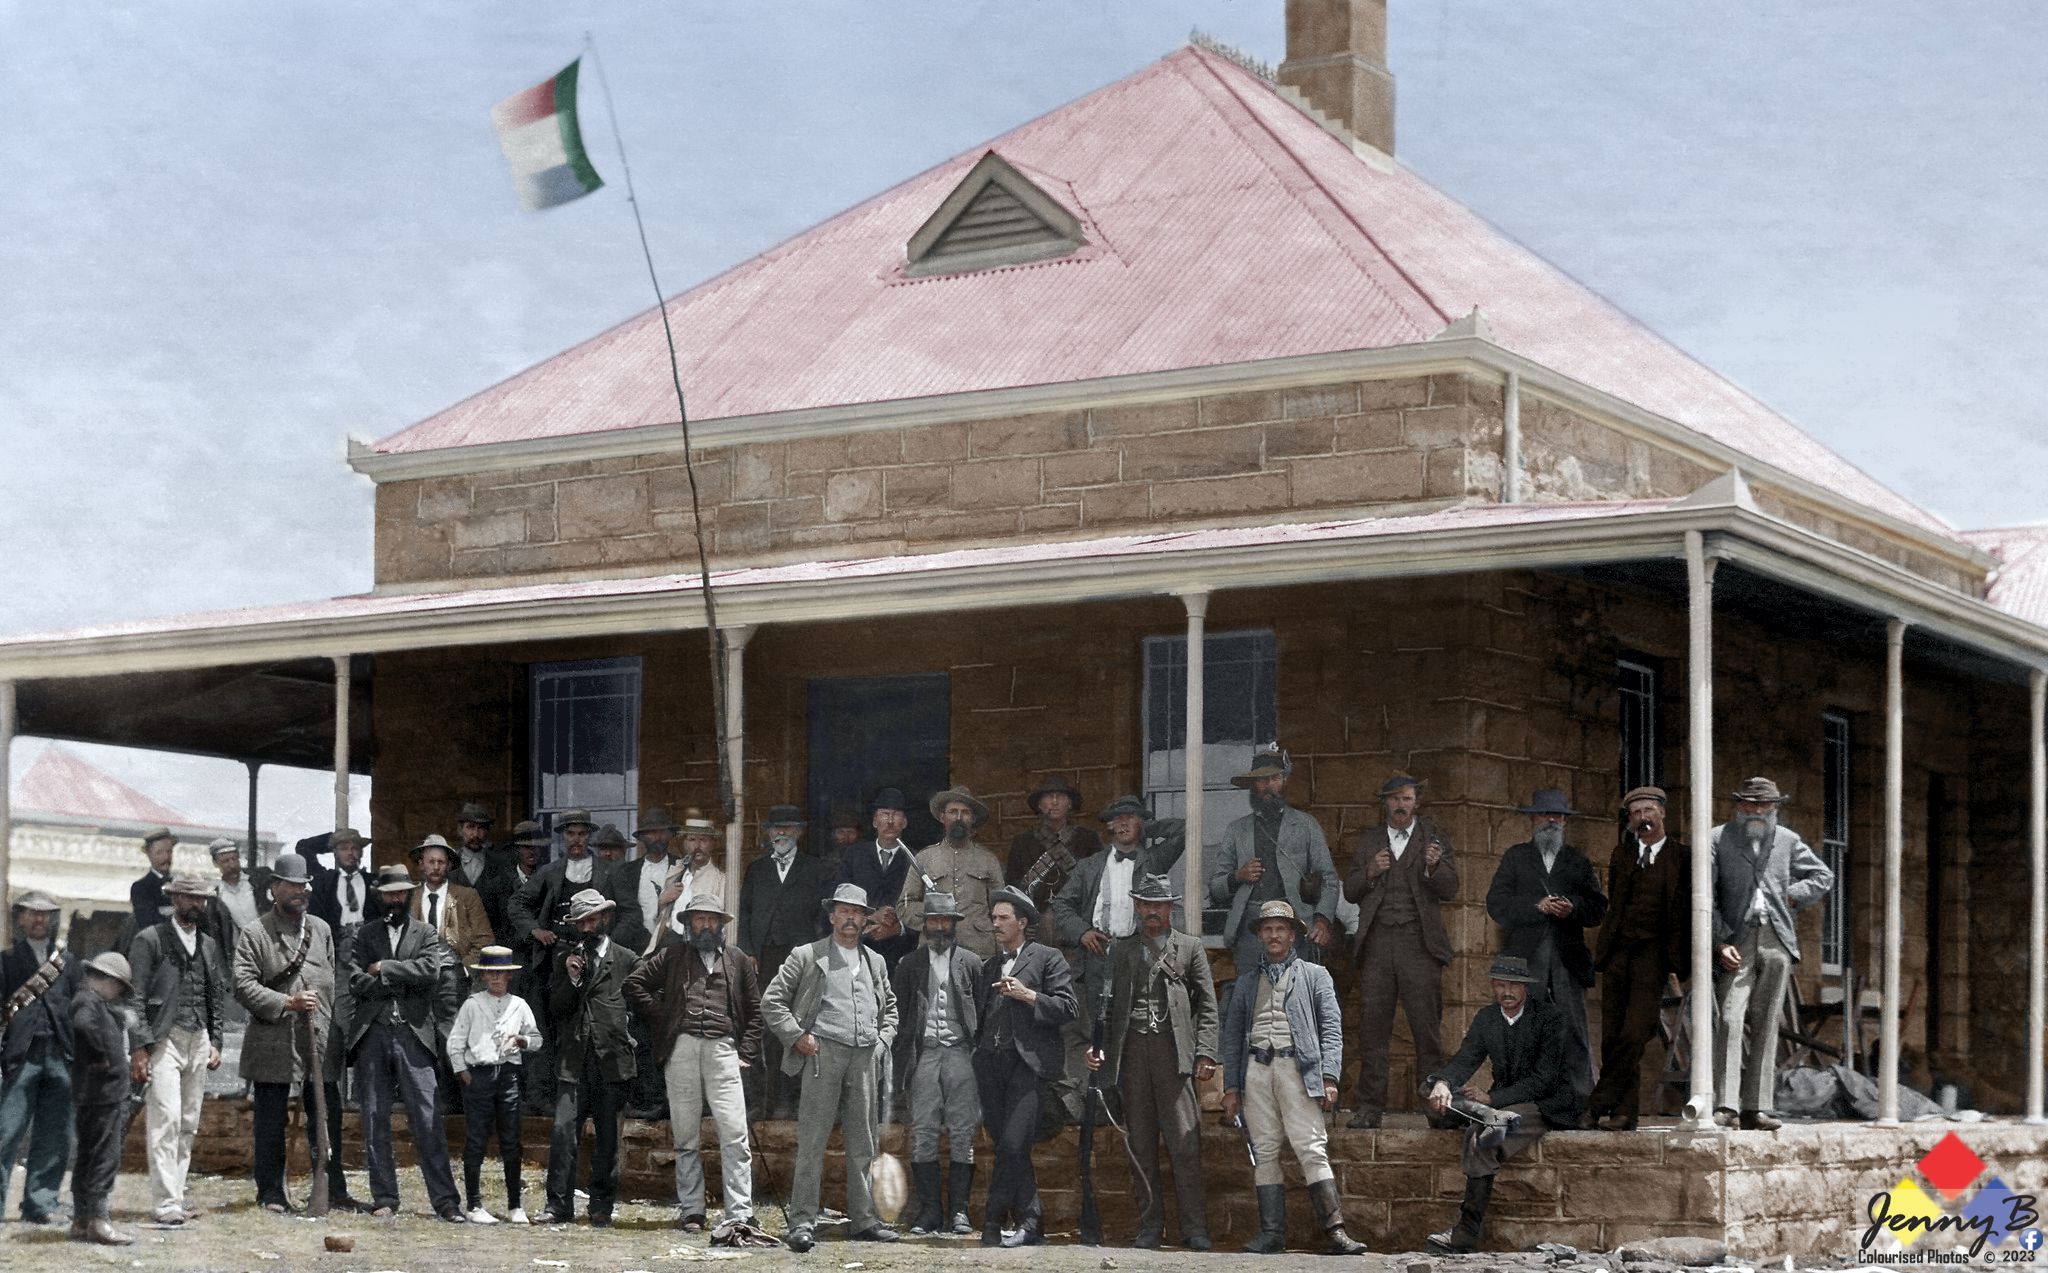
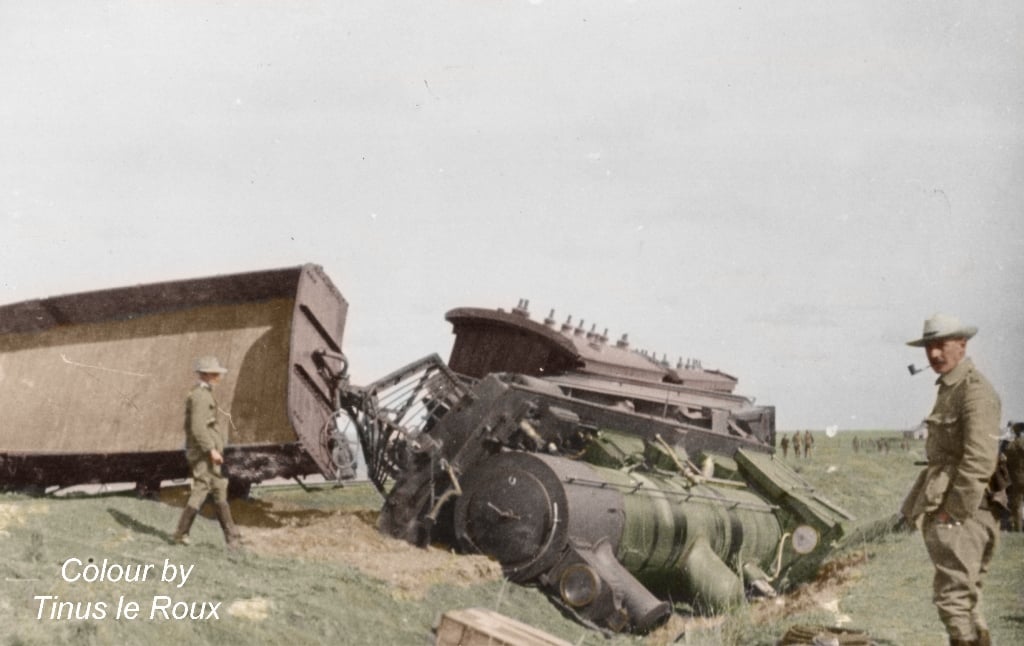
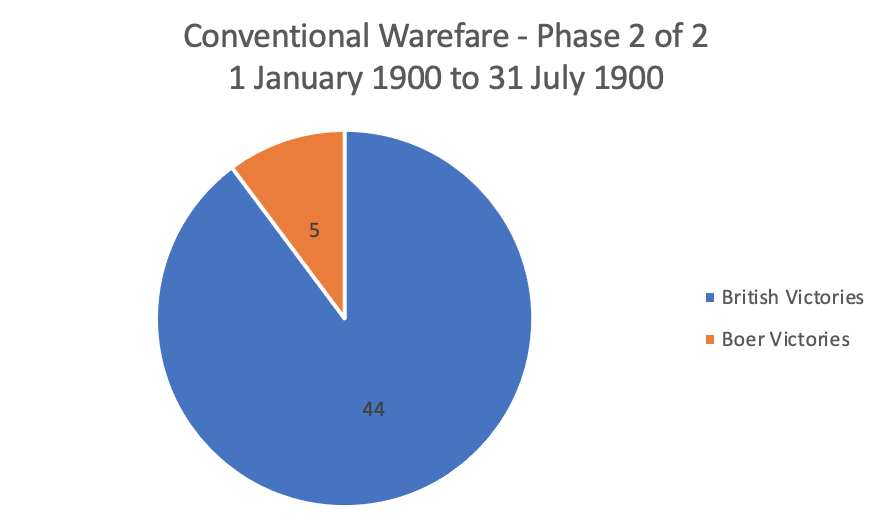
1900 – from January 1900, the British ‘Army Force’ starts to land. Bloemfontein, the capital of the OFS falls to British forces on 13 March 1900. Pretoria, the capital of the ZAR falls on 5 June 1900. Thereafter the Boer Forces change strategy from conventional warfare to unconventional “hit and run” guerrilla warfare focusing primarily on extended British lines of supply and razing ‘hensopper’ (surrendering Boers taking oaths of loyalty) farmsteads, ‘Joiner’ (Boers joining British forces) farmsteads and British Loyalist farmsteads.
This in turn forces the British to focus on the localised Boer Commandos lines of supply – their ‘bittereinder’ (Boer Forces refusing surrender) farmsteads – and a controversial ‘scorched earth’ policy to raze these farmsteads is implemented – this is done along with a “refugee camp” (concentration camp) policy to deal with all the civilian displacement, comprising both loyalist civilians displaced by Boer actions and bittereinder civilians displaced by British actions.
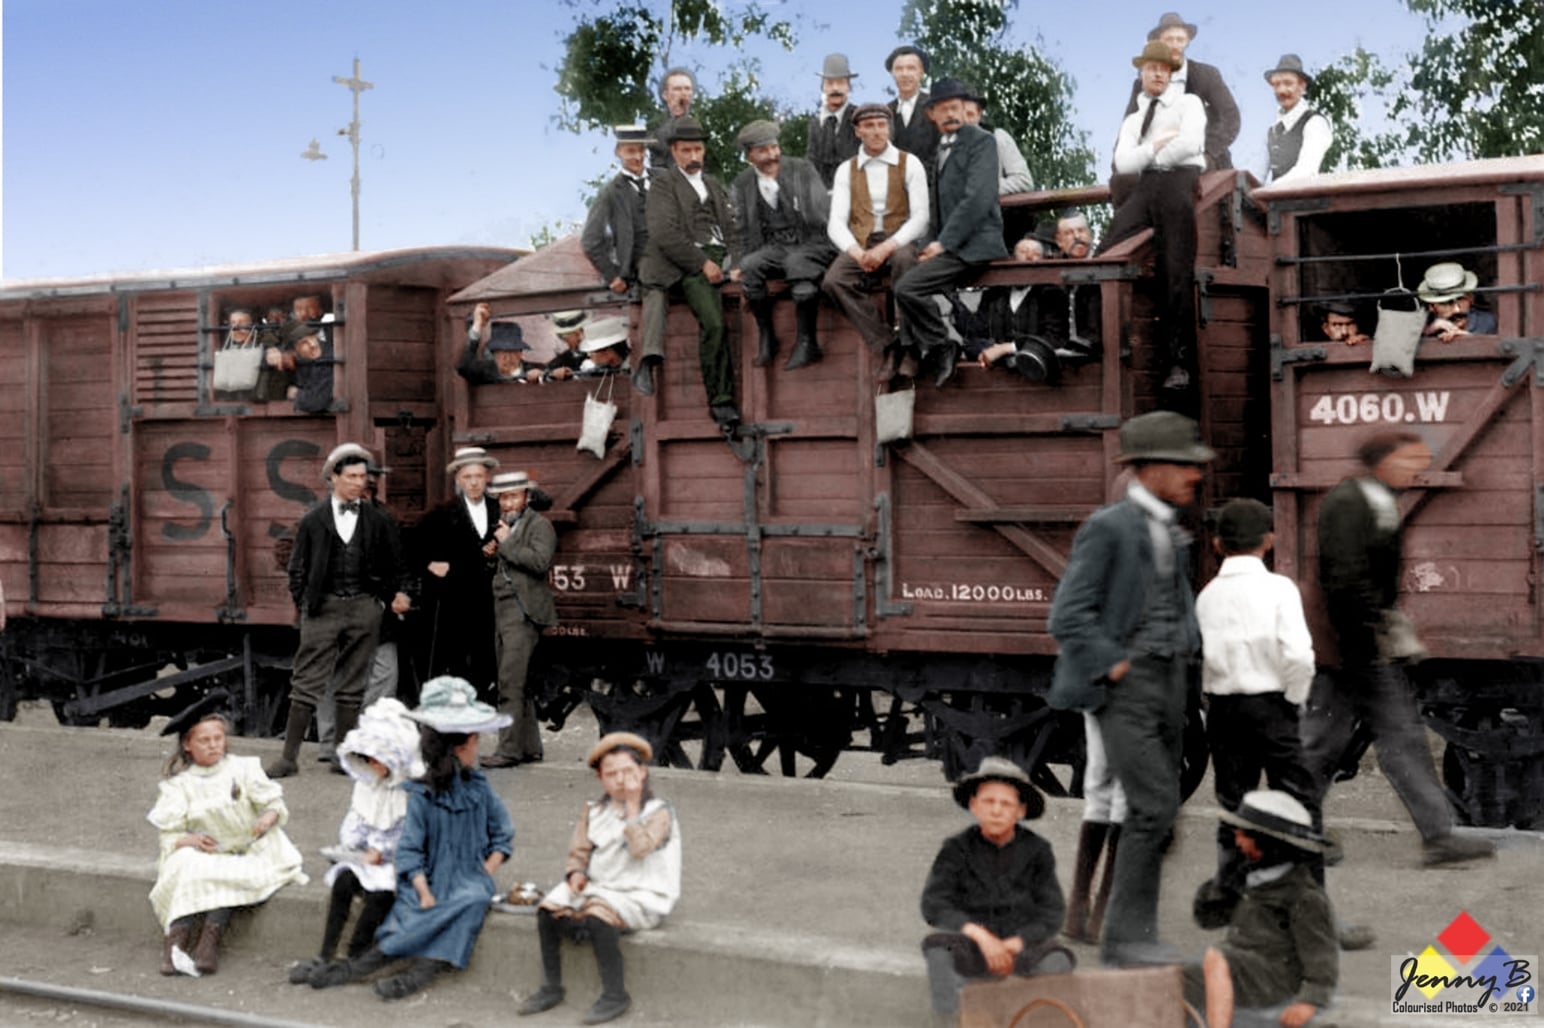
1901 – Two vastly different types of British “refugee” camps emerge – ‘white’ Boer “concentration” camps taking in displaced white men, women and children of Bittereinders, Joiners, Hensoppers and loyalists (and the odd Black servant) – these camps are run along the lines of tented refugee camps and internees are provided rations (albeit limited), shelter and not forced to labour.
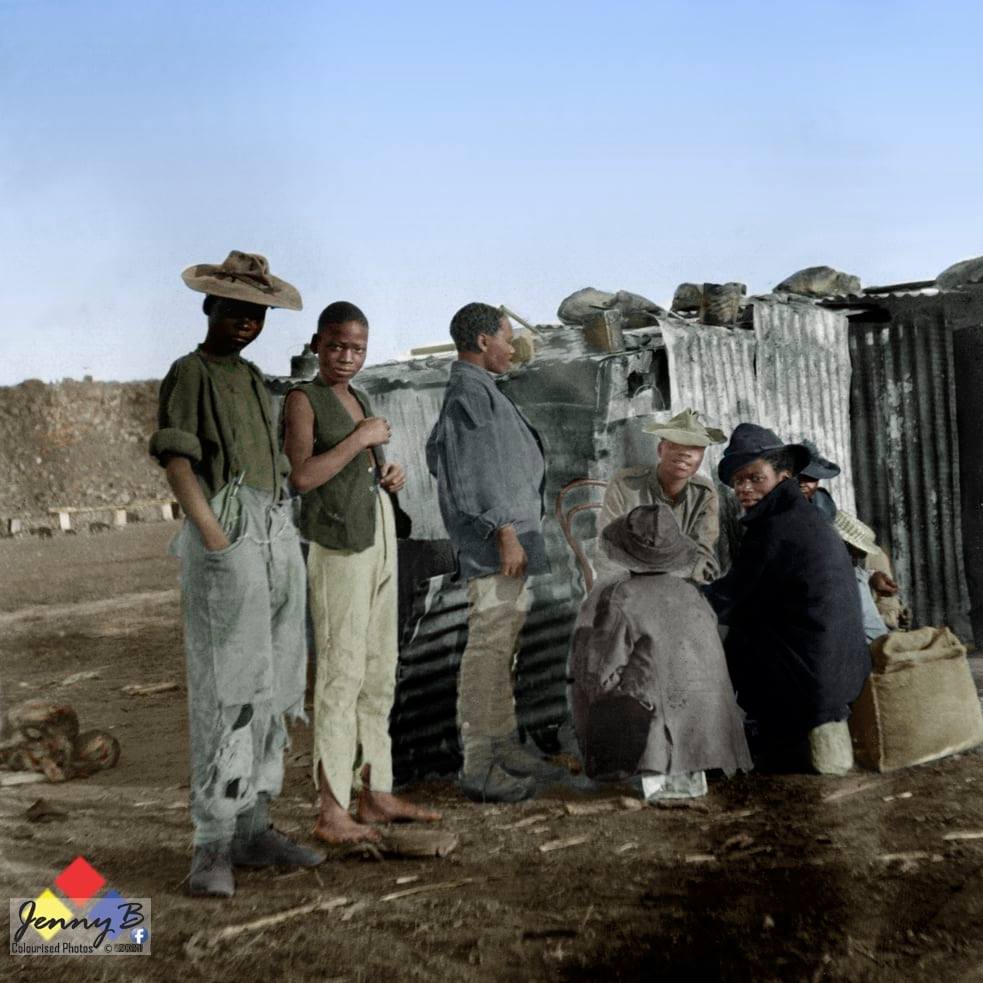
‘Black’ “concentration” camps taking in displaced native farm labour, again men, women and children, are however fundamentally different to the white Boer camps, they are more rudimentary, rations and shelters are highly limited and are purchased in exchange for work. Ultimately these camps are run along the lines of labour camps in support of British ‘Total War’ military objectives.
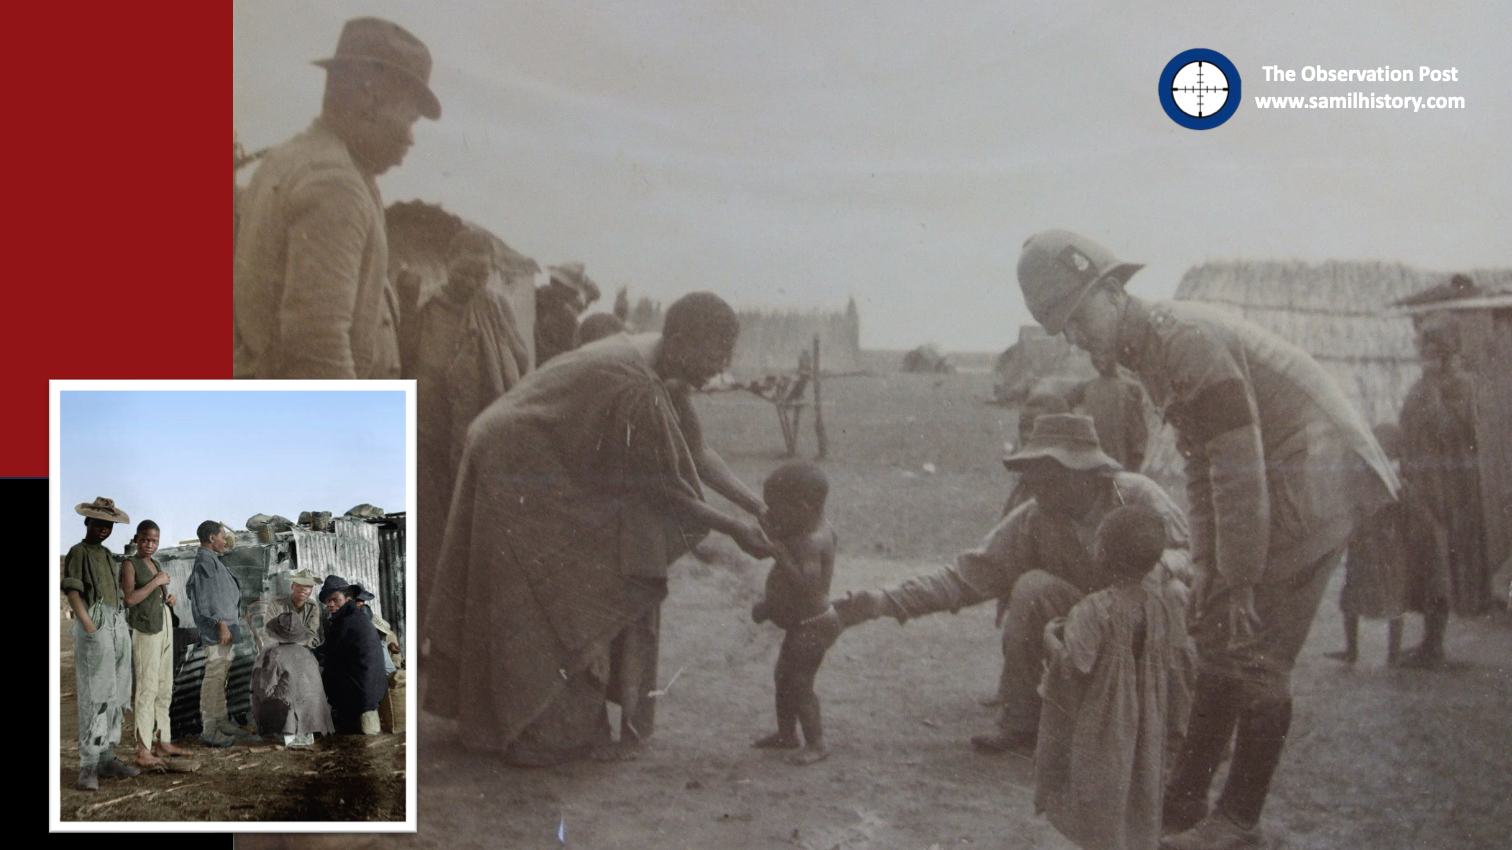
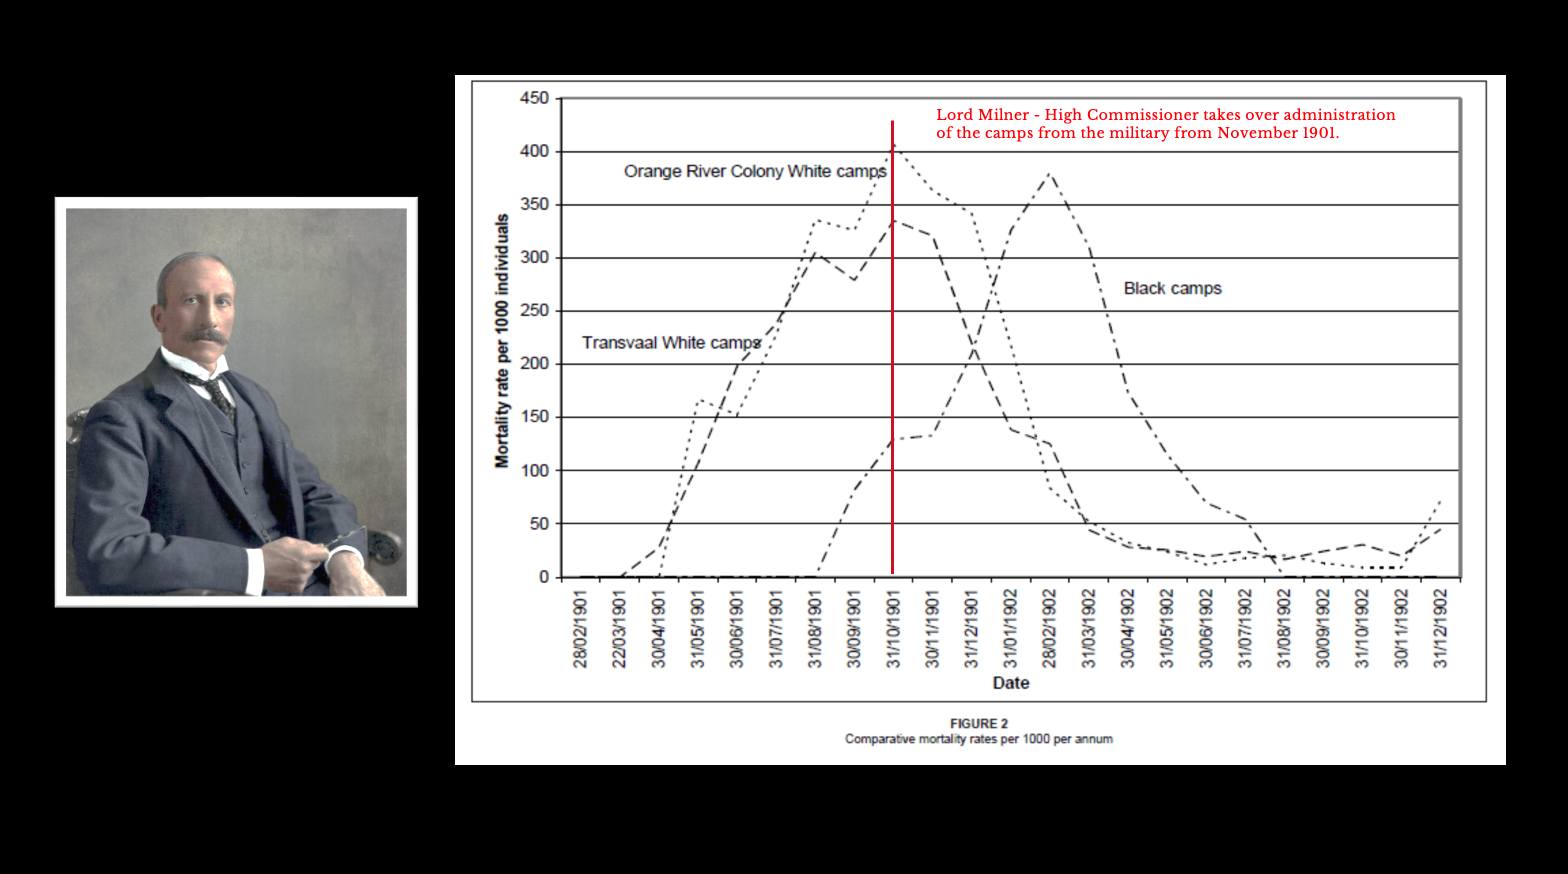
Both types of camps experience a high incidence of disease (contact and contamination) and civilian death rate. Over the duration of the war, 29,491 Boer Camp civilian deaths are recorded, of which 2/3 are children and infants, all attributed to disease – in the case of children this is attributed primarily to a measles epidemic which sweeps the camps 27.
Over 30,000 Black “concentration” camp civilian deaths are recorded – minimum, the complete Black death toll for the Boer War including both disease and starvation casualties in Black internment or labour camps and in key British towns like Kimberley besieged by Boer forces is projected to be as high as 50,000.28
Noteworthy here, is historian Dr. Garth Benneyworth’s research into the ‘Black’ internment camps of the Boer War, specifies that ‘Blacks’ are not merely “participants” in the war, and the Boer and Black “concentration” camps are not a “shared trauma” of “mutual suffering” at the hands of the British as:
‘The separation of internees along racial lines created fundamentally different internee experiences’29
The first round of peace talks to end The South African War open at Middleburg from 28 February to March 16 1901 between Lord Kitchener and General Louis Botha. One of the conditions of peace specified by the British is the implementation colour blind franchise as it exists in the surrounding territories in the two Boer Republics. The accompanying statement in this respect reads:
‘… the legal position of Kaffirs will be similar to that which they hold in the Cape Colony’30
The peace proposals, on all counts including the question of a colour blind franchise, are universally rejected by the Boers and the war continues.
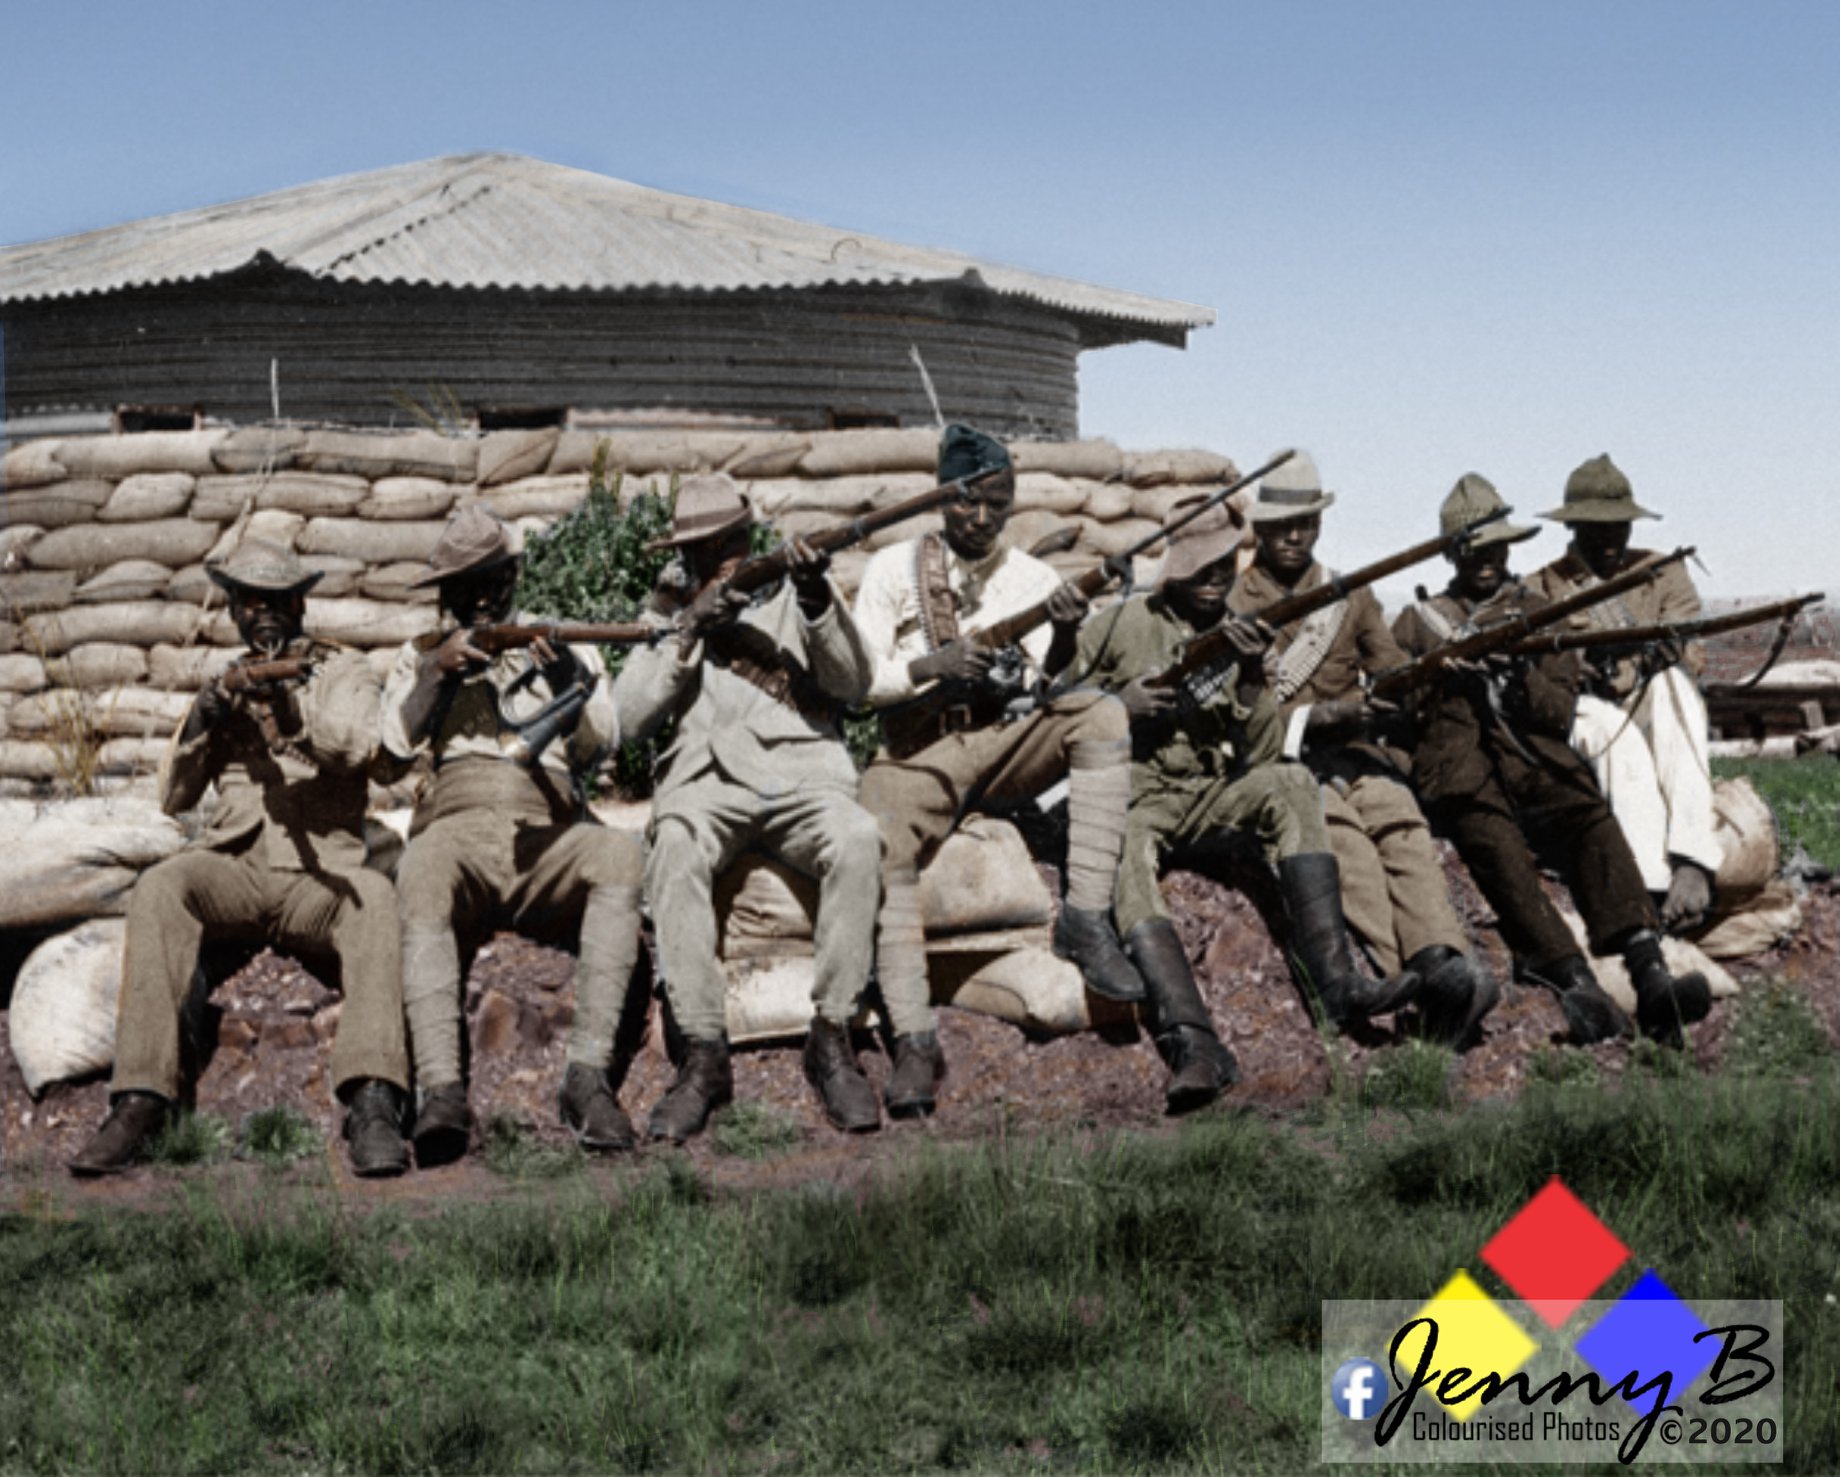
The latter half of the South African War is marred by the ‘guerilla warfare’ phase which produces two highly undesirable results. The concentration camps become overcrowded and steadily unmanageable and the Boers implement a policy of executing any Black or Coloured person in the service of the British military on the spot, General Christiaan de Wet would inform Lord Kitchener that he personally issued the order and writes:
‘the ungovernable barbarity of the natives realises itself in practice in such a manner that we felt ourselves obliged to give quarter to no native and for these reasons we gave general instructions to our Officers to have all armed natives and native spies shot.’31
Kitchener responds to de Wet:
‘….. (I am) astonished at the barbarous instructions you (General de Wet) have given as regards the murder of natives who have behaved in my opinion, in an exemplary manner during the war.‘32
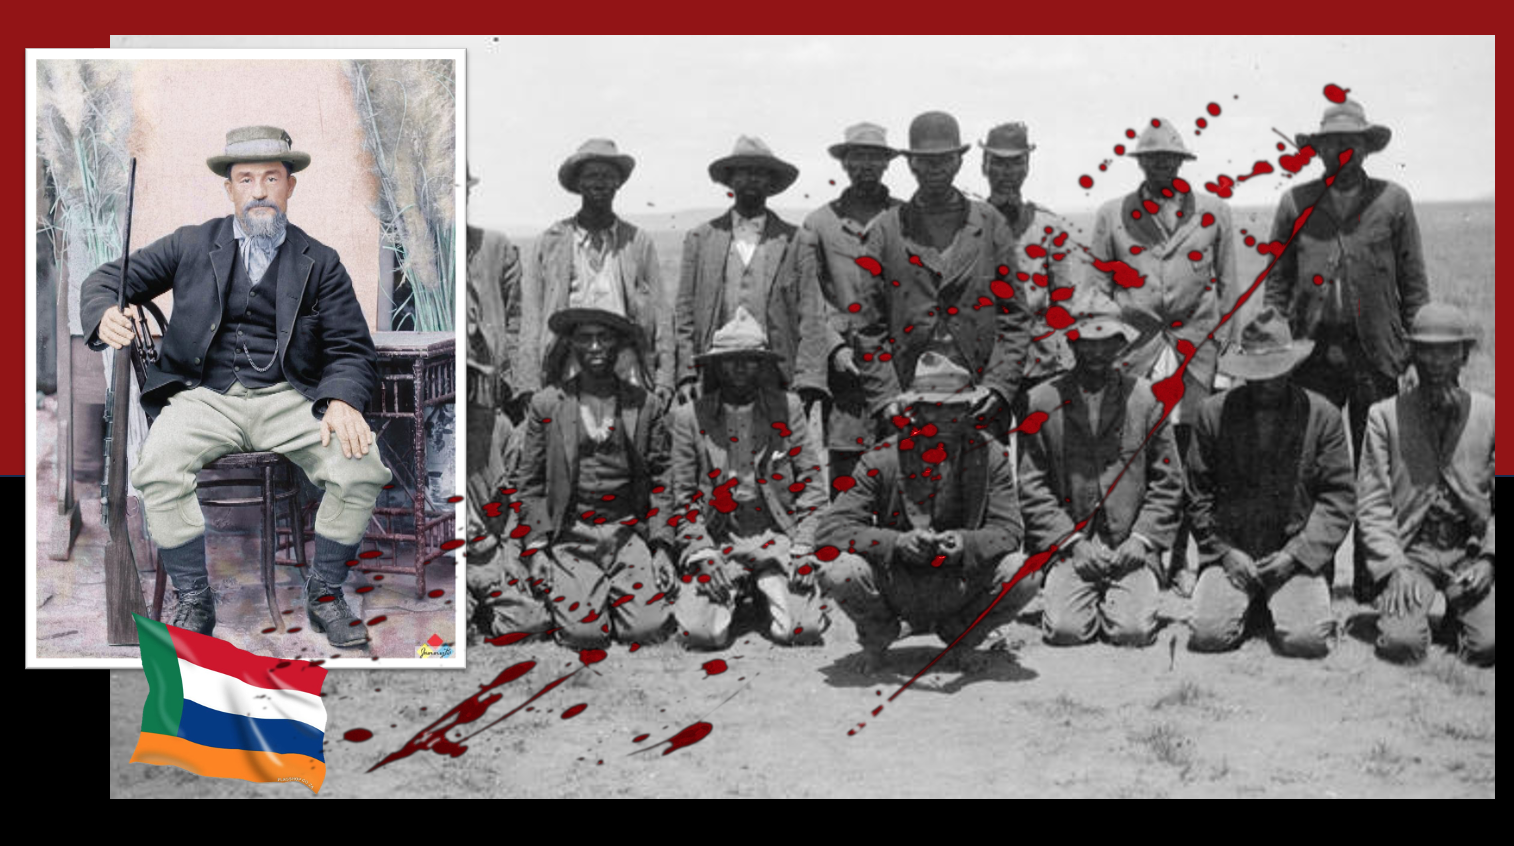
The ruthless massacres of ‘Black’, ‘Indian’ and ‘Coloured’ citizens and contractors by Boer Generals and Commandants at Tweebosch, Leliefontein, Modderfontein, Uniondale, Calvinia and many other places come to define the closing phase of the South African War.
1902 – The second round of peace talks at Vereeniging end the South African War on 31 May 1902. Joseph Chamberlain insisted the issue of the Colour Blind qualified franchise for the two former Boer Republics is included, however this turns into a deal breaker for the Boers. The British attempt to strike a compromise and the initial draft of the Vereeniging Peace treaty includes the following phrase:
‘The Franchise will not be given to NATIVES until after the Introduction of Self-Government’.
This meant it would be given to them as part of the future self-government package. The Boer delegation even reject this concept, General Jan Smuts in his capacity as a lawyer convinces the British that the Boers will address the matter ‘in the future’ after self governance is granted (here Smuts is looking to the future South African ‘Union’) and the phase is changed again to read:
‘The question of granting the franchise to Natives will not be decided until after the introduction of self-government.’
This meant that the all white parliaments of the Transvaal and Orange Free State would independently decide the colour blind qualified franchise on their own, only after self-government is granted them, and even in that instance they may or may not decide to implement it.
Historian Peter Warwick would claim that as to the future emancipation of Blacks in South Africa this was the most significant clause of the surrender33 Black leaders would look to this as been ‘sold out’ by the British, especially given their considerable military resources and man-power used to help the British win the war.
1903 – With the Boer Republics under British control – The Transvaal Colony and Orange River Colony (both “officially” established in 1902). Lord Milner commissions a study into the “native question” i.e. the black emancipation issue, called the “South African Native Affairs Commission”. It would report back two years later.
1905 – the “South African Native Affairs Commission” reports. It’s Edwardian in its outlook on social Darwinism i.e. recognising where various races lie on a social “civilisation” track – but it does make key recommendations: That the “Cape Law” i.e the Colour Blind qualified franchise is applied across the entire country. In terms property rights it recognisers that land ownership laws applicable in the Cape be extended to the rest of South Africa and to acknowledge Black rights to own land – rural and urban. It also recognisers Black aspirations for an equal education.34
1906 – another “khaki” election takes place in the United Kingdom and the Tory Imperialists of the South African war period lose the election to the Liberal Party led by Henry Campbell-Bannerman – during the South African War, as opposition, the Liberal Party had taken an “Anti-War” ticket and took a “Pro-Boer” position. Campbell-Bannerman famously accused the Tories during the South African War of using “methods of barbarism” in dealing with the white Boer civilian population.
This “anti-Imperialist” and “Pro-Boer” position would lead to this majority “Liberal” government giving concessions to Boer ‘Afrikaner’ politician’s demands ahead of any other demands from South African population or ethnic groups.35
Lord Selborne, the Liberal Party’s new man on the ground, replaced Lord Milner as High Commissioner for South Africa and Governor of the Transvaal and Orange River Colonies. Although Selborne is in favour of extending the Cape Colour Blind Qualified Franchise and land ownership and other recommendations of the “South African Native Affairs Commission” to the old Boer Republics – he is unable to do so, as it would be in violation of the terms of the Vereeniging Peace Accord which Campbell-Bannerman intends to honour. According to Godfrey Lagdon, the Transvaal Commissioner for Native Affairs:
‘(the Boers) would “bitterly resent” it, and it would likely re-ignite the war’36
The Campbell-Bannerman government later grants ‘Responsible Government’ to the Transvaal Colony on 6 December 1906 which reinstates a Boer led Parliament for the region led by General Louis Botha.
1907 – the Campbell-Bannerman government grants ‘Responsible Government’ to the Orange River Colony on 27 November 1907 which reinstates a Boer led Parliament for the region led by Abraham Fischer.
Unlike the Cape Colony and Natal Colony’s ‘Colour Blind’ franchise, the Boer led Parliaments of the Orange River Colony and Transvaal Colony implement a whites only ‘Colour Bar’ franchise.
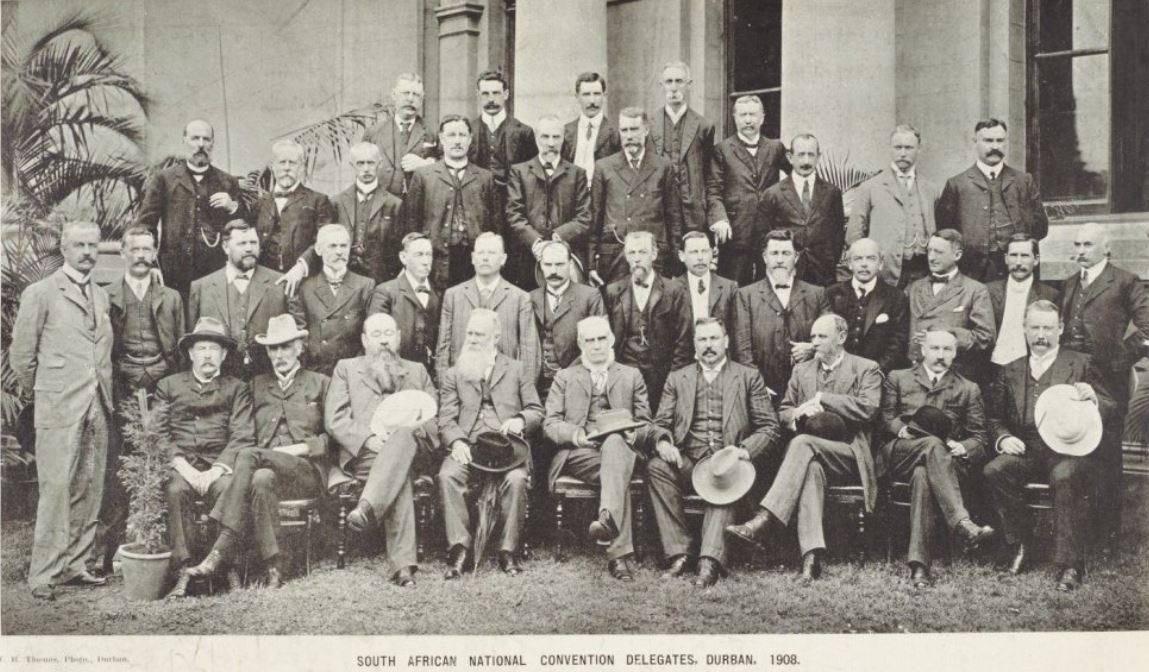
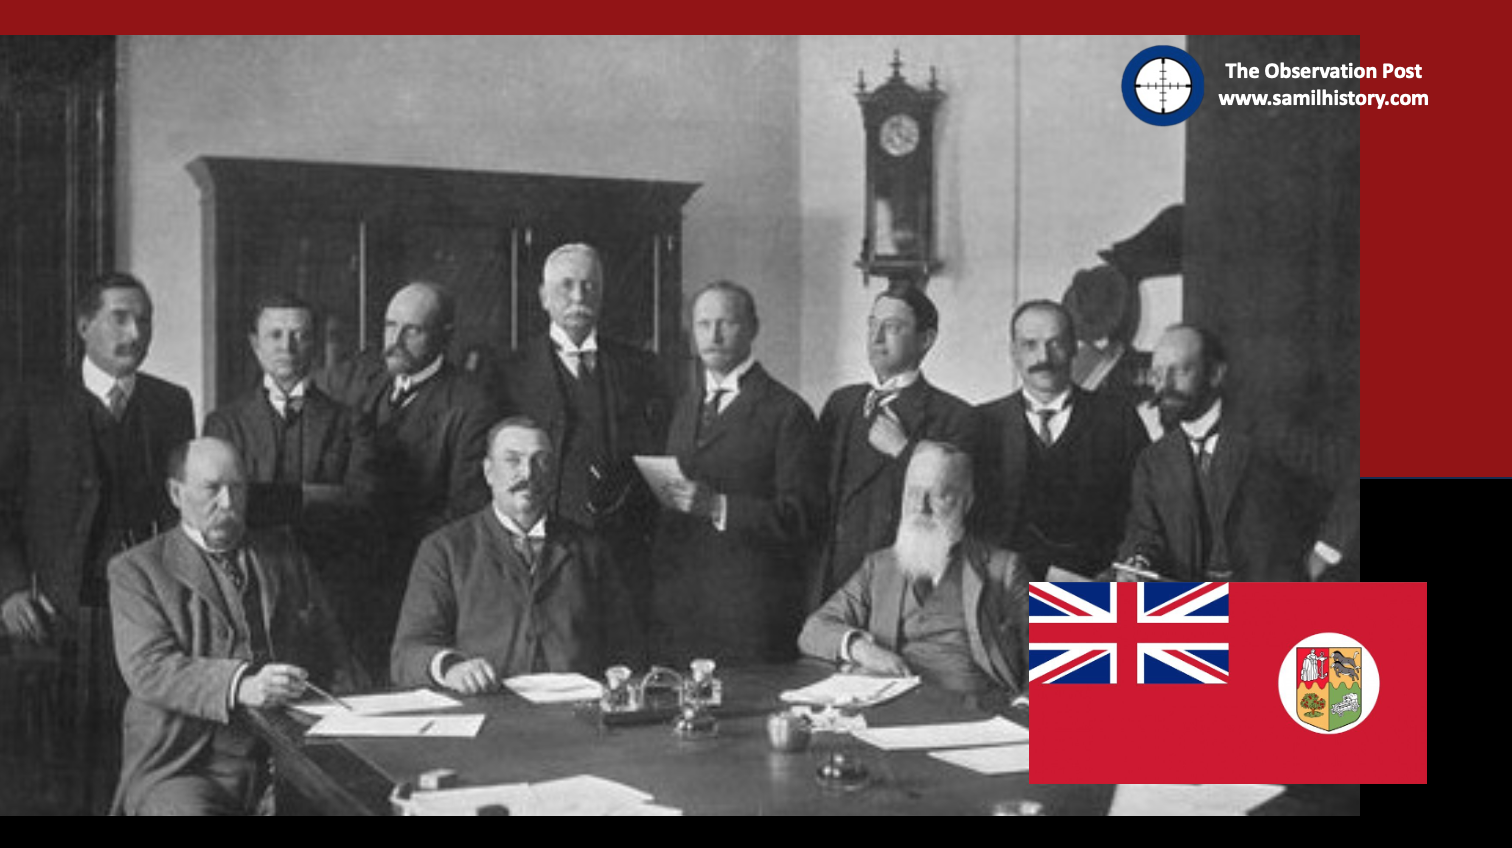
1908 – To complete the regions ambition to “self governance” as specified in the Vereeniging Peace Accord, the leaders of the old Boer Republics (now in leadership positions in the Orange River Colony and the Transvaal Colony) and the Colonial leadership of the Cape Colony and Natal Colony as well as Rhodesia commence the “The Closer Union Convention” or “National Convention” from 12 October 1908, with the intention of bringing a federation of states together under a unitary paramountcy for shared ‘white’ control (Boer and Brit) – from ‘the Zambezi to the Cape’ – all under the British “family of nations”. The convention is a “whites only” affair for all intents and purposes.
1909 – The Closer Union Convention concludes on 11 May 1909 and agrees to a “Greater Union for South Africa” in phases. Jan Smuts’ plan for union sees Phase 1: the initial South African ‘Union’ between the Cape, Natal, Orange Free State and Transvaal sans the British “High Commission Territories” consisting of Bechuanaland (Botswana), Lesotho and Swaziland. Phase 2: This later phase encompasses the territorial ambitions of the Union and would see the incorporation of the “High Commission Territories”, German South West Africa (Namibia), the southern half of Portuguese East Africa (Mozambique – Delagoa bay) and Southern Rhodesia (Zimbabwe) to all join the South African Union.37
The convention concludes that South Africa will be a unitary state with centralised authority. On the thorny issue of Franchise – the ‘English’ led Cape delegates are insistent the Cape ‘colour blind’ Franchise is applied across the entire country, the ‘Afrikaans’ led Free State and Transvaal delegates are immovable on a ‘colour bar’ whites only franchise for the entire country. A compromise is struck which ensures the Cape Franchise is ensconced in the new Union of South Africa constitution on a 2/3 majority for the Cape and Natal provinces, whilst the Transvaal and Orange Free State continue with the colour bar franchise until a future “independent” South African Union Parliament can resolve the matter.
Olive Schreiner, the South African author would make a startling prediction in her letter to the convention when she says:
‘The idea that a man born in this country, possibly endowed with many gifts and highly cultured, should in this, his native land, be refused any form of civic or political right on the ground that he is descended from a race with a civilisation, it may be, much older than our own, is one which must be abhorrent to every liberalised mind. I believe that an attempt to base our national life on distinctions of race and colour, as such, will, after the lapse of many years, prove fatal to us.’38
The “High Commission Territories” (Bechuanaland (Botswana), Lesotho and Swaziland) being ‘Black’ Kingdoms under British protection resolve to remain outside of the Union for the time being, fearful of the sharp racist construct of the Franchise laws in the old Boer Republics. They adopt a “wait and see” approach. As does Rhodesia which eventually opts for a plebiscite to decide of the matter of union with South Africa in 1923.
In Britain, the Pro-Boer governing Liberal Party, now under Herbert Henry Asquith agree to the Closer Union Convention’s recommendations on constitutional, legislative and economic design and they pass “The South Africa Act 1909” which establishes the South African Union as a “Responsible” Self-Governing State with ‘Parliamentary Sovereignty’ – which essentially separated the South African Parliament from Westminster and British Common Law, the South African Union now free to make laws of its own independent of Britain.
The South Africa Act goes ahead despite the “Schreiner Mission” to Britain made up of William Schreiner (the Premier of the Cape Colony), Dr. Abdurahman (the ‘Coloured’ deputation leader) and J.T. Jabavu (leader of the ‘African’ deputation and future ANC) – its mission to convince Westminster of the need to confer the right to vote upon all South Africans regardless of colour. They prophetically warn the British that the future South African Union Parliament with an independent Parliamentary Sovereignty bestowed on it would be empowered to remove the franchise from persons of colour at the Cape.
1910 – The Union of South Africa comes into official existence on 31 May 1910 with independent Parliamentary Sovereignty free of Westminster. The first Union elections are held 15 September 1910, the “Pro-Afrikaner” side of the house – The South African Party in conjunction with Orange Unie (OFS) and Het Volk (Transvaal) win the majority of the house with 66 seats.
1912 – The South African Native National Congress (renamed the African National Congress in 1923) is formed in Bloemfontein on 8 January 1912 in reaction to the lack of adequate Black representation in the formation of the Union of South Africa and the Closer Union Convention.
1913 – The South African Union with Parliament under the Pro-Afrikaner ‘South African Party’ (SAP) majority government led by Prime Minister Louis Botha – comprising the old ZAR and OFS Boer ‘Bittereinder’ Generals – Louis Botha himself, Koos de la Rey, Jan Smuts, Barry Hertzog, Christiaan de Wet et al – table and then pass the ‘Native Land Act 1913’. To re-affirm the South African Union’s Parliament as “independent” of Britain, the legislation is “rushed” and passed without the input or approval of the British.
This act enforces ‘segregation’ and marginalises Black South Africans economically into a role of perpetual servitude and serfdom. Roughly 20% of “good land” was in the hands of Black Africans in 1913. The Native Land Act reduced Black African land to 7%. It demarcated “Black” farmland and “White” farmland as land solely for either Blacks or Whites. The black farmers and sharecroppers were disadvantaged to the larger degree, they cannot buy land and many are disposed of their land – with little choice many simply became labour on “white” farms.39
‘The Land Act was an anti-capitalist measure aimed at preserving a semi-feudal relationship between white land owners and black “serfs” (with no claim to land ownership)’40
The South African Native National Congress and Sol Plaatjie’s efforts to protest this legislation to the British, still under the governing party of the Pro-Boer Liberal Party, falls on deaf ears.
General James ‘Barry’ Munnik Hertzog is the Orange Free State champion in South African Party, and holds a Cabinet position. However he comes to loggerheads with Prime Minister Louis Botha over ‘language policy’ – Botha and Smuts believe in a “one stream” policy which will see ‘English’ and ‘Afrikaners’ eventually merge as a unitary entity. Hertzog believes in a ‘two-stream’ policy which would see Afrikaans and English speaking whites ‘separated’ in all socialisation aspects – education, culture, religion etc. so as to develop ‘apart’ from one another, and Afrikaner ‘nationalism’ is to carry its own momentum. Known as “Hertzogism”, it divided Botha’s party and resulted in Botha removing Hertzog from his cabinet.
“Hertzogism” is also a pre-curser of Apartheid thinking as the “two stream” policy is eventually extended to exclude Blacks to develop “separately” and “apart” from “whites” in addition.
1914 – Hertzog moves to resign from Botha’s South African Party (SAP), and spits the SAP with key SAP Orange Free State ministers moving with him to establish the National Party in January 1914, effectively ending Afrikaner unity41. The National Party moves to adopt “Hertzogism” and “Krugerism” as its central ideology.
The Nationalists take their initial inspiration from the United States of America (USA), drawing inspiration from Jim Crow, they also admired the USA for having won its war of independence against Britain. They were influenced by the Irish republican movement with a reverence for the notion of popular sovereignty and ethnic self-determination – principles which they did not want to apply to Blacks.42
World War 1 (1914-1918) commences on 28 July 1914. The Union of South Africa, primarily to fulfil its territorial ambitions for German South West Africa (GSWA)43, per the Closer Union Convention, votes in a parliamentary landslide to declare war on Imperial Germany and invade GSWA – 92 votes “for” and 12 votes “against”.
This triggers the ‘Afrikaner Rebellion 1914’, a handful of senior South African Union Defence Force officers and a few ministers of Botha’s South African Party, including the Boer War ‘Volk-hero’ General Christiaan de Wet go into open treason in support of Imperial Germany and he leads the rebellion alongside Lt. Col Manie Maritz, General Christiaan Beyers and Major Jan Kemp et al.
Although Anglophobia is a cited reason for the Rebellion, Philip Sampson a commentator (and historian) at the time argues that the ‘colour blind franchise’ and human rights for ‘natives’ are also key motivations for the rebellion – the Afrikaner rebels are intent on maintaining a Afrikaner led hegemony, an oligarchy based on “Krugerism” as an ideology – which means no franchise or emancipation to anyone of colour. The declaration of war to invade GSWA presents an opportunity for these Afrikaner leaders, with the assistance of Germany, to take over the whole of South Africa and implement this Republican ideal and political construct of theirs.
This sentiment is manifest in Christiaan de Wet, who would go on to say of the Cape Colour Blind Qualified Franchise’, still upheld in the Cape Providence:
‘The ungodly policy of Botha has gone on long enough, and the South African Dutch are going to stand as one man to crush this unholy scandal.’44
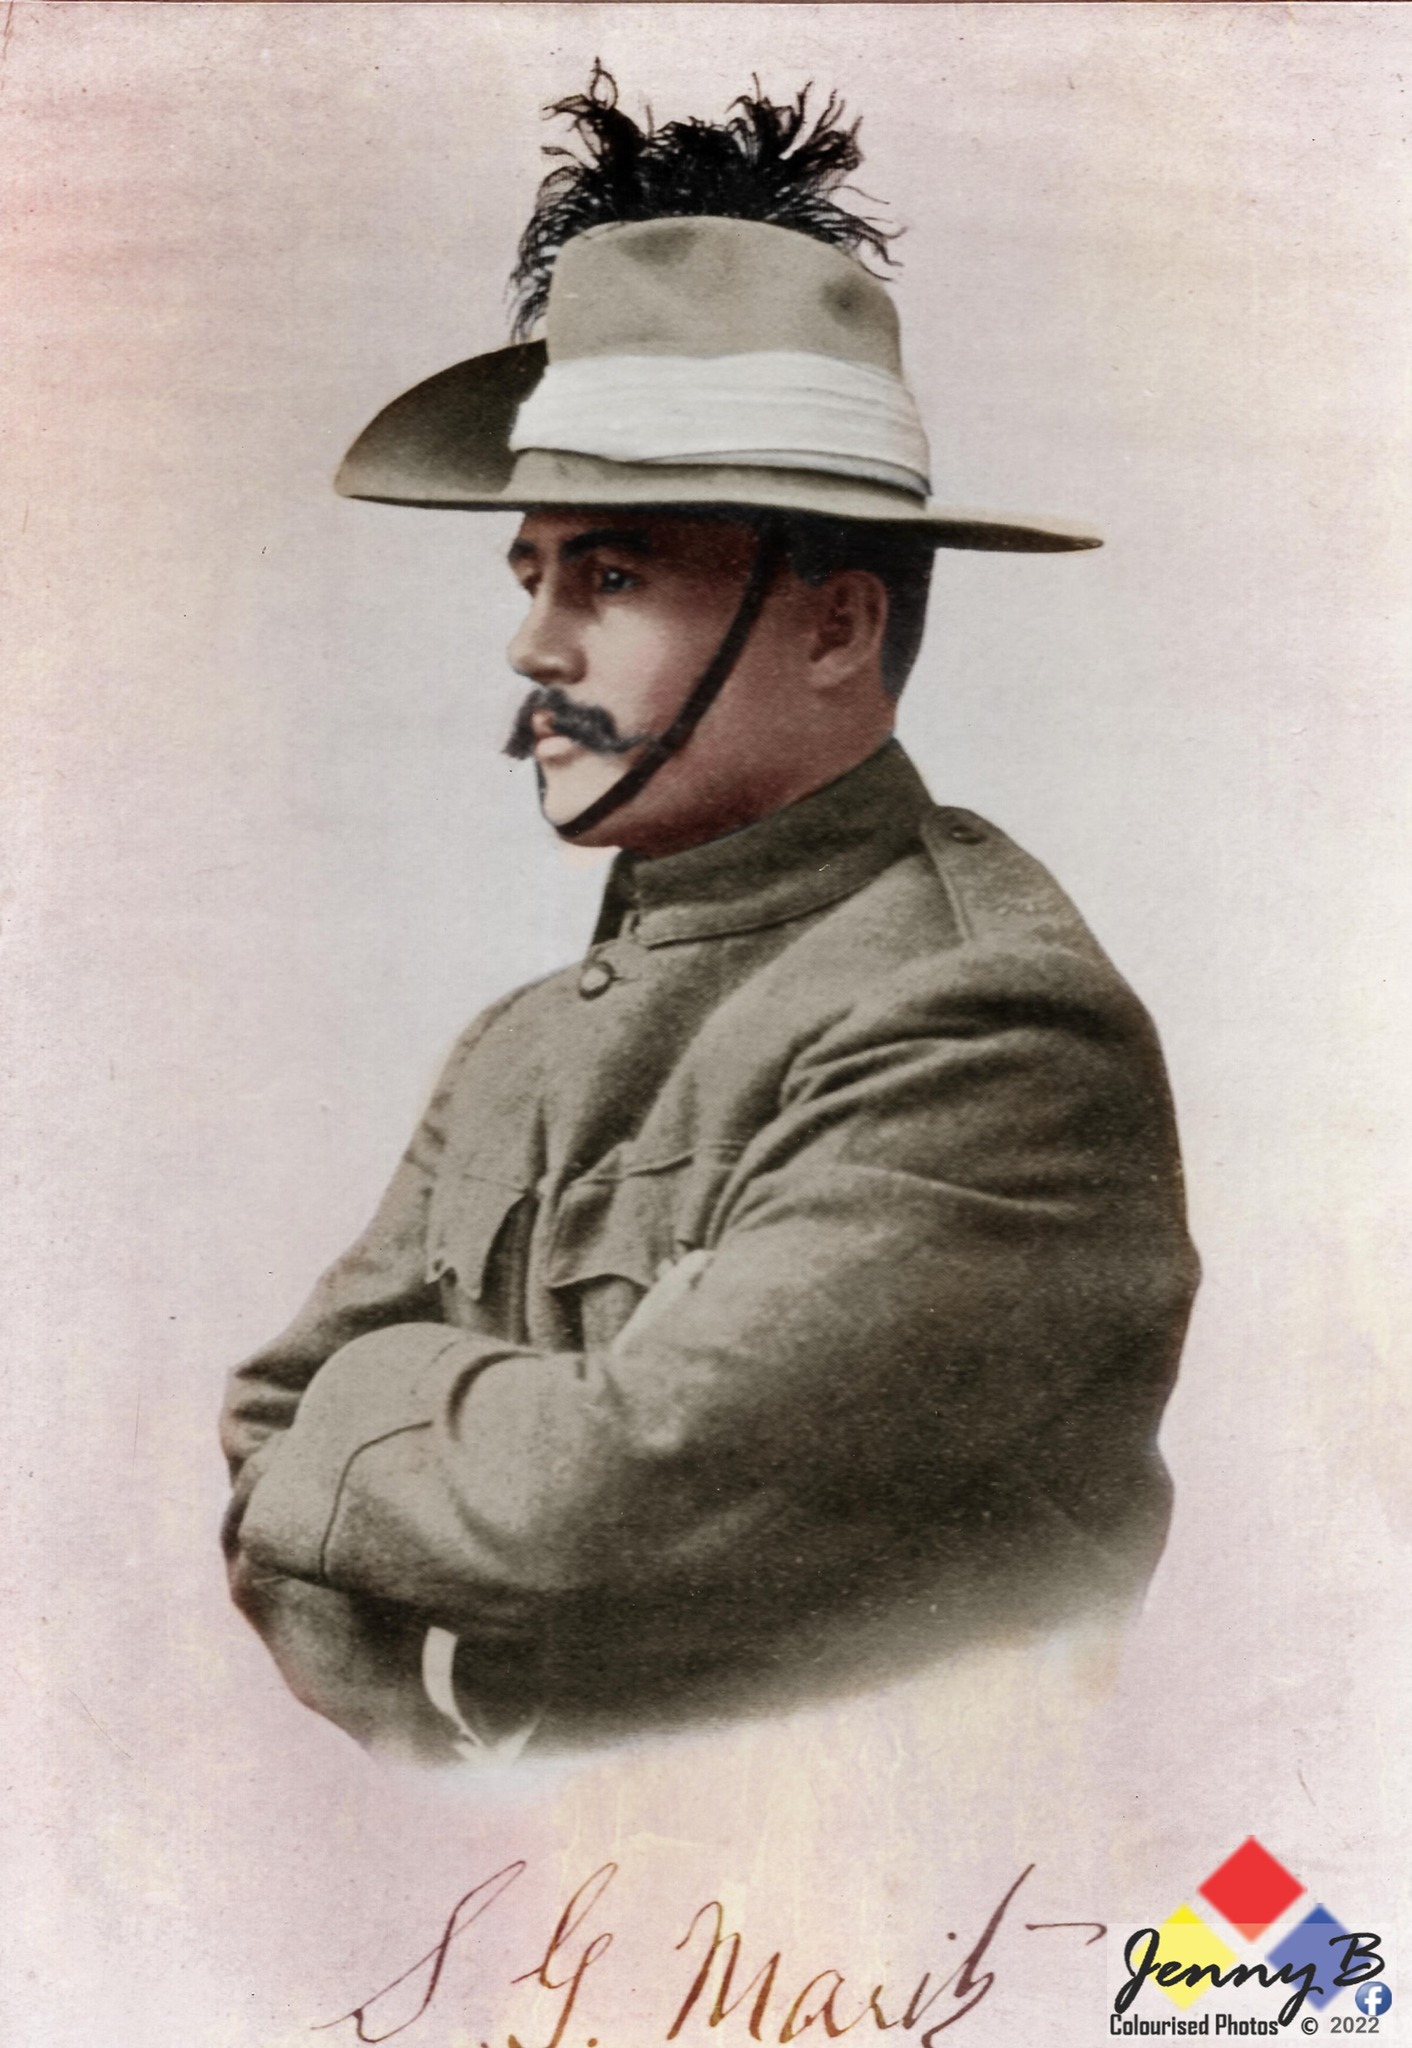
To prevent a ‘Black’ uprising in resistance to the Afrikaner Rebellion and maintain white authority, Maritz would make a draconian declaration and states:
‘… an emphatic warning is issued that all coloured people and natives who are captured with arms, as well as their officers, will be made to pay the penalty with their lives.’45
The Afrikaner Rebellion is poorly supported – only 11,476 Boers join the rebellion – primarily desperate ‘bywoner’ (landless or sharecropper farmers) from the Orange Free State, promised a better life if the rebellion was successful.46Strategically, Operationally and Tactically the Rebellion is poorly conceived and poorly led. General Louis Botha is able to crush the rebellion in a matter of months. The state deals with all the rebel leaders with Kidd gloves, with the exception of Jopie Fourie who is executed for treason – Fourie would go on to become a Afrikaner Nationalist martyr and carry with his legacy an on-going and intense National Party propaganda campaign to demonise General Jan Smuts.
On Indian politics, Smuts and Gandhi settle the Indian Relief Act of 1914 abolished the Indian tax which affected indentured labourers and Indian ‘free men’ domiciled in Natal, it facilitated widespread reforms to all Indians domicile in South Africa.47
1917 – The South African Party under Botha, in collaboration with the National Party under Hertzog table the ‘Native Affairs Administration Bill – 1917’, which institutionalises “segregation” between race groups – specifically Black and White. It is debated by not passed – it’s repeatedly amended over the years and only eventually passed as the ‘Native Administration Act’ in 1927 when the National Party has commanding oversight of it.
1918 – The Broederbond is established, a Calvinist, adult white male only Afrikaner secret organisation to forward Afrikaner Nationalist aims and objects on Christian principles.48
1919 – Prime Minister Louis Botha dies suddenly of heart failure after a bout of influenza, aged just 56. Jan Smuts takes over the party leadership of the SAP and the Premiership of South Africa.
1921 – the pillars of the General Mission Committee of the Dutch Reformed Church (DRC) Cape synod of 1921 were established in conjunction with delegates from the Transvaal and Orange Free State. At that meeting, it was concluded as follows:
‘The practice of the Church follows the doctrine of the State on the relation of the white and the black races to each other. That doctrine is that the white race is and must remain the ruling race. The coloured and the black sections of the population occupy a strictly subordinate position. This is not due to, as is very generally supposed, to the accident of their colour: it is due to their lower stage of cultural development.’49
1922 – the ‘Rand Rebellion 1922’ breaks out in March 1922. The Rebellion is triggered by white ‘communist’ led miners intent on maintaining a work ‘colour’ bar and preventing the Chamber of Mines from taking on cheaper unskilled and skilled Black labour from taking their jobs. Their intention is to spread worldwide Communism under a slogan:
‘Workers of the world, unite and fight for a white South Africa!‘50
Hertzog’s National Party in opposition comes out in support of these white communist mine workers, and issues a pamphlet stating:
‘The (National) party would never accept a “black industrial South Africa with a poor white South Africa”‘.51
The white miners call a general strike, however after ‘the strikers began to assault and massacre black people’ 52, the strike devolves into an armed rebellion and the rebels take up defensive positions, the rebellion in turn is brutally repressed by Prime Minister Jan Smuts, who sends the Union Defence Force into Johannesburg to quell it.
Four “English” Communist ring leaders are found guilty of treason and in two cases the murder of Black South Africans in addition, they go to the gallows singing their anthem, ‘The Red Flag’.
1923 – In sympathy with the miners rebellion, the securing of white proletariate class jobs, the idea of self-determination and in mutual opposition to ‘British Capital’ the National Party moves closer to the Labour Party, Hertzog would say of Communism and Labour:
‘We should not fear Bolshevism (Communism) …. The idea in and of itself is excellent.… If we say that we have the right to govern ourselves and we say that it is our duty to express that right, then we are in fact Bolshevists.’53
Dr. Daniël Francois (DF) Malan, the National Party’s Cape leader would also find an unusual bedfellow in Communism and the Labour movement. As Malan put it:
‘the two parties were tied together by their similar resistance against “capitalistic-monopolistic hegemony” (by which he meant the mine owners)’54
Historian and scholar, William Henry Vatcher, Jr. would say:
‘The alliance of Nationalists and Labour was a strange marriage of convenience. Essentially, it was a white man’s front against the Africans created for the purpose of raising white wages and ensuring jobs for the poor whites, the overwhelming majority of whom were Afrikaners.’55
1924 – Mutual resentment over Smuts’ handling of the Rand Rebellion meant that the National Party/Labour Party coalition was victorious at the polls and formed the ‘Pact Government’ in 1924. This would see the National Party take the reins of the country as a ruling party (in coalition with Labour) for the first time and Hertzog would oust the SAP and Smuts and become South Africa’s Prime Minister.
The Labour Party leader, Col. Frederic Creswell in going into the Pact Government ensures that Hertzog’s and the National Party’s ambitions for a white Afrikaner led South African hegemony and Republicanism are shelved,and that the country remains a British dominion with independent Parliamentary sovereignty.56
In coalition, the National Party were however able to pass three important acts which secured employment opportunities for whites and entrenched segregation in the labour market. The Industrial Conciliation Act of 1924, allows ‘whites’ to unionise, but specifically forbids ‘blacks’ from joining a union. The Wage Act 1925, sets up a wage board and specifically prevents black workers from undercutting “civilised” levels of wages. The Mines and Works Amendment Act of 1926, firmly established the colour bar and job reservation for whites in certain mining jobs.
1926 – Barry Hertzog as Prime Minister is the South African delegate to the Balfour Declaration of 1926. The declaration gives more autonomous powers to all British Dominion’s including South Africa. To Hertzog, the Balfour Declaration of 1926 is sufficient so as to ensure South Africa’s complete legislative independence of Westminster and therefore no need to fulfil the National Party’s ambitions for a South African Republic.
1929 – at the DRC conference in Kroonstad the Reverent J.C du Plessis makes the first recorded reference to the term “Aparthied” when he said:
‘In the fundamental idea of our missionary work and not in racial prejudice one must seek an explanation for the spirit of Apartheid that has always characterised our Church’s conduct.’57
The 1929 General Election is fought over the matter of women’s suffrage, Hertzog’s National Party win a majority Parliament, no longer requiring the Labour Party to retain a ruling party status.
1930 – the Women’s Enfranchisement Act, No 18, of 1930 was enacted by the National Party which granted white women over the age of 21, the right to vote and stand for election. This doubles the size of the white voting bloc. Despite promises on universal female suffrage, the franchise is given to white women only – countrywide, female Black and Coloured voters under the Cape provinces’ “Colour Blind Qualification” Franchise are not given the vote.
1931 – The Free State Synod of the DRC in Kroonstad rejects gelykstelling (racial levelling) and social equality with Blacks, and with it, race degeneration and ‘bastardisation’, as ‘an abomination to every right-minded white and native’. The DRC declares Blacks should develop:
‘on their own terrain, separate and apart’.58
In Britain, the “Statute of Westminster 1931” ends the British empire and replaces it with the Commonwealth. South Africa’s self-governance and independence of Britain’s legislature is complete in all things except name.59
The National Party further entrenches and expands the ‘white vote’ when it passes the Franchise Laws Amendment Act, No. 41 of 1931, which removed all property and educational franchise qualifications applying to white men (and women) countrywide, whereas Coloured and Black men under the Cape Franchise are still subject to education and property qualifications to vote (Coloured and Black women are still not allowed to vote).
1933 – The 1933 General Election outcome forces the National Party to “fuse” with the South African Party to tackle the economic challenges of the Great Depression and a maintain an Afrikaner led hegemony in the interests of South Africa’s white population.60 Hertzog led this fusion undertaking as Prime Minister with Smuts as his deputy. Known as the United South African National Party or simply ‘United Party’ (UP), it contained within it a component of Afrikaner nationalists harbouring republican desires and a component within it of Afrikaners satisfied with Union and South Africa’s status as a British Dominion.61
Unhappy with the centre right politics of ‘Fusion’, Louis Theodor Weichardt breaks away from Hertzog’s old National Party and forms a far right Nazi Party equivalent in South Africa on 26 October 1933 called The South African Christian National Socialist Movement with a paramilitary section (modelled on Nazi Germany’s Sturmabteilung) called the ‘Gryshemde’ (Grey-shirts).
By December 1933, the ‘Swarthemde’ (Blackshirts) are formed by Manie Wessels – also breaking away from the National Party, they are called the ‘South African National Democratic Movement’ (Nasionale Demokratiese Beweging). The ‘Black-shirts’ form in opposition to the ‘Grey-shirts’ anti-democracy position and look to a more “purified” whites only democracy free of Jewish and Capitalist influence.62 The Black-shirts themselves would splinter into another Black-shirt movement called the ‘South African National People’s Movement’ (Suid Afrikaanse Nasionale Volksbeweging), started by Chris Havemann and based in Johannesburg, these Black-shirts advanced a closer idea of National Socialism.63
1934 – by May 1934, the ‘Grey-shirts’ combine with the South African Christian National Socialist Movement and form a new enterprise called ‘The South African National Party’ (SANP). The SANP would all keep the ‘grey-shirts’ as their dress and the caveat of ‘Grey-shirts’ – their political position is one of anti-semitism and pure national socialism (Nazism), the swastika is adopted as the party emblem. Overall, Weichardt saw democracy as an outdated system and an invention of British imperialism and Jews.64
1935 – The DRC Federal Conference declares that education for whites and blacks should remain separate within the barriers of national identity, and defines ‘Coloureds’ for the first time as a “separate nation” from both Black and White but all are equal as individuals before God.65
The mission policy at a DRC Synod held in 1931 in Kroonstad was officially promulgated in 1935 as the official DRC mission policy. It was at this conference that the DRC expressed itself unequivocally against any form of equality (gelykstelling) between blacks and whites.
The church affirmed that the natives had souls as white people have and that they possessed a soul of equal value in the eyes of God. However, in order to stick to this fundamental belief and at the same time to stick to their ‘treasured policy of inequality and separateness’.66
The 1935 DRC Federal Conference reaffirmed the 1931 Free State Synod ‘twist’ i.e. that blacks should develop ‘on their own terrain and apart’ from whites. Language, customs, culture and colour became determinants and the policy was securely aligned with that of the government of the day.67
On the political front, in 1935 the Afrikaner nationalists to the political far right are unhappy with the idea of Fusion between Hertzog and Smuts and their ex-National Party colleagues in the new United Party. The breakaway is led by the DRC theologian Dr. Daniël Francois (DF) Malan and they reconstitute themselves as the ‘Purified’ National Party (PNP).68
The ,central objective of the PNP was a complete break with Britain and the establishment of an independent oligarchy Republic under a white Afrikaner hegemony.69 Anglophobia was a critical ideology underpinning DF Malan’s PNP and Malan sought to exclude English speakers from the PNP completely.70
1936 – the arrival of the S.S. Stuttgart in Cape Town on the 27th October 1936 packed with 537 Jewish refugees on board71 sharply brought the National Party’s policies of immigration and race into focus – it defined what sort of ‘demographics’ the Pure National Party were prepared to focus on to augment the ‘white races’ in South Africa and which were the ‘undesirables’. The arrival of the SS Stuttgart was met with a mass protest of some 3,000 ‘Grey-shirts’.72
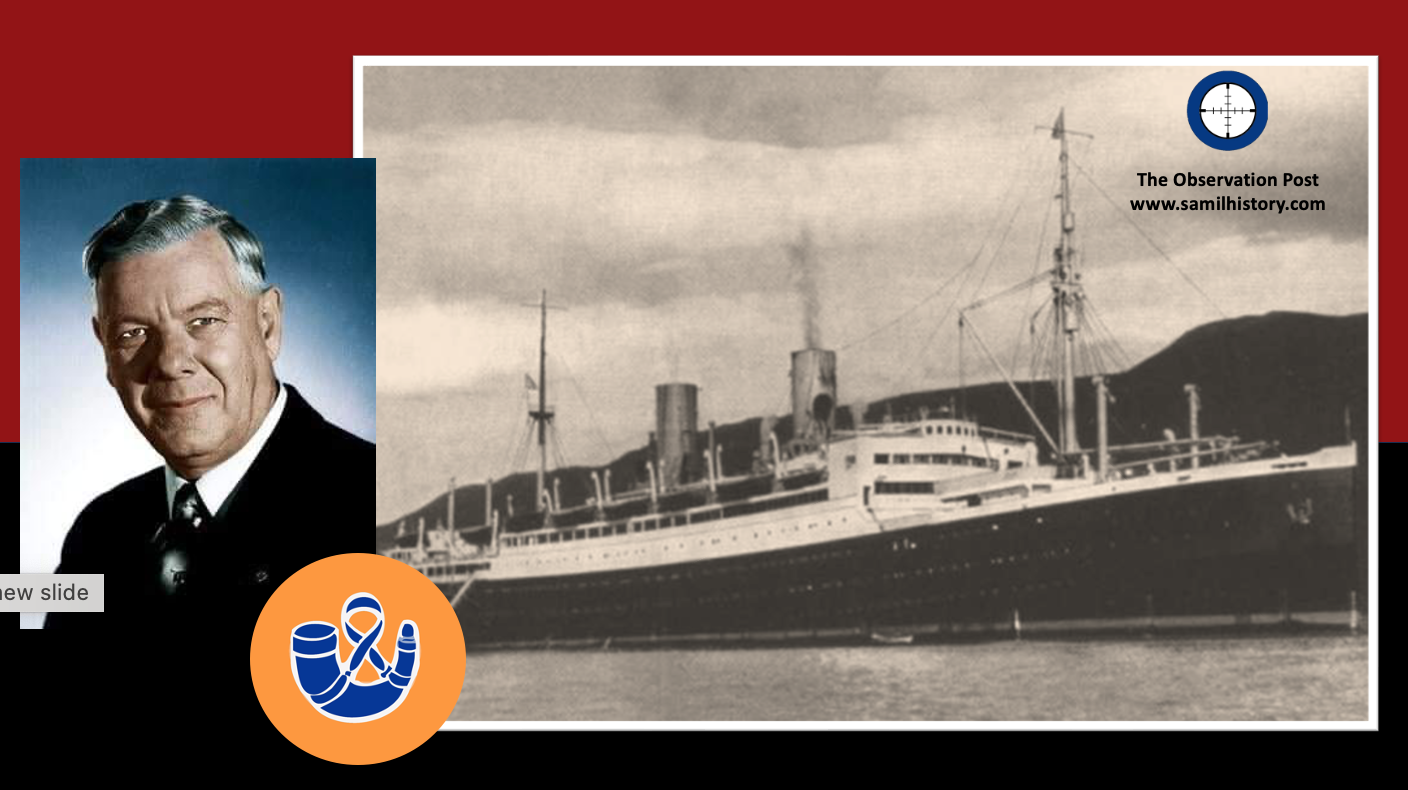
Dr. Hendrik Verwoerd showed his antisemitic colours when he and a deputation of four fellow minded Nationalist academics – Christiaan Schumann, Dr. Johannes Basson and Dr. Theophilus E. Dönges from Stellenbosch University and Frans Labuschagne of Potchefstroom University joined hands with the Grey-shirts and lodged protest with Hertzog’s’ government as to the immigration of Jews from Nazi Germany.73
At this point these Afrikaner Nationalist academics were concerning themselves with the poor white problem and ‘völkisch‘ mobilisation warning that Jews were ‘unassailable‘ to the Afrikaner Volk , they met to protest the SS Stuttgart at the University of Stellenbosch on 27 October 1936 and resolved that Jews were ‘undesirable‘ on account of ‘religion’ and ‘blood mingling‘ and that ‘cultural cooperation‘ with them was impossible.74
On 4 November, Dr Theophilus E. Dönges (future NP Acting Prime Minister) would nail the Nationalists colours to the mast and said:
“The Jew is an insoluble element in every national life.”
1937 – DS Valie Strydom of the DRC writes a paper on Apartheid titled “the policy of Apartheid here in our land and the United States of America” comparing it to American South state segregation policies on schooling, church and suburbs as a model for both Coloured and Black Africans in South Africa.75
On the political front, in the wake of the ‘Stuttgart incident’, Dr. DF Malan tables an Immigration and Naturalisation Bill which sought to exclude immigrants who were ‘unassailable‘ with Afrikaner culture and even economics of the Afrikaner Volk and deal with ‘the Jewish problem’ as he termed it. This in turn led to the ‘Aliens Bill of 1937′ 76 being passed by the Hertzog led United Party government which although a watered down version of Malan’s original proposal, still pandered to issue of cultural and economic ‘assimilation’ to prevailing ‘European’ white culture in South Africa – opening the way for the “right kind” of European immigrants (the Aryan kind) and not the wrong kind (the Jewish kind).
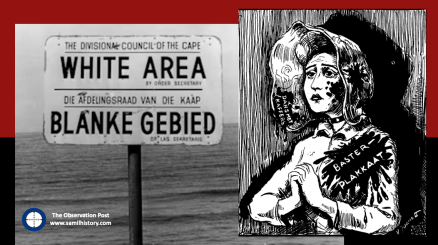
1938 – The ‘Baster Plakaat’ political illustration appears in the ‘Die Vaderland’, a National Party mouthpiece on 12 May 1938 and marks the trigger point where ‘Race Law’ starts to enter into National Party thinking from the political front using mass media. Building on a combination of the Nazi Nuremberg Race laws (which banned ‘mixed’ blood marriages of different races and Jews) and Jim Crow American segregation laws (the separation of blacks and whites on which the Nazi German lawyers based their Nuremberg Laws).
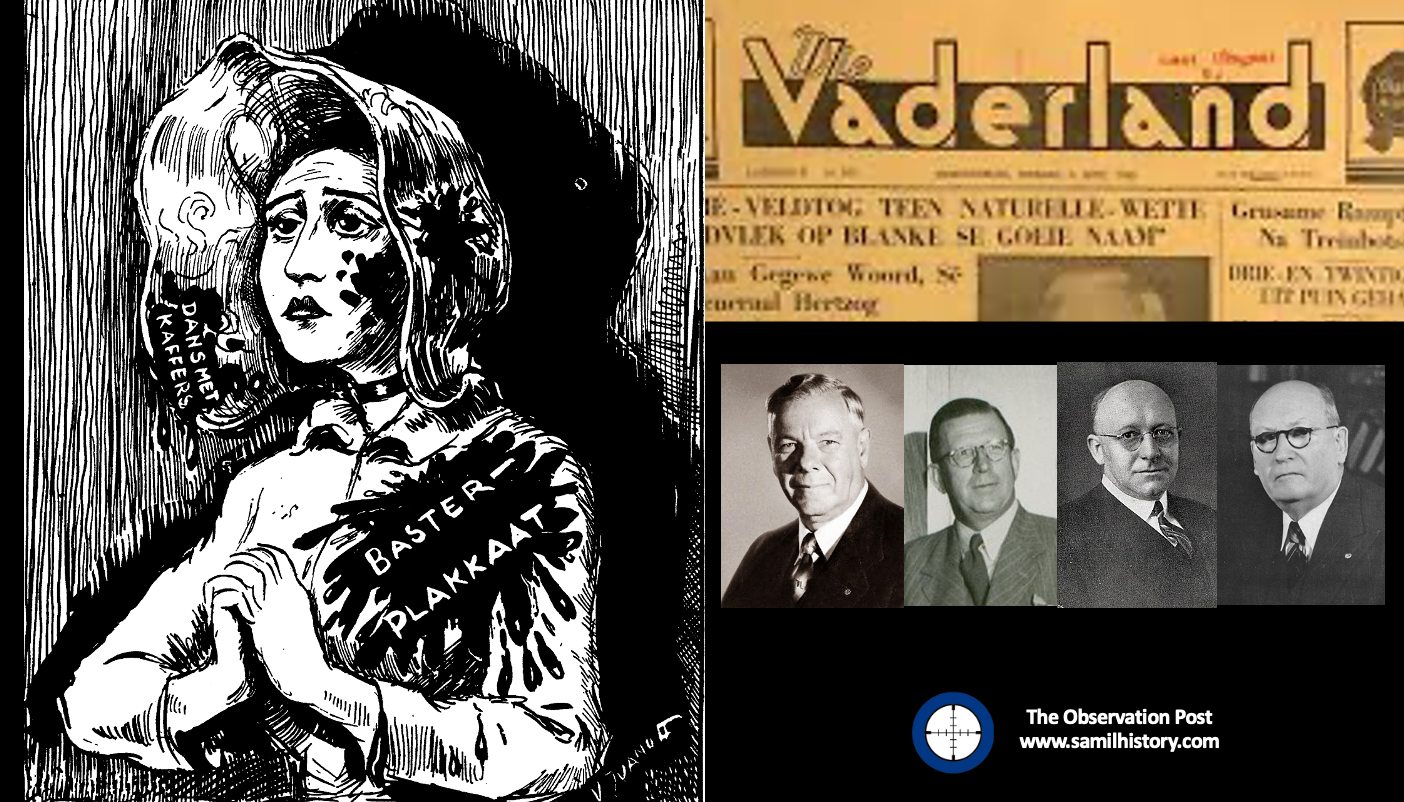
The race laws find context and expression in a ‘Pure’ Voortrekker woman, in prayer to God and in ‘pure’ white traditional kappie and dress – now “tainted” with “Kaffir” blood, the words ‘dans met Kaffirs’ (dances, i.e to have sexual relations with the black native ‘Kaffirs’) writ in blood … a warning to keep races apart and prevent intercourse lest the purity of soul and the honour of white Afrikanerdom is compromised.77
On the theological front, the Rev. Koot Vorster (the future Prime Minister’s older brother) writes:
‘The Afrikaner’s freedom lies at the foundation of our aspiration and will to keep our blood pure and not to allow our people to miscegenation (bastardise).’78
DF Malan’s Purified National Party (PNP) become the official opposition to Hertzog’s United Party ‘fusion’ after the General Election held on 18 May 1938. Malan and the Purified Nationalists at their The Union Congress of the Nationalist Party in 1938 declared:
‘This Congress regards the dominant position of the White race in the spirit of guardianship as of vital importance to the future and welfare of South Africa. It declares therefore that it must be the earnest and determined struggle of that race to preserve its racial purity, to ensure the creation of a sound relationship between it and the non-White races, and also to avoid its economic destruction.’79
Dr. Malan then proclaimed the basic slogan of the Nationalists would be:
‘We want to make sure that South Africa remains a White man’s country.’
In 1938, the Broederbond under the directive of its Chairman, Henning Klopper sought to use the centenary of Great Trek to unite the ‘Cape Afrikaners’ and the ‘Boere Afrikaners’ under the symbology of the Great trek. In this endeavour artificially creating a shared Afrikaner heritage under the pioneering symbology of the Great Trek and to literally map a “path to a South African Republic” under a white Afrikaner hegemony. Klopper started a Great Trek re-enactment with two Ox-Wagons in Cape Town on 8 August 1938, and addressed the large crowd of 20,000 spectators by saying;
‘Let us build up a monument for Afrikaner hearts. May this simple trek bind together in love those Afrikaner hearts which do not yet beat together. We dedicate these wagons to our People and to our God.‘80
The trek re-enactment was very successful, and Klopper managed to realign white Afrikaner identity under the Broederbond’s Christian Nationalist ideology calling on providence and declaring it a:
‘sacred happening’81
1939 – The Ossewabrandwag was formed on 4 February 1939 (OB, the Ox-Wagon Sentinel) on the back of the 1938 Great Trek Centennial celebration and tasked with spreading the Broederbond’s (and the PNP’s) ideology of Christian Nationalism like “wildfire” across the country (hence the name Ox wagon “Sentinel”).
The Rev. Koot Vorster crosses over from his career as a theologian studying Church Law in the DRC to politician when he Chairs the ‘Separate Neighbourhoods Organisation’ which is a think tank for Group Areas Act and the Separate Representations Act, both keystone ‘pillars’ of National Party’s future Apartheid policy.82
‘In 1939 a ‘colour petition’ organised by the Pure Nationalists and signed by 230,619 Whites was presented to Parliament but not discussed. It demanded: (1) a ban on all mixed marriages; (2) all blood-mixing of White and non-White to be punishable (3) all deurmekaarwonery (living of the various races side by side) to be ended; and (4) economic and political segregation of White and non-White.’83
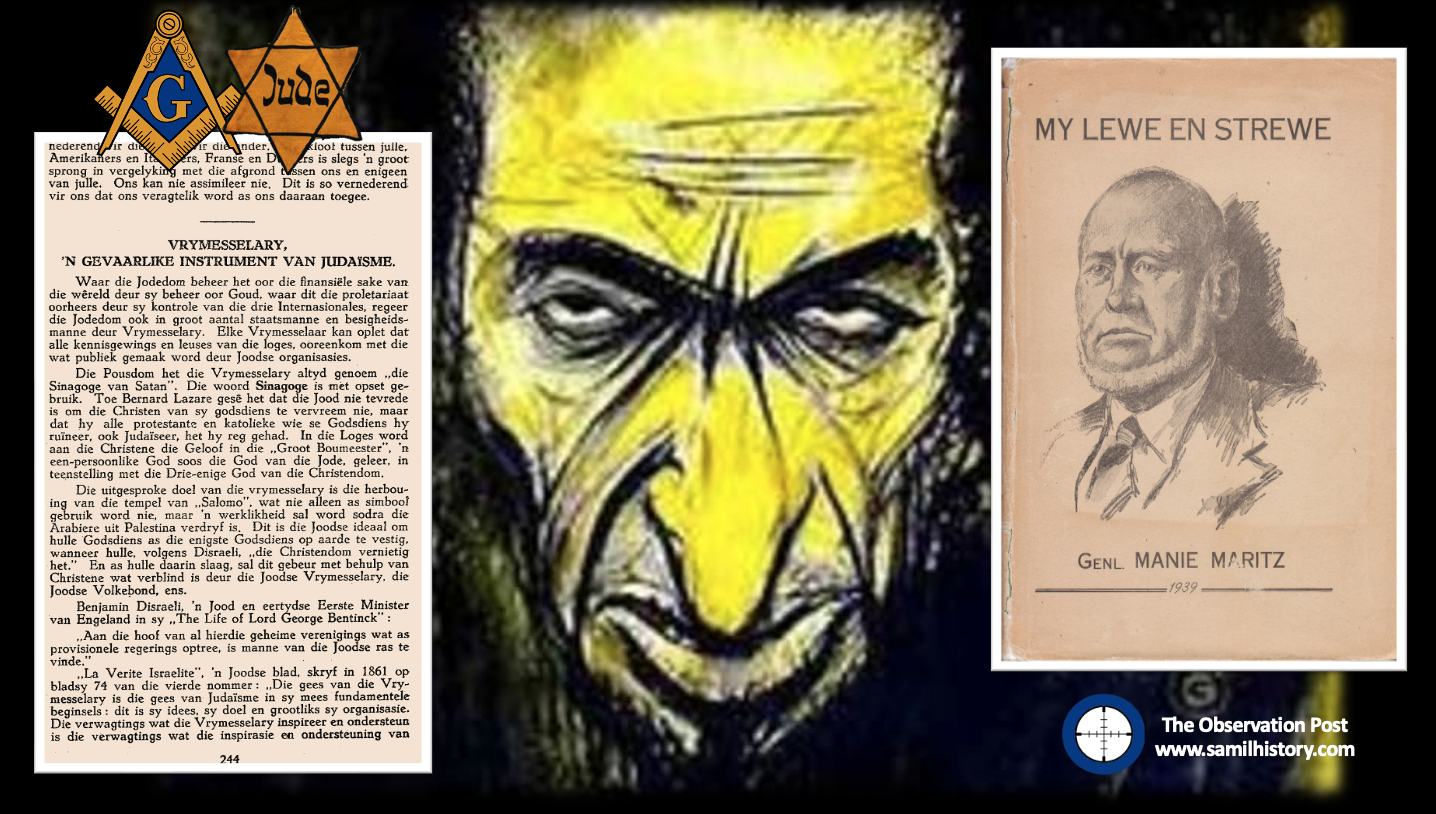
Manie Maritz, the Afrikaner Rebellion 1914 leader and Afrikaner “people’s hero”, also admired German National Socialism and split from his association with Hertzog’s old National Party to join the SANP Grey-shits, after a leadership purge he joined Chris Havemann’s Black-shirts. A converted antisemite and extreme racist, Maritz blamed the South African War on a Jewish conspiracy. He publishers an autobiography “My Lewe en Strewe” (my life and purpose) in 1939 and he outlines his political purpose to bring “the protocols of the elders of Zion” (a discredited racist propaganda document) and the dangers of Freemasonry, Judaism and Bolshevism contained therein to the Afrikaner people.84
Dr. Nico Diederichs (future National Party ceremonial State President) on 9 May 1939, in his capacity of the Chairman of the Broederbond, would meet Herr. H. Kirchner, a Nazi foreign ministry representative in South Africa. Diederichs assures Kirchner that the divisions in Afrikanerdom had been overcome by the purging of Freemasons from Broederbond (which he had personally seen to) – he would go on to say that the Pure National Party (PNP) was a committed anti-semitic party and as policy had hung its hat on it, he assures Kirchner that Dr. DF Malan, Malan is also a committed anti-semitic. Diederichs however feels that more needs to be done to frame up National Party policies in line with National Socialism and confides in Kirchner that he does not think Dr. DF Malan is the man to do it, rather the implementation of the ‘anti-democratic’ and other national socialist principles should he left to Dr. Hans van Rensburg (future leader of the Ossewabrandwag) who he also feels would be ideal leader of the Purified National Party going forward.85
By July 1939, the Black-shirts were formally incorporated into the OB and focussed on the recruiting of ‘Christian minded National Aryans’ into the OB and starts to infuse it with National Socialist “volkisch” Nationalism.86
World War 2 breaks out when Britain and France declared war on Germany on 3 September 1939, the United Party found itself in a dilemma and a parliamentary three-way debate would take place. This debate, primarily between the two factions in the United Party (Hertzog’s cabal and Smut’s cabal) and the Purified Nationalists, was whether South Africa should go to war against Germany or remain neutral.
Prime Minister Hertzog was very confident he had the majority to carry a motion of neutrality. However Smuts’ argument that to stand aside from the conflict would be to expose the whole “civilised” world to danger wins the day.87 Smuts’ amendment to Hertzog’s Motion of Neutrality was carried by 80 votes to 67 votes on the 4 September 1939 and South Africa finds itself at war against Nazi Germany. Surprised at the outcome, Hertzog promptly resigned and along with 36 of his supporters left the United Party, thereby leaving the South African Premiership and the leadership of the United Party to Smuts.88
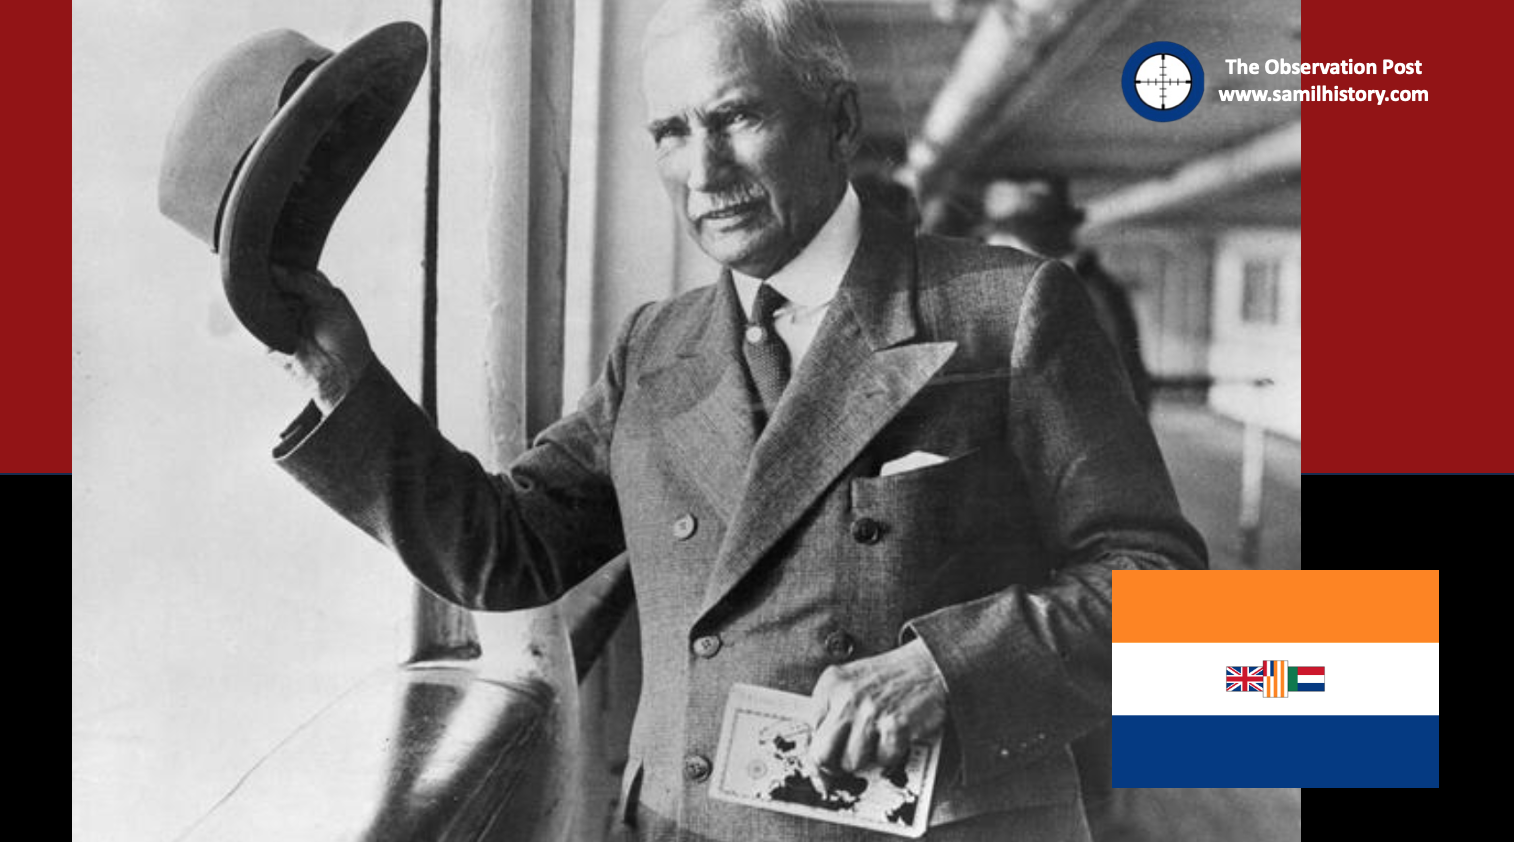
1940 – Hertzog moved to form a new party – the “Volksparty” and successfully reconciled with the “Malanites” in the PNP to then form the “Herenigde Nasionale Volksparty” (HNP) 89 or Reunited National Party in January 1940.90 However, on 5 November 1940 at the HNP’s Convention in Bloemfontein, Hertzog reaffirmed his position on English-speakers rights, and falling on deaf ears, he grabbed his hat and walked out of the National Party forever, leaving the leadership of the HNP to Malan.
Oswald Pirow, whilst Hertzog’s old Minister of Defence met with Adolf Hitler, Hermann Göring, Benito Mussolini and Francisco Franco, and he becomes a convert to Nazism and Fascism. On 14 March 1940 Smuts forced Pirow out of his position as Minister of Defence for mismanaging his parliamentary portfolio, rendering the defence force unfit for wartime purposes and his failed “bush cart strategy”.91
Pirow gambled his career on a Nazi Germany victory and on 25 September 1940, he founded the national socialist ‘New Order’ (NO) for South Africa. He positioned it as a study group within the reformulated National Party (HNP), and based it on Hitler’s new order plans for Africa.92 During the Second World War, Pirow also positioned the NO as a defender of whites in Africa against the threat of Communism.93 In terms of the NO’s values, Pirow espoused Nazi ideals and advocated the “anti-democratic” principle an authoritarian state.94
The Rev. Koot Vorster in his guise as both a Church Leader and Ossewabrandwag ‘General’ conflates National Socialist “Führerprinzip” or Leader Principle and Afrikaner identity and the need for ‘separateness’ to succeed when on 15 September 1940 he states:
‘Hitler’s ‘Mein Kampf’ shows the way to greatness – the path of South Africa. Hitler gave the Germans a calling. He gave them a fanaticism which causes them to stand back for no one. We must follow this example because only by such holy fanaticism can the Afrikaner nation achieve its calling.’95
Hertzog, now in retirement and angered by his treatment at the hands of HNP and Malan, performs a remarkable volte-face and issued a press release in October 1941 in which he championed National Socialism.96 In the release Hertzog excoriated liberal capitalism and the democratic party system, praised Nazism as in keeping with the traditions of the Afrikaner, and argued that South Africa needed the oversight of a one-party state dictatorship.97
Manie Maritz, moving from the Black-shirts, then founded his own anti-parliamentary, pro National Socialist, antisemitic ‘Volksparty’, in Pietersburg in July 1940. 98 This evolved and merged into ‘Die Boerenasie’ (The Boer Nation), a party with National Socialist leanings originally led by J.C.C. Lass (the first Commandant General of the Ossewabrandwag) but briefly taken over by Maritz until his accidental death in December 1940.
On 30 October 1940, J.C.C. Laas resigns from the Ossewabrandwag as the Kommandant General, Malan also makes a declaration in a speech at Cradock which became known as the ‘Cradock Agreement’, defining the respective spheres of the Reunited National Party (HNP) and the Ossewabrandwag (OB). Each organization undertook not to meddle in the affairs of the other. The HNP was to do the work of Afrikanerdom in the party-political sphere, while the OB was to operate on the other (cultural) fronts of the Afrikaner “volk” (people).99
The Broederbond attempts to define Apartheid as a policy and commissions ‘think tanks’ within its structure to come up with it. However it falls short and L.J. du Plessis urges that Segregation is used rather than Apartheid as segregation was the ‘national policy’ in any event and had not reached its fullest potential as:
‘Afrikanerdom had not yet had the chance to carry it out.’.100
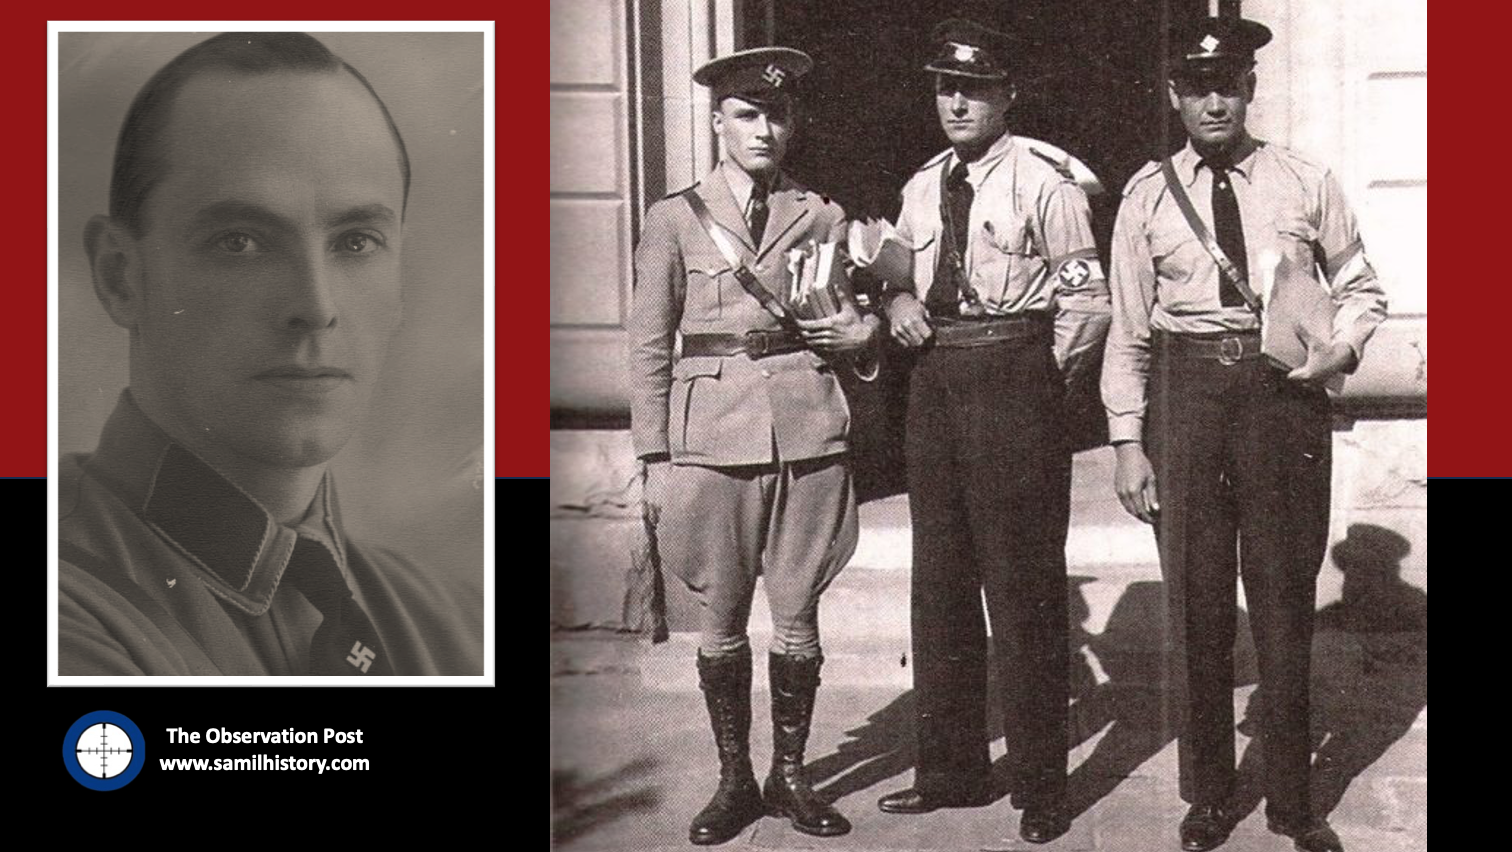
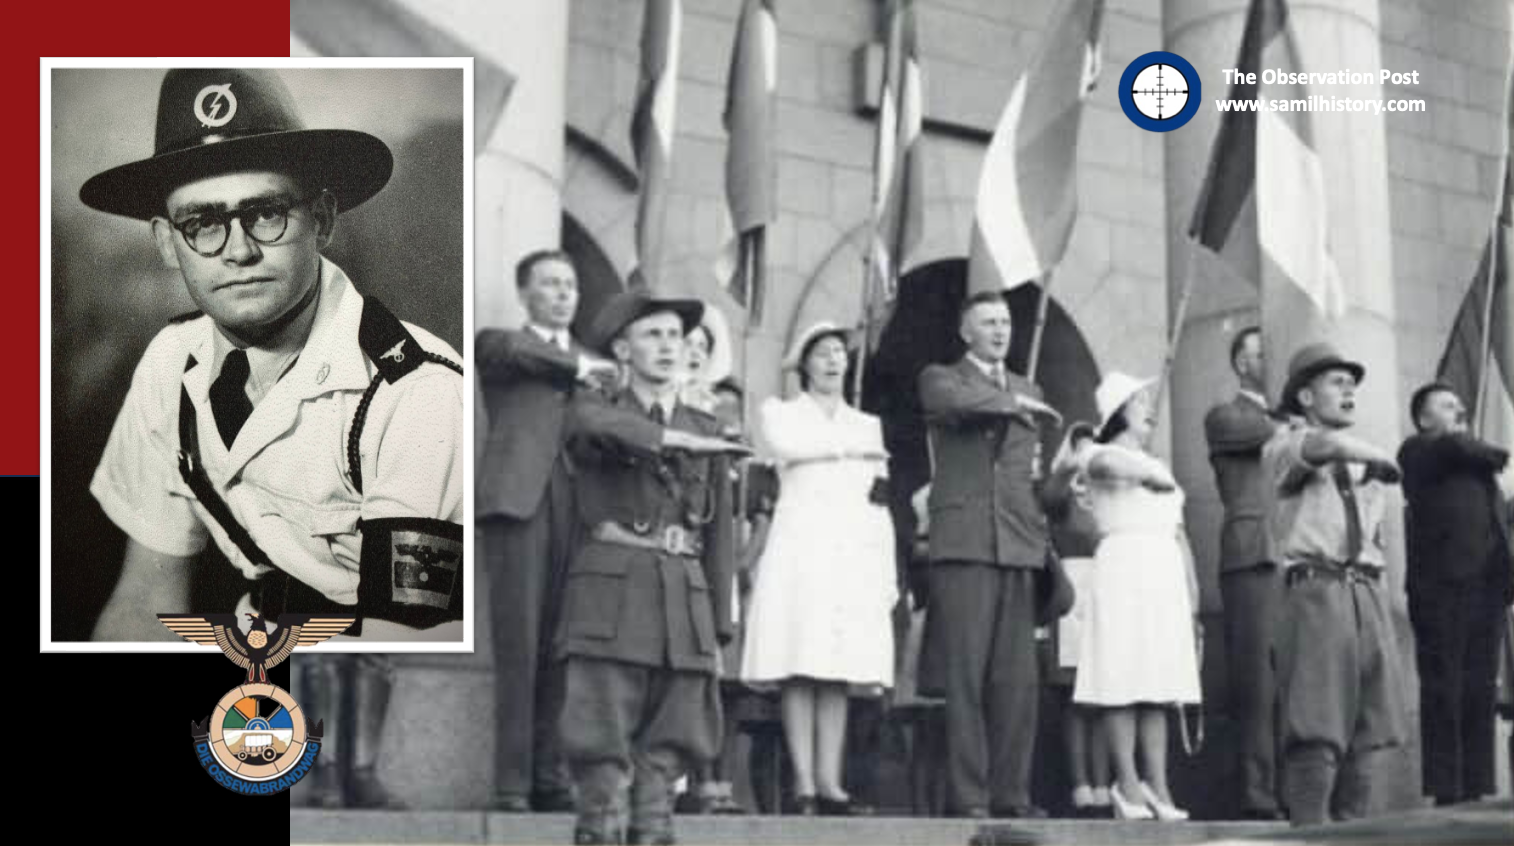
1941 – on 15 January 1941 the Ossewabrandwag (OB) came under the leadership of Dr. J.E.J. (Hans) van Rensburg,101 who had served as a National Party administrator of the Orange Free State. He was a strong admirer of Nazi Germany and campaigned for ‘a free Afrikaner republic based on nationalist-Socialist foundations.’ Explicitly rejecting parliamentary politics, the OB insisted that as the only mass movement it represented all Afrikaners. The OB pinned its hopes on a victory Nazi Germany and German help in establishing an Afrikaner republic. The OB had its own division of storm troopers, called the Stormjaers, who actively resisted the war by acts of sabotage and a handful of assassinations.102
Van Rensburg infused the OB with National Socialist ideology, whereafter the organisation took on a distinctive fascist appearance, with Nazi ritual, insignia, structure, oaths and salutes. Ideologically speaking the OB adopted a number of Nazi characteristics: they opposed communism, and approved of antisemitism. The OB adopted the Nazi creed of “Blut und Boden” (Blood and Soil) in terms of both racial purity and an historical bond and rights to the land. They embraced the “Führerprinzip” (Führer Principle) and the “anti-democratic” totalitarian state (rejecting “British” parliamentary democracy). They also used a derivative of the Nazi creed of “Kinder, Küche, Kirche” (Children, Kitchen, Church) as to the role of women and the role of the church in relation to state. In terms of economic policy, the OB also adopted a derivative of the Nazi German economic policy calling for the expropriation of “Jewish monopoly capital” without compensation and added “British monopoly capital” to the mix.103
On 1 January 1914, the Afrikaner nationalist mouthpiece Die Vaderland called the OB ‘the greatest Afrikaans organisation outside of the Church’ and van Rensburg was not inclined to play second fiddle to Malan, whom he despised as a hide-bound constitutionalist.104
The Rev Koot Vorster, in February 1941 is sentenced to three years hard labour by the Smuts government when he is caught red handed in acts of sedition supporting the Nazi German war effort.105
In September 1941, fearing a leadership crisis over the OB’s encroachment from the cultural realm into the political realm and the promotion of the “Führerprinzip” over D.F. Malan’s more acceptable approach to working within “parliamentary democracy”, Malan in addition fears an ‘armed uprising’ of Afrikaners, so he moves to ‘ban’ OB members from joining the HNP. 106 B.J. “John” Vorster (the future National Party Prime Minister) refuses to resign from either, so the HNP make his mind up for him and expel him.
1942 – Smuts’ delivers a keynote address to the Institute of Race Relations on 21 January 1942, his usual position on ‘black’ and ‘white’ race and patronage changes, he opposes Nazism and attacks the Afrikaner nationalists who accepted Nazism, Smuts states, ‘.. that Nazi ideology of race produces the idea of a master people, the Herrenvolk. That is going back to an old discarded idea of slavery’ … and the policy of ‘segregation had resulted in very great disappointment at the results’ … and he proposes the need for a new policy, including a more equitable territorial (land) reconfiguration and the recognition of increasing Black urbanisation and their political aspirations.’107 Smuts then states:
‘Segregation has fallen on evil days’108
Smuts’ speech rallies the Afrikaner right wing who take up a position that Smuts’ “liberal” policies intend to give Black South Africans the franchise, and that an Afrikaner who did not believe in Afrikaner Nationalism was an “an Afrikaner of another kind”, a “traitor” with a “British heart”.

On the Afrikaner Nationalist right, the firebrand nature of the Ossewabrandwag (OB) also appealed to B.J. Vorster (future National Party Prime Minister and President of South Africa) more than the National Party during the war years. In 1942 he conflates the Broederbond’s ideology of Christian Nationalism with Nazism and Fascism and publicly states:
‘We stand for Christian Nationalism which is an ally of National Socialism. You can call this anti-democratic principle dictatorship if you wish. In Italy it is called Fascism, in Germany National Socialism (Nazism) and in South Africa, Christian Nationalism.’109
In response to growing support for Nazism in the Afrikaner community, a number of Afrikaner Nationalists find themselves interned by the Smuts government for acts of sedition and treason supporting the Nazi German war effort, these include the Broederbond’s legal stalwart Kowie Marais and B.J. Vorster.110
1943 – The DRC Federal Mission Council approaches Prime Minister Jan Smuts and requests a ban on mixed marriages. The DRC mission includes a biologists report from H.B. Fantham, who:
‘maintained that the colouring of black and white intermixture displayed negative social and mental characteristics.’111
Smuts rejects their proposal stating:
‘The line between white and coloured people in many instances could not be drawn.’112
Die Burger uses ‘Apartheid’ for the first time in mass media, when it referred to Apartheid as the:
‘accepted Afrikaner viewpoint’.113
In 1943, Dr. Verwoerd, as the editor of Die Transvaler, sued the English-language newspaper The Star for libel after it accused him of being a Nazi propagandist, the case back-fired as Justice Millin, in a 25,000-word judgement found Verwoerd had indeed being complicit in promoting Nazism and concluded:
‘Dr. Verwoerd caused this large body of German propaganda to be published and that it was along the same themes as the Afrikaans Zeesen reports which was “calculated to make the Germans look on Die Transvaler as a most useful adjunct to this propaganda service”‘.114
1944 – in May 1944, Dr. D.F. Malan and Paul Sauer, offered the first extended defence of Apartheid as a concept in parliament. Malan called for a republic based on the policy of:
‘apartheid and trusteeship, made safe for the white race and the development of the non-white race, according their own aptitude and abilities.’115
1945 – The Reunited National Party adopts Apartheid as its official policy.116
Surrounded by the Red Army, Adolf Hitler commits suicide and 30 April 1945. Nazi Germany unconditionally surrenders to Allied forces on 7 May 1945.
From 20 November 1945 to 1 October 1946, the Nuremberg Trial takes place and exposes the full criminality of the Nazi Party regime and its ideology. The Nazi dogma with its focus on the bogus “protocols of the elders of Zion” to justify the holocaust is exposed as wilful genocide and deemed a crime against humanity.
1946 – having served his sentence and released from jail, the Rev. Koot Vorster champions a DRC inter-church commission on Communism. This commission’s aim was to ‘combat the communist worldview in South Africa‘ and represents another cross over of Church and Afrikaner Nationalism politics in defining the “Rooi Gevaar” (red danger) policy.117
In light of his ‘segregation has fallen on evils days’ statement, Smuts appoints The Native Laws Commission (also known as the Fagan Commission) to look at Black African urbanisation and investigate changes to the policies of segregation. In August 1946, in agreement with the Fagan Commission recommendation to end segregation, Smuts nails his colours to the mast in opposition to Apartheid and says of it:
‘The idea that the Natives must all be removed and confined in their own kraals is in my opinion the greatest nonsense I have ever heard.’118
1947 – Malan appoints P.O. Sauer to head a party commission to turn apartheid into a comprehensive racial policy.119 The Sauer Commission was in part intended to forestall Smuts’ Native Laws Commission (the Fagan Commission) and counteract its recommendations as to any changes to segregation policies.
The Sauer Commission proposes a policy aimed at ensuring blacks develop:
‘in their own territory and in their own towns.’120
Malan also declares that it is not the state that took the lead with inventing Apartheid, it was the DRC.121 He says:
‘It was not the State but the Church who took the lead with Apartheid The State followed the principle laid down by the Church in the field of education for the native, the coloured and the Asian. The result? Friction was eliminated. The Boer church surpasses the other churches in missionary activity. It is the result of Apartheid.”
1948 – the DRC Synod of the Transvaal accepts the 1935 DRC Mission for separate education for separate nations and refers the Tower of Babel as the justification for Apartheid.122
April 1948 sees Oswald Pirow re-engage his relationship with Oswald Mosley, the discredited leader of the defunct ‘British Union of Fascists’, in order to collaborate on a Neo Nazi ‘New Order’ model for Africa as a whole. The come up with the Mosley-Pirow Proposals, which were: ‘a natural development of General Hertzog’s Segregation Policy and was foreshadowed by (his) then cabinet colleagues 15 years earlier’.123 The proposals essentially divide Africa into a large southern ‘white’ state with its labour provided by separate ‘black’ vassal states on temporary work permits. The work foreshadows the Apartheid Bantustan program and influx control policies.
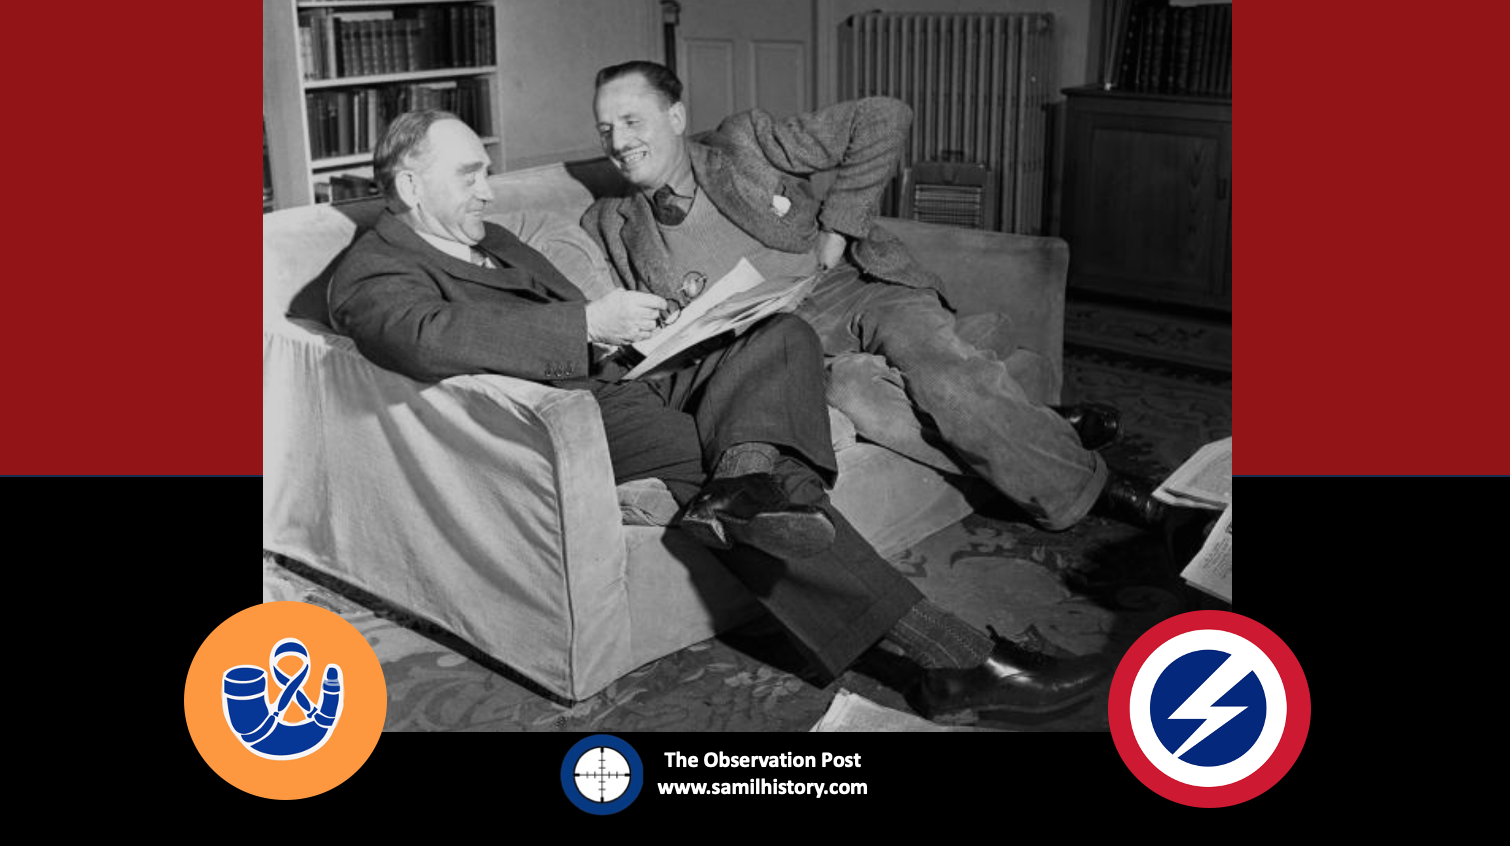
With Nazism now a worldwide anathema, the Grey-shirts (SANP) disbands in 1948 with most its leadership joining Malan’s HNP or aligning with it under a new entity called ‘the white workers party’ in 1949.
Dr. Malan pledges that Aryan German immigrants were necessary to cultivate a ‘broad Nordic front to counter Communism, Blacks and Jews’.124 Schalk Botha and Dr. Vera Bührmann fly to war-torn Germany on behalf of the ‘German Children’s Fund (DKF) on 27 April 1948. They aim to implement a Weimar Eugenic program and locate 10,000 healthy White, German, Protestant (Aryan) orphans and bring them to South Africa for adoption by leading Afrikaner Nationalists in order to:
‘strengthen their own Afrikaner Volk with the blood of “prestigious” German-Aryan Herrenvolk’125
Unable to meet their target due to restrictions in Germany, they secure only 87 “orphans”, the first choice of which is given to Dr. Malan who adopts a little girl.
The 1948 General Elections on 26 May 1948 are a landmark occasion in South Africa, as Malan and his HNP in coalition with the Afrikaner Party win a constitutional majority by a single seat, although not elected on a ‘majority’ popular vote they take up the mantle of ruling party citing divine providence to bring their policy of Apartheid to all South Africans.
As the new ruling party the HNP tables and passes Acts that begin to form the ‘cornerstone’ of Apartheid, these include:
- The South West Africa Amendment Act. propagated in 1948, provided for the representation for white South West Africans citizens in the South African Parliament, ignoring International Law and the status of the Namibian mandate.
- Asiatic Laws Amendment Act of 1948 takes away franchise and land ownership rights of South African Indians and confines them to pre-determined ‘areas’.
1949 – the DRC Synod of the Cape declares the 1857 DRC Synod which made way for separate worship as the epicentre of Apartheid – and to the 1935 DRC Church policy on the segregation of schools and education and declares:
‘”Vertical Separation” between black and white so they can each achieve their own “independence “.’126
The fundamental difference in Afrikanerdom between Smuts and Malan is seen on 16 December 1949, at the inauguration of Voortrekker Monument as a symbol of ‘the Afrikaner’s proprietary right to South Africa’. General Jan Smuts warned:
‘Let us not be fanatical about our past and romanticise it.’ Smuts then called for greater co-operation between white and Black South Africans as the ‘most difficult and final test of our civilisation’.
Malan, now the Prime Minister of South Africa, took a different view to Smuts in his speech and warned:
‘Godless communism’ was threatening the achievements of the Afrikaners and ‘there was a danger of blood mixing and disintegration of the white race. The only way of avoiding the spectre of a descent into “semi-barbarism” was a return to the Voortrekker spirit and a return to the volk, church and God.’127
1950 – Acts which constitute the ‘Pillars of Apartheid’ are passed by the National Party as the governing party, these include:
- The Immorality Amendment Act, 1950 (Act No. 21 of 1950) prohibits sexual intercourse between white people and people of colour. The act was an amendment to the 1927 Immorality Act originally introduced by Hertzog’s governing National Party and its eventually extended to include homosexuality.
- The Group Areas Act, 1950 (Act No. 41 of 1950) separates urban areas into racially segregated zones where members of one specific race alone could live and work. Group areas were created for the exclusive ownership and occupation of a designated group and it became a criminal offence for a member of one racial group to reside on or own land in an area set aside by proclamation for another race.
- The Suppression of Communism Act, 1950 (Act No. 44 of 1950) gives the Minister of Justice broad powers to suppress not only Communism but any scheme aimed at achieving change, whether economic, social, political, or industrial, “by the promotion of disturbance or disorder” or any act encouraging “feelings of hostility between the European and the non-European races … calculated to further (disorder)”
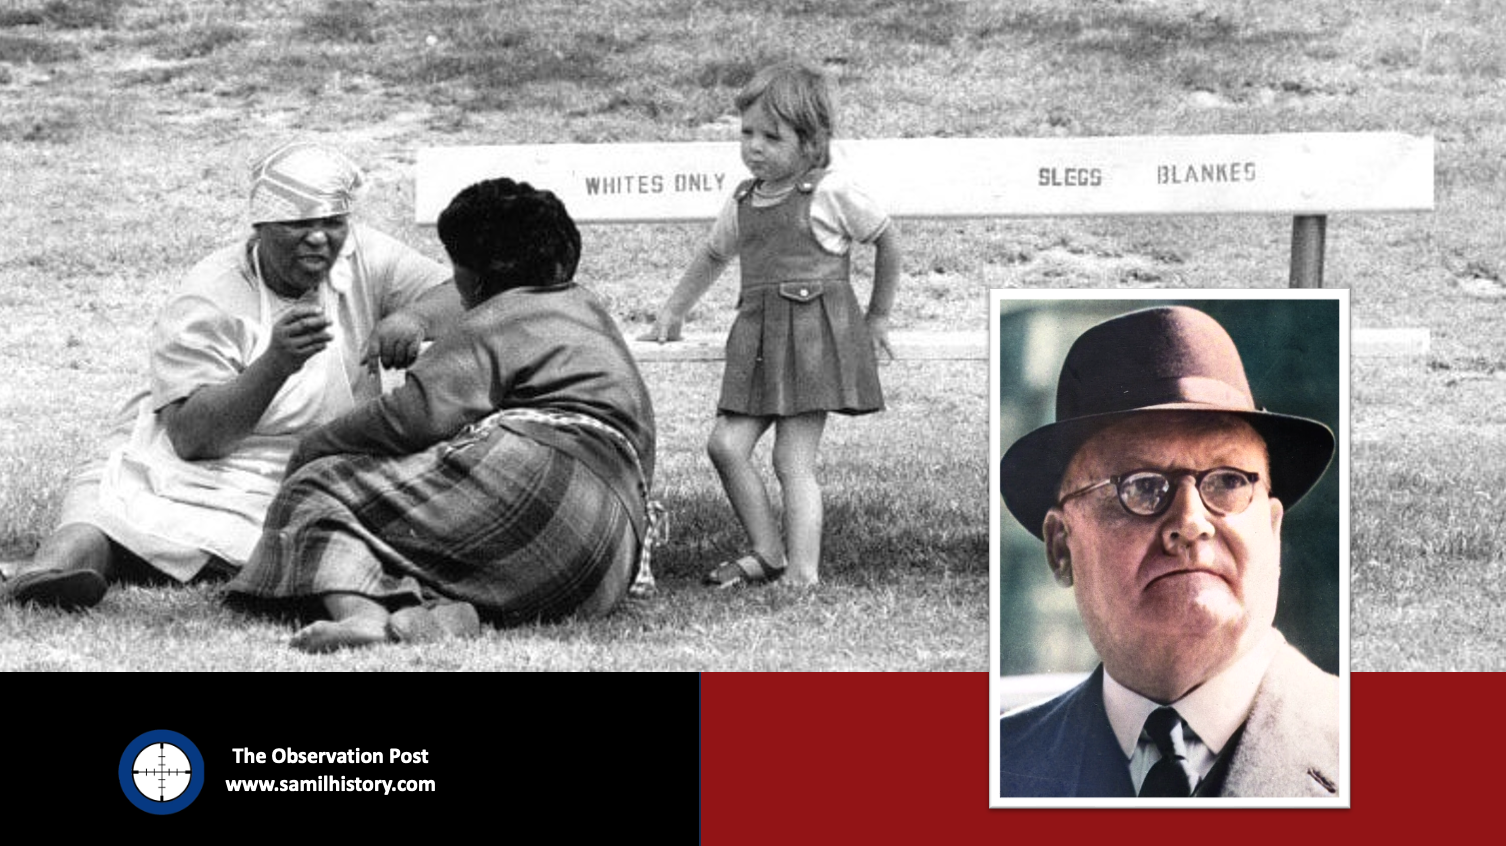
Jan Smuts passes away on the 11 September 1950 of a heart attack, aged 80.
1951 – The Reunited National Party formally Afrikaner Party are formally amalgamated to form ‘The National Party’ again, ending the long standing division caused by Hertzog and “Fusion” with Smuts back in 1933. The Afrikaner Nationalists who had splintered from the National Party into all the various shirt movements, the Ossewabrandwag and the New Order are welcomed back under a singular party.
These pro-Nazi and anti-war groupings within the National Party planted a fertile seed bed for the future authoritarianism of the Apartheid state. The constant depreciation of liberal democracy in this demographic of Afrikaners alongside an almost ‘hysterical exaltation’ for both ‘racist’ and a ‘Völkisch‘ group ethics were to have long term effects.128
Although Nazi ideology and dogma was no longer permissible in the political sphere, no solid measures were put in place by the Smuts government to prevent it from flourishing. Afrikaner Nationalists entertaining strong National Socialist ideologies and having committed treason and sedition during the war, who in European countries would have been hanged for war crimes, landed up back in mainstream party politics under the banner of the National Party and many even ended their days in Parliament.129
On the legislative front:
- The Separate Representation of Voters Act 1941( Act No. 46 of 1951) is introduced as part of a deliberate process to remove all non-white people from the voters’ roll and revoke the Cape Qualified Franchise system, this triggers the Constitutional Crisis.
The Separate Representation Act and the Constitutional Crisis, triggers the formation of War Veterans Action Committee (WVAC), a returning ‘white’ war veterans lobby group led by Sailor Malan, which in turn becomes the first mass anti-apartheid protest movement, called The Torch Commando. In Sailor Malan’s words, The Torch Commando’s primary mission:
‘The Torch Commando was established to oppose the police state, abuse of state power, censorship, racism, the removal of the coloured vote and other oppressive manifestations of the creeping fascism of the National Party regime’.
1952 – the African National Congress (ANC) announces the start of the Defiance Campaign scheduled to begin with mass protests and defiance of Apartheid laws by the country’s black majority on 26 June 1952.
Whodunnit
As can be seen from the chronology and historiography of Apartheid, the body that ‘invents’ it is not the British and nor is it the entire white Afrikaner diaspora. It is in fact invented in the Dutch Reformed Church (DRC). The British are the “catalyst” to Apartheid in that without Britain’s abolition of slavery and Britain’s implementation of a colour blind franchise putting Dutch Reformed Church puritans on the same footing as some black slaves – the journey to ‘Apartheid’ would have taken a different path.
There has been a long standing debate in academic circles revolving around Apartheid’s origins and historiography. Two sides emerged from the debate, both agree that the origin of Apartheid is slavery in the Dutch Cape Colony, however after that the two arguments go separate ways.
One group points to the Voortrekker’s Puritan religious standpoint which brought the idea of “separate worship” for Blacks and Whites into Dutch Reformed Church policy. The epicentre is the Zuid-Afrikaansche Republiek (ZAR) NGK Synod in 1857 and subsequent Synods and Dominees come to define Apartheid along the lines of Jim Crow Laws, Darwinist Eugenics and Southern American State Segregation policies. This group, defines Apartheid as a derivative of American Segregation along ecclesiastical lines.
The other group points to the advent of National Socialism (Nazism) in the mid 1930’s as the key political driver of Apartheid’s origin, and they name the National Party’s ‘Think Tank’ Professors and academics who are all enamoured and besotted with Nazi Germany, anti-Semitism, Nuremberg Race Laws and Weimar Eugenics as the chief proponents of it. This group would define Apartheid as a derivative of National Socialism along party political and ideological lines.
Stepping into the fray to sort the argument out once and for all in 2003 was the heavy-weight Afrikaner historian – Professor Hermann Giliomee. He concluded in his work ‘the making of the Apartheid plan’ that the essence and origin of Apartheid lay along the DRC’s ecclesiastical lines and had nothing to with Nazism. He cites a famous speech by Dr. DF Malan in 1947, and taking it at face value he formats it as the crux of his argument, it’s a speech where Malan declares that it is not the state that took the lead with Apartheid, it was the Dutch Reformed Church who led it – and according to the Church, the DRC Synod in 1857 in the ZAR marks the start of it.130
What Professor Giliomee loses sight of by quoting DF Malan, is it is this very man who is front a centre in a very Weimar Eugenic based Aryan adoption program to boost the bloodline of white Afrikaners with Nazi German Herrenvolk blood and to advance an Völkisch ideology in South Africa. Malan not only opens the way for this ideology and thinking by the “Germanophiles” and wartime pro-Nazi leaders in his party, he even adopts one of the children. The German Children’s Fund (DKF) is not only inspired by National Socialist dogma, it is a vert practical and realistic application of it in South Africa.
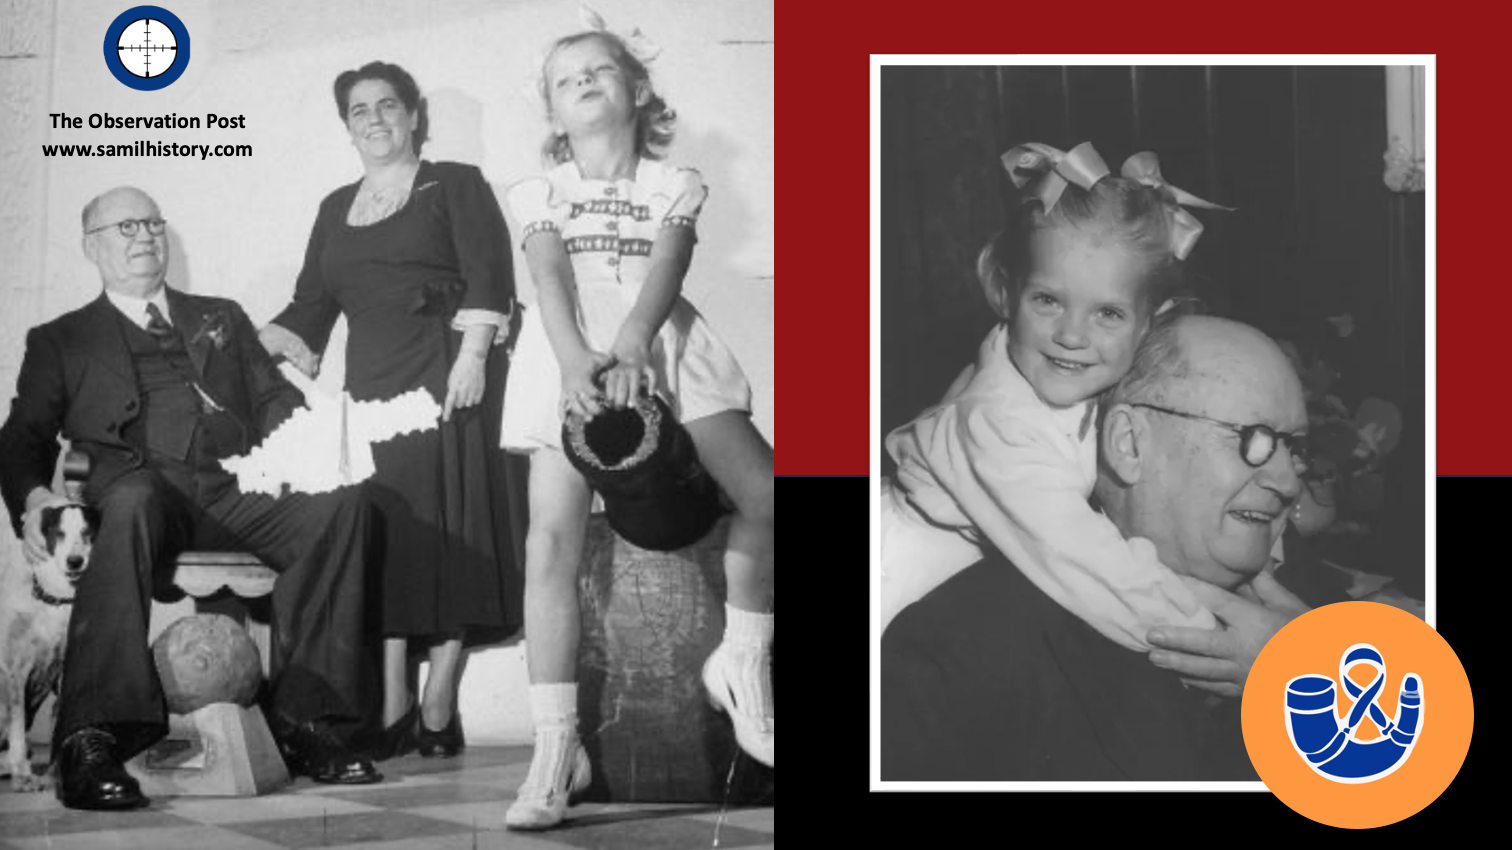
Giliomee also loses sight of the fact that Malan makes this declaration in 1947, after the end of the war in 1945 and the exposure of Nazism and its ideological connection to the holocaust, and by deflecting to the Dutch Reformed Church (to which he is pre-disposed to do as a Dominee anyway) he is gaslighting for the plethora of “Germanophiles” who have been advocating National Socialism in all the various Afrikaner Nationalist cultural, media and political structures and who have all subsequently been warmly welcomed into the HNP’s fold and its leadership caucus. Especially after their 1948 election win and the merger with the Afrikaner Party to reconstitute the HNP as the “National Party” (NP).
To be fair to Giliomee, what he does not have sight of in 2003 is all the recently uncovered archive files and materials found 20 years later. Documents on the Ossewabrandwag pointing to Nazi collusion – files, court records, letters, memos and confessions from South African Nazi renegades within Afrikaner nationalism captured and interrogated in the Rein Commission and published in the Barrett Commission findings after the war – files which were, until recently, regarded as either missing, “gate-kept” or embargoed. Even the recent findings and academic works on the Nazi German propaganda program in South Africa makes for an eye-opening historiography of Apartheid.
Previously “shielded” (gate-kept) or missing files – primary source material – have now finally put the nail into the ecclesiastical argument as the sole origin and development of Apartheid and we can now finally conclude that not only was Apartheid ‘invented’ by the Dutch Reformed Church, it was subsequently infused with National Socialism – and although not Nazism in its purest form it is indeed a derivative of Nazism.
Afrikaner Christian Nationalism vs. German National Socialism
So what’s the real difference between Apartheid and Nazism? The fundamental difference lies in the religious approach to establish a ‘Herrenvolk’ – a ‘pure’ white European race. How this is arrived at is fundamentally different to one another – the Nazis arrived at the idea of a Herrenvolk on a Nordic mythology and occultism platform, the Afrikaner Nationalists arrive at the idea of a Herrenvolk on a Calvinist puritan and ecclesiastical platform. Whichever way they arrive at it, they arrive at the same thing.
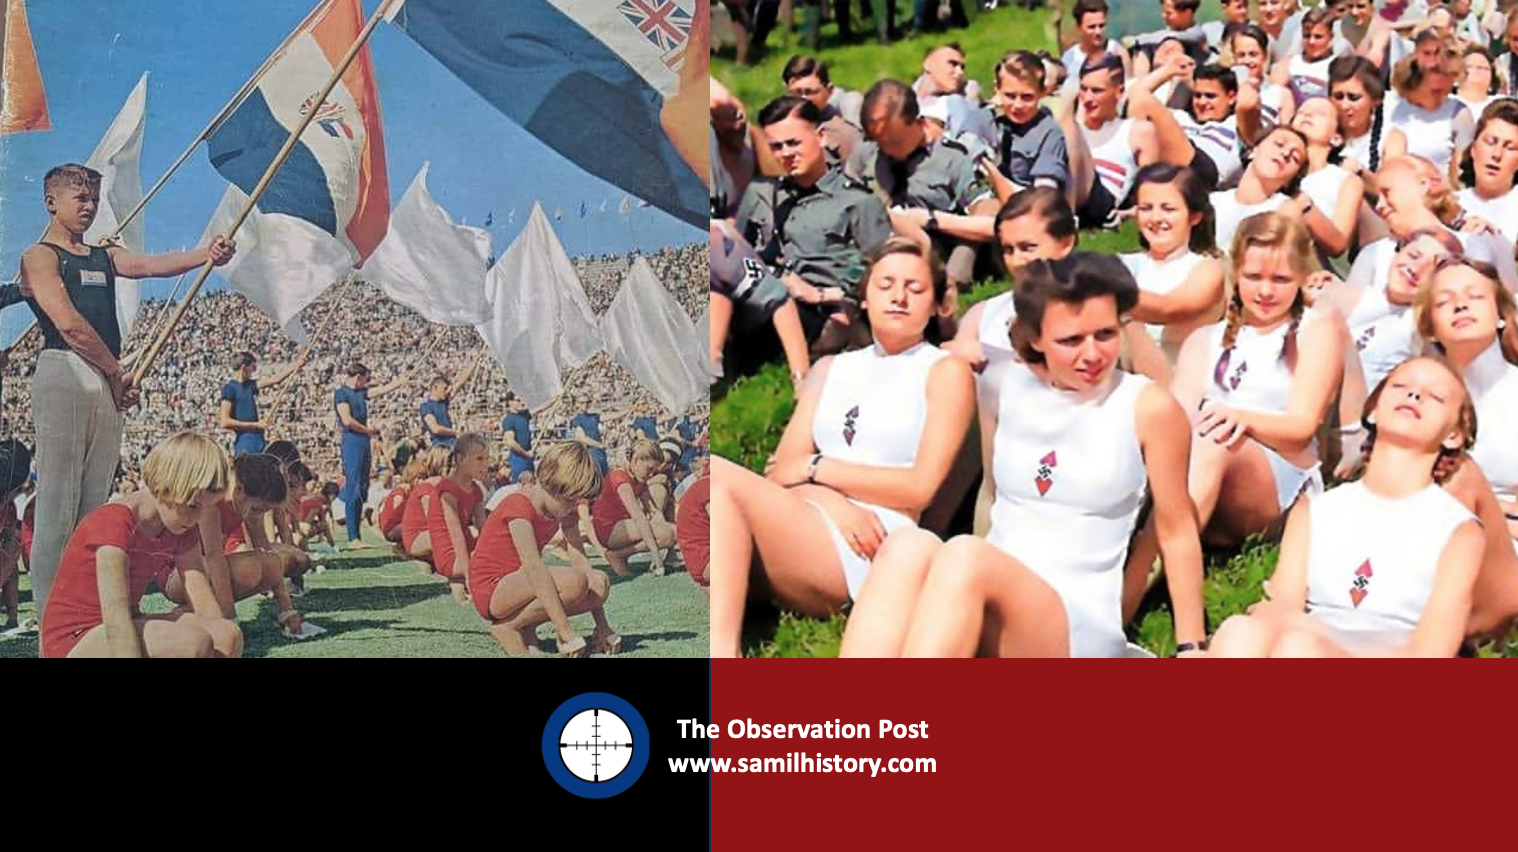
The ‘dominees’ base their Herrenvolk concept on a strict Calvinist Puritan dogma and an early idea of Darwinism and American eugenics based on Jim Crow and American Anti-miscegenation and segregation laws, the idea that the Afrikaner nation is ordained by God to be a morally superior nation over heathen (Kaffir) nations. The more germaphobe ‘politicians’ in the National Party build on the Herrenvolk concept with Nazi German Nuremberg Race Laws and German (Weimar) eugenics promoted by Hitler – the idea that the infusion of degenerate elements (Untermensch nations – including Blacks and Jews) into the bloodstream weaken the Herrenvolk nation so as to be morally inferior.
With the adoption of Krugerism as its core ideology and the conflating of Church and State, the National Party finds itself split in two camps over its historic sweep – on the one side are the Dutch Reformed ‘dominees’ like Dr. D.F. Malan and on the other side are the ‘politicians’ like Dr. H.F. Verwoerd.
Also, one group in the National Party sphere, like Malan and Sauer tend to favour ‘democracy’ as defined within the ‘white democratic constitution’ of South Africa to attain political objectives (as are the principles in the segregated states of the USA) – the Germaphobe inclined politicians in the National Party sphere like van Rensburg, Dönges, Vorster, Pirow, Diederichs etc. favour the ‘anti-democratic’ principle as defined by the Nazi “Führerprinzip”. This has bearing later as South Africa as they manipulate the constitution and laws to become a police state and with all opposition banned, imprisoned, deported or gagged – the Apartheid state mirrors a Nazi modus operandi and becomes a one party authoritarian state promoting a very thin veneer of wholesome ‘democracy’ to its faithful.
At the end of the day Apartheid – from a dogma standpoint, is a curious mix of Puritan Calvinism and Völkisch Nationalism. Legally it’s a curious mix of American Jim Crow segregation laws and Nürnberger Gesetze Nazi German race purity laws. Ideologically speaking Apartheid is a curious cocktail of Krugerism, Hertzogism, National Socialism and Fascism. None of which have anything to do with the British and their prevailing philosophy – which is a curious mix of monarchism and democratic liberalism.
Neo Nationalist Revisionism
As to Hélène Opperman Lewis book “Apartheid: Britain’s Bastard Child” released in 2017 blaming Apartheid as a psychological consequence of mutual trauma caused the British scorched earth and concentration camps policies of the South African War (1899-1902), and more recently reinforced by Albert Blake’s in his book “Jopie Fourie – ’n besinning” (a reflection) when he writes (my translation from Afrikaans):
Afrikaner Nationalism is increasingly seen as an attempt at self-protection – exclusively, partly to avoid repeating the unacceptable past (referring the South African War 1899-1902 and the Afrikaner Rebellion 1914-1915). This contributed to the emergence of hard-line Afrikaner nationalism which gave rise to an inflexible and, for others, an unacceptable racial policy. The Afrikaner wanted to avoid similar suffering as in the past at all costs, but by doing so overlooked the suffering of others. It became a vicious cycle from ‘abused children’ (under British rule) to ‘abusive parents’ (under apartheid) that is never broken, because there has been no healing for the unprocessed trauma.’131
Blake and Opperman Lewis are effectively extending an old National Party argument, the idea of ‘the politics of pain’ as the justification for nationalism and the identification of a ‘political’ and ‘economic’ enemy embodied therein, in the case of the Afrikaner Nationalists this led to extreme Anglophobia and the raison d’exister for Apartheid. This old Christian Nationalism dogma is largely disproven as rhetoric to drive a racially divided state. But in this case it has been given a new veneer, as in the social sciences Psychology has emerged as another method to understand history and in this case it has a tool called epigenetics.
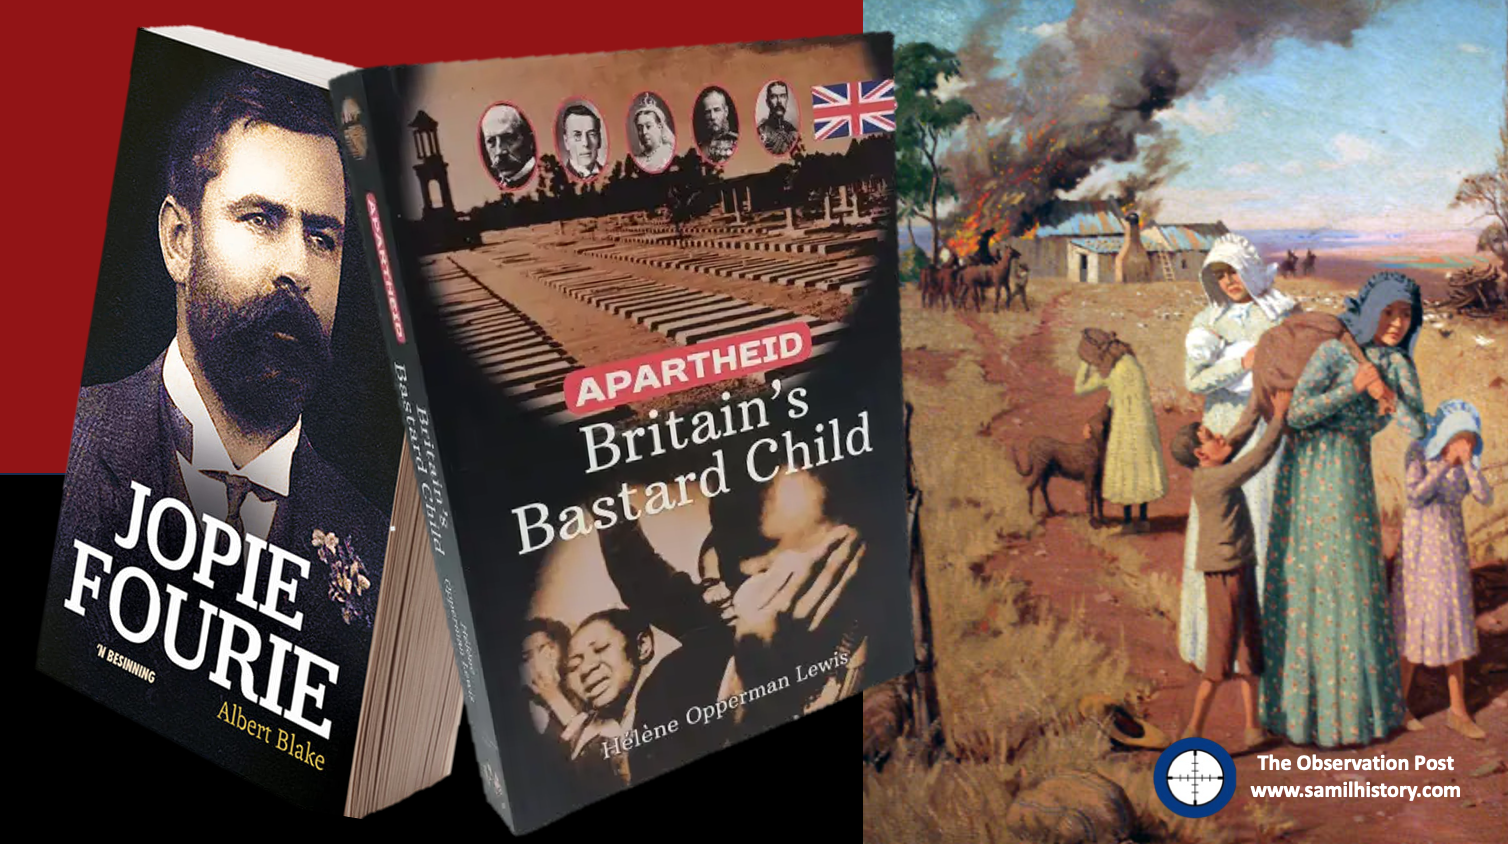
Epigenetics states that ‘trauma’ is carried from generation to generation in the DNA and called ‘Intergenerational trauma’. So according to Elsabé Brits in her review of Albert Blake’s book titled. Op dees aarde: Oorlogstrauma en die radikale Afrikaner-psige (On this earth: War trauma and the radical Afrikaner psyche) – it was the women’s and children’s suffering in both the white and black concentration camps that was passed on from one generation to the next and although they kept it to themselves it resurfaced generations later.132 The political landscape was impacted, Apartheid instituted as a protection mechanism and mutual suffering entered Afrikaner identity along with Anglophobia. Blake argues further that this Afrikaner Nationalism driven by trauma was accelerated by the 1914 Afrikaner Rebellion and Jopie Fourie’s execution.
There are a number of problems with this Neo Nationalist Revisionism. As can be be seen from the historiography of Apartheid, and the chronology of Apartheid, this revisionist approach really has unhinged itself from the historical method. For the following glaring reasons:
- It denies the historical fact that Apartheid’s origins lie in slavery and the abolishment thereof and rejects all contemporary historians who advocate this.
- It ignores the historic sweep of all the Boer conflict with Black tribes to establish Afrikaner led hegemony’s and skips out the establishment of the Afrikaner covenant (and Afrikaner Nationalism) on the back of the Boer invasion of the Zulu Kingdom (1837-1840) and warring with “Blacks” (and not the British) – Xhosa, Zulu, Pedi, Tswana etc. In the end ‘Apartheid’ is a system of primarily repressing ‘Black’ ambitions and not the ‘White’ ones (Boer or Brit).
- It denies the historical fact that the Dutch Reformed Church invented Apartheid in a fully independent ZAR in 1857 when it instituted separate worship, it even rejects the Afrikaner Nationalist’s and D.F. Malan’s claim that it was the Dutch Reformed Church who invented Apartheid – proof that it has nothing to do with the ‘British’ and it rejects all the contemporary historians who advocate this.
- It rejects the fact that the origins of Apartheid legislature lie in the Constitution of the ZAR in 1860, legislature that has no bearing on ‘the British’ or Westminster whatsoever.
- It does not recognise the advent of Krugerism in 1883 as the ideological bedrock of Christian Nationalism and Apartheid.
- Afrikaner Nationalism as a movement seeking regional paramountcy for the Afrikaner started in 1880 with the Afrikaner Bond – long before the South African War.
- The British Scorched Earth policy only impacts the ZAR and OFS boers, which before the Boer War account for less than half the white Afrikaner diaspora – the majority of Afrikaners are in the Cape and they do not take up arms against the British. The idea that they have a ‘shared’ experience with their northern brethren is an artificial one put forward by the Broederbond in 1938.
- Even within the concentration camps themselves, it does not acknowledge that the concentration camps contained Afrikaner families with British loyalist leanings because of Boer actions traumatising them (loyalists, hensoppers and joiners) and attempts to lump these groups with Bittereinder families as all been “traumatised by the British” as a “national whole”. Again leaning to the propaganda of the Broederbond in 1938 rather than to actual historic fact and simple statistics.
- It also attempts to lump the Black Concentration camp experience with the White Concentration camp experience as a mutually shared trauma, when leading historians on black concentration camps have proven this is not the case.
- Although acknowledging the idea of “the enemy of my enemy is my friend” with regards Nazi Germany, this Neo Nationalist Revisionism thinking does not adequately explain or even answer why Apartheid becomes so enamoured with National Socialist dogma, ideology, symbology and legislation – even after National Socialism is soundly defeated and exposed for what it is in 1945.
Epigenetics is a new scientific argument in the ‘nature versus nurture’ debate and a highly controversial one at that, what is currently known is that there is no real understanding as to ‘how’ the DNA signature comes about, in mice experiments it shows the phenomenon to be ‘very rare’ and trauma signatures are not transferable to the majority. It is also thought that it can be ‘un-learned’ through social conditioning and therefore the linear transference of trauma can be stopped.133
A case to consider here, is that through two World Wars and the London ‘Blitz’, more British civilians died at the hands of German Luftwaffe bombers from 1940-1941 in the London Blitz alone than the entire Boer population during the South African War 1899-1902, one would think that given “inter-generational’ trauma and ‘Post Traumatic Stress Disorder’ (PTSD) issues the modern Briton would simply “hate” the Germans and be in permanent lock-stop with all the psychological trauma caused by it all the time – and at the same time trying to conceive nationalist mechanisms to protect themselves from Germany in future. But the simple truth is, there is no such hatred for Germans in modern Britain, and that is very much a function of how modern Britons (and Germans for that matter) are socially and culturally “conditioned” – their socialisation process in effect.
The idea that Epigenetics, in the rare cases it can be found, can be ‘stopped’ through social conditioning brings up another point from a historic point of view. In the case of the Boer War, the simple fact that the vast majority of Black South Africans have no inter-generational shared trauma to the Boer War whatsoever, the legacy of the Black concentration camps is all but forgotten. In fact historians like Dr. Garth Benneyworth are having to revert to the forensic and archaeological record to account the history as it is so poorly captured in the written record and even more scarce in the verbal (spoken) record.
The reason that Black South Africans have not been conditioned as to their role in the Boer War is because it was pitched for decades by Afrikaner Nationalists as a “whites only” affair, the trauma of the Boer War almost exclusively on “white” women and children over a five decade long Broederbond ‘Christian Nationalist’ indoctrination and socialisation process – Blacks were merely “by-standers” and only “participated” here and there (and there are still some out there trying to push this narrative) – so simply put, generationally speaking, Black South Africans have “un-learned” it and have lost touch with any latent post traumatic stress (PTSD) it may or may not have caused.
What is however very existent in the Black community today is the trans-generational trauma caused by the Afrikaner Nationalists and their “Apartheid” ideology on the new generation of Black South Africans – and this is also very much a function of “conditioning” due to revolutionist and revisionist history rather than any DNA signature or for those Black South Africans “born free” any sort of latent PTSD.
To answer the question upfront, who does Apartheid’s “bastard child” belong to? Whose the parent? The uncomfortable truth is that many white Afrikaner writers and authors need to face facts – Apartheid has origin in their Church, it’s not birthed outside of it, it’s birthed inside it. The chronology and historiography of Apartheid is very clear and the responsible parent is not “the British” it’s in fact the “Dominee” and for many Afrikaners and their scribes that truism still cuts far too close to the bone to contemplate – its much easier to write to white Afrikaner popularism and appeal to a community desperately seeking absolution for Apartheid and blaming the British instead.
Written and Researched by Peter Dickens
Editors Notes
Please note, there will be many who will say … what about this battle, that protest or this strike that are not included? Where’s the Bambatha Revolt, the British war on the Pedi, the ZAR civil war with the OFS, the First Chimurenga, the Sharpeville Massacre, the Battle of Deville Wood, the Gun War, the Ngcayechibi’s War, the Malaboch War, the Griqua and the diamonds, Chinese indentured labour, the mfecane …. there’s LOADS missing!
That’s the problem, to do a chronology of Apartheid we come close to doing an entire chronology of South African history and it would exceed the limits of this blog. So, I’ve had to try and look at the thread of Apartheid – track where it has been part of constitutional changes as nation states have been formed, the legalise and the key players involved. Most important is the history of the ‘vote’ – the colour blind ‘franchise’ as that is critical to the development of Apartheid. Also critical is to look at the two different lines that shape Apartheid – the Dutch and the British and where and with whom the ‘invention’ of Apartheid lies – the “whodunnit”, and here we’ve had to include the history of the Dutch Reformed Church as it is critical – certainly when it comes to the “whodunnit”.
Time has also been spent on all three of The Boer Wars – The Transvaal Revolt (1880-1881), the South African War (1899-1902) and the Afrikaner Rebellion (1914-1915) as these three events are critical to modern psychological studies on the invention of Apartheid and the advent of Afrikaner Nationalist ‘politics of pain’ and ‘identity politics’ into the historiography of Apartheid.
I have also spent a little time to show that ‘segregation’ and the emancipation of people of colour between the British and the Dutch (and subsequently the Boer nations) follows an entirely different trajectory. Whilst British Imperialism is by no means perfect, and whilst over the course of historical sweep they have also instituted or have been privy to racist thinking and philosophy (the Victorian and Edwardian thinking on ‘civilisation’ and where nation states stood in relation to it), their trajectory in general follows a ‘progressive’ path to emancipation, the Liberal Democracy blueprint of Westminster and the Magna Carta guides it, whereas the Boer Nations and Afrikaner Nationalism with Krugerism at the centre of it has consistently followed a ‘regressive’ path to emancipation and served to deepen racial segregation and Apartheid – both before and after the South African War.
I’ve also included a little on Jan Smuts to show the track of ‘segregation’ as government policy sought by his party under Botha with the Land Act, and to show how Smuts evolves, firstly in his resistance to white miner colour bars and the Miners Revolt, then when he is finally back in the pound seats as Prime Minister from 1939 to 1948 his u-turn and rejection of segregation and Apartheid – this to show the development of Apartheid is not a linear phenomenon inherent to white Afrikaners and even within this diaspora there are a great many who are not in support of it.
Included, as it’s often purposefully ignored, and becoming increasing relevant as more information and material comes to light, is the ‘Nazification of the Afrikaner Right’ – the influence of Nazi Germany and National Socialism on the outcome of Apartheid as South Africans get caught up in a global conflict and Afrikaner Nationalist leaders and followers become enamoured and influenced by Nazi ideology.
I hope I’ve done it justice and the ‘essence’, the ‘golden thread’ is clear. I’ve stopped at the advent of the National Party and Apartheid as policy after 1948, as after that it’s less about who invented Apartheid and more about a chronology of “the struggle” from 1948 – 1994, something which has been drilled into every South African by now and a chronology all on its own.
Footnotes
- Creswicke, South Africa and the Transvaal War, Vol 1, 1 ↩︎
- Walker to George Richardson. 10 September 1839, Miscellaneous Letters, Box R4/5, Library of Friends; Backhouse, Narrative, 81. ↩︎
- Awake, South Africa’s Dutch Reformed Church – A House Divided, 16-19 ↩︎
- Binckes, The Great Trek Uncut, 192 ↩︎
- Harrison, The White Tribe of Africa, 14 ↩︎
- Awake, South Africa’s Dutch Reformed Church – A House Divided, 16-19 ↩︎
- Theal, History of South Africa since 1795, Vol. 2, 444 ↩︎
- Creswicke, South Africa and the Transvaal War, Vol 1, 13 ↩︎
- Gordon, The growth in Boer opposition to Kruger, 8 ↩︎
- Plaut, Promise and Despair – review by Milton Shain ↩︎
- Awake, South Africa’s Dutch Reformed Church – A House Divided, 16-19 ↩︎
- Feinstein, An economic history of South Africa, 53 ↩︎
- Goolam, Power and Resistance, 299-317 ↩︎
- Giliomee, The Afrikaners, 184–185. ↩︎
- Fitzpatrick, The Transvaal from Within, Chapter 1 e-book ↩︎
- Farrelly, The Settlement After the War in South Africa, 76 ↩︎
- Farrelly, The Settlement After the War in South Africa, 294 ↩︎
- Meintjes, President Paul Kruger: A Biography, 130-131 ↩︎
- Trapido, Imperialism, Settler Identities and Colonial Capitalism, 61 ↩︎
- Trapido, Imperialism, Settler Identities and Colonial Capitalism, 60 ↩︎
- Headlam, The Milner Papers, 178 ↩︎
- Ash, Kruger’s War, 127 ↩︎
- Guyot, Boer Politics, 103 ↩︎
- Roberts, Salisbury: Victorian Titan, 717 ↩︎
- Fitzpatrick, The Transvaal from Within, Appendix D, Volksraad debates. ↩︎
- Reitz, A Century of Wrong, 56 ↩︎
- van Heyningen, et al. Measles Epidemics of Variable Lethality in the Early 20th Century, 416 ↩︎
- Benneyworth, Work or Starve and correspondence between Peter Dickens and Dr Benneyworth – 8 November 2024 ↩︎
- Benneyworth, Work or Starve, 47 ↩︎
- Pakenham, Boer War, 491 ↩︎
- Judd & Surridge, The Boer War, 235 ↩︎
- Judd & Surridge, The Boer War, 235 ↩︎
- Warwick, Black People and the South African War, 164 ↩︎
- O’Connor, A short history of South Africa 1902 – 1989. ↩︎
- O’Connor, A short history of South Africa 1902 – 1989. ↩︎
- O’Connor, A short history of South Africa 1902 – 1989. ↩︎
- Katz, General Smuts and his First World War in Africa 1914 – 1917, 33-36 ↩︎
- Schreiner, A Letter on the South African Union and the Principles of Government. ↩︎
- O’Connor, A short history of South Africa 1902 – 1989. ↩︎
- O’Connor, A short history of South Africa 1902 – 1989. ↩︎
- Katz, General Smuts and his First World War in Africa 1914 – 1917, 48 ↩︎
- Marks, The Rand Revolt, the Red Scare, and the Roots of Apartheid, 203-204 ↩︎
- Katz, General Smuts and his First World War in Africa 1914 – 1917, 59 ↩︎
- Sampson, Capture of De Wet, 148 ↩︎
- Sampson, Capture of De Wet, 252 ↩︎
- Swart, Desperate Men and Bottomly, The Orange Free State and the Rebellion of 1914, 29-73 ↩︎
- Meer, Portrait of Indian South Africans, 44. ↩︎
- Shain , A Perfect Storm, 46 ↩︎
- Van Donk, Land and the church, 32 ↩︎
- Marks, The Rand Revolt, the Red Scare, and the Roots of Apartheid, 199-200 ↩︎
- Marks, The Rand Revolt, the Red Scare, and the Roots of Apartheid, 203 ↩︎
- Marks, The Rand Revolt, the Red Scare, and the Roots of Apartheid, 200 ↩︎
- Marks, The Rand Revolt, the Red Scare, and the Roots of Apartheid, 205 ↩︎
- Marks, The Rand Revolt, the Red Scare, and the Roots of Apartheid, 206 ↩︎
- Marks, The Rand Revolt, the Red Scare, and the Roots of Apartheid, 206 ↩︎
- Marks, The Rand Revolt, the Red Scare, and the Roots of Apartheid, 206 ↩︎
- Giliomee, The Making of the Apartheid Plan, 374 ↩︎
- Giliomee, The Making of the Apartheid Plan, 382 ↩︎
- O’Connor, A short history of South Africa 1902 – 1989. ↩︎
- D Harrison, The White Tribe of Africa, 99. ↩︎
- D Harrison, The White Tribe of Africa, 99 ↩︎
- Shain , A Perfect Storm, 41 ↩︎
- Shain, A Perfect Storm, 84 ↩︎
- Bouwer, National Socialism and Nazism in South Africa, 18. ↩︎
- Giliomee, The Making of the Apartheid Plan, 382 ↩︎
- Kgatla, Magwira. The defining moments for the Dutch Reformed Church mission policy ↩︎
- Kgatla, Magwira. The defining moments for the Dutch Reformed Church mission policy ↩︎
- Davenport, South Africa, A Modern History. ↩︎
- Bunting, The Rise of the South African Reich, 41 ↩︎
- Harrison, The White Tribe of Africa, 112 ↩︎
- Shain, A Perfect Storm,131 ↩︎
- Shain, A Perfect Storm,134 ↩︎
- Shain, A Perfect Storm, 132-133 ↩︎
- Shain, A Perfect Storm,133 ↩︎
- Giliomee, The Making of the Apartheid Plan, 382 ↩︎
- Shain, A Perfect Storm, 143-149 ↩︎
- Hyslop, White Working Class Women and the Invention of Apartheid, 76 ↩︎
- Louw, Die Vormingsjare van die kerkleier J.D. (Koot) Vorster, 337 ↩︎
- Bunting, The Rise of the South African Reich, 80 ↩︎
- Harrison, The White Tribe of Africa, 103 – 106 ↩︎
- Harrison, The White Tribe of Africa, 103 – 106. ↩︎
- Louw, Die Vormingsjare van die kerkleier J.D. (Koot) Vorster, 338 ↩︎
- Bunting, The Rise of the South African Reich, 80 ↩︎
- Maritz, My Lewe en Stewe‘, 97-270 ↩︎
- Rein Commission – unpublished ↩︎
- Shain, A Perfect Storm, 238 ↩︎
- Bunting, The Rise of the South African Reich, 85 ↩︎
- Shain, A Perfect Storm, 233 ↩︎
- Shain , A Perfect Storm, 237 ↩︎
- Giliomee, The Afrikaners, 441 ↩︎
- Mouton, Beyond the Pale, 18 ↩︎
- Bunting, The Rise of the South African Reich, 57 ↩︎
- Mouton, Beyond the Pale, 20 ↩︎
- Monama, Wartime Propaganda in the Union of South Africa, 1939 – 1945, 62 ↩︎
- Harrison, The White Tribe of Africa, 133 ↩︎
- van den Heever , General J.B.M Hertzog, Official Biography. ↩︎
- Furlong, Pro-Nazi Subversion in South Africa,16. ↩︎
- Shain, A Perfect Storm, 230 ↩︎
- Bunting, The Rise of the South African Reich, 104 ↩︎
- Giliomee, The Making of the Apartheid Plan, 379 ↩︎
- O’Mally Collection on-line: The leader of the Ossewabrandwag Johannes Frederik Janse Van Rensburg ↩︎
- Giliomee, The Afrikaners, 442 ↩︎
- Bunting, The Rise of the South African Reich, 92 – 93 ↩︎
- Bunting, The Rise of the South African Reich, 110 ↩︎
- Louw, Die Vormingsjare van die kerkleier J.D. (Koot) Vorster, 370 ↩︎
- Shain, A Perfect Storm, 248 ↩︎
- Hyslop, Segregation has fallen on evil days, 451 ↩︎
- Hyslop, Segregation has fallen on evil days, 438-460 ↩︎
- Bunting, The Rise of the Afrikaner Reich, 88 ↩︎
- Harrison, The White Tribe of Africa, 132 ↩︎
- Giliomee, The Making of the Apartheid Plan, 383 ↩︎
- Giliomee, The Making of the Apartheid Plan, 383 ↩︎
- Giliomee, The Making of the Apartheid Plan, 374 ↩︎
- du Toit, The Jewish Question and Verwoerd, 83 ↩︎
- Giliomee, The Making of the Apartheid Plan, 388 ↩︎
- Giliomee, The Afrikaners, 476 ↩︎
- Louw, Die Vormingsjare van die kerkleier J.D. (Koot) Vorster, 306 ↩︎
- Barber, South Africa in the Twentieth Century, 134 ↩︎
- Giliomee, The Afrikaners, 476 ↩︎
- Giliomee, The Making of the Apartheid Plan, 383 ↩︎
- Giliomee, The Making of the Apartheid Plan, 383 ↩︎
- Giliomee, The Making of the Apartheid Plan, 382 ↩︎
- British National Archives – Kew reference 2/908, 12 April 1948 – Oswald Pirow Statement. ↩︎
- van der Merwe. Herrenvolk Bloed vir die Afrikaner, 81 ↩︎
- van der Merwe. Herrenvolk Bloed vir die Afrikaner, 85 ↩︎
- Giliomee, The Making of the Apartheid Plan, 384 ↩︎
- Giliomee, The Afrikaners, 488 ↩︎
- Furlong. Pro-Nazi Subversion in South Africa, 1939-1941. ↩︎
- Furlong. Pro-Nazi Subversion in South Africa, 1939-1941 ↩︎
- Giliomee. The Making of the Apartheid Plan, 383 ↩︎
- Brits, Oorlogstrauma en die radikale Afrikaner-psige, Litnet on-line ↩︎
- Brits, Oorlogstrauma en die radikale Afrikaner-psige, Litnet on-line ↩︎
- Henriques, Can the legacy of trauma be passed down the generations? BBC on-line ↩︎
Bibliography and References:
Ash, Chris. Kruger’s War – the truth behind the myths of the Boer War. Durban: 30 degrees South Publishers, 2017.
Awake. South Africa’s Dutch Reformed Church—A House Divided 1983 (pages 16-19)
Barber, James. South Africa in the Twentieth Century: A Political History – In Search of a Nation State (History of the Contemporary World). Wiley-Blackwell. 1999.
Benneyworth, Garth. Work or Starve - Black concentration camps and forced labour camps in South Africa: 1901 – 1902. Publisher – The War Museum of the Boer Republics. 2024.
Binckes, Robin. The Great Trek Uncut: escape from British rule, the Boer exodus from Cape Colony, 1836. Helion Limited, 2013.
Bouwer, W. National Socialism and Nazism in South Africa: The case of L.T. Weichardt and his Greyshirt movements, 1933-1946. (MA Thesis, University of the Free State, Bloemfontein 2021)
Bottomly, John. The Orange Free State and the Rebellion of 1914: the influence of industrialisation, poverty and poor whitism.
British National Archives – Kew reference 2/908, 12 April 1948 – Oswald Pirow Statement.
Brits, Elsabé. Op dees aarde: Oorlogstrauma en die radikale Afrikaner-psige (War trauma and the radical Afrikaner psyche) Rebrieke. Litnet on-line review of Albert Blake’s book: Jopie Fourie Jopie Fourie – ’n besinning 2024-10-18
Bunting, Brian. The Rise of the Afrikaner Reich. Penguin Books, 1964.
Creswicke, Louis. South Africa and the Transvaal War. Vols. 1-7. First Published by T. C. & E. C. Jacket, 1900-1901.
Davenport, TRP. South Africa, A Modern History. Cambridge Commonwealth Series. London: Macmillan Publishers, 1977.
du Toit, Karen S. The Jewish Question and Verwoerd: Editorship of Die Transvaler 1937-1948. Masters Thesis, University of the Witwatersrand, Johannesburg, 2019.
Farrelly, Michael. The settlement after the war in South Africa. London : Macmillan & co., ltd. 1900.
Feinstein CH. An economic history of South Africa: Conquest, Discrimination and Development. Cambridge University Press. 2005.
Fitzpatrick, J.P. The Transvaal from Within. London: William Heinemann. 1899
Furlong, Patrick J. National Socialism, the National Party and the radical right in South Africa, 1933-1948 (D.Phil. Thesis, University of California), 1990
Furlong, Patrick J. Pro-Nazi Subversion in South Africa, 1939-1941. 1988. Ufahamu: A Journal of African Studies, 16(1).
Giliomee, Hermann. The Making of the Apartheid Plan, 1929-1948. Journal of Southern African Studies, Vol. 29, No. 2, Taylor & Francis, Ltd. 2003, pp. 373-392
Giliomee, Hermann. The Afrikaners: Biography of a People. C. Hurst & Co. Publishers. 2003.
Gordon, C.T. The Growth of Boer Opposition to Kruger, 1890-1895. Oxford University Press. 1970
Hopkins, J. Castell. Halstead, Murat. South Africa and the Boer-British War, Volume I – Comprising a History of South Africa and its people, including the war of 1899 and 1900 – e-book release 2012.
Harrison, David. The White Tribe of Africa: South Africa in Perspective. Macmillian Publishers. 1981
Headlam, Cecil (ed). The Milner Papers (2 vols: South Africa 1897-1899 and South Africa 1899-1905). Cassell, London. 1931 and 1933.
Henriques, Martha. Can the legacy of trauma be passed down the generations? BBC On-line 26 March 2019.
Hyslop, J. ‘Segregation has fallen on evil days’: Smuts’ South Africa, global war, and transnational politics, 1939–46. Journal of Global History (2012), 7, 438–460.
Hyslop, J. White Working Class Women and the Invention of Apartheid: ‘Purified’ Afrikaner Agitation for Legislation against Mixed Marriages 1934-1939.
Judd, D & Surridge, K. The Boer War. London: John Murray Publishers, 2002.
Katz, David Brock. General Smuts and his First World War in Africa 1914 – 1917. Jonathan Ball Publishers, Johannesburg, 2022.
Louw, Reinier Willem. Die Vormingsjare van die kerkleier J.D. (Koot) Vorster 1909 – 1956. Masters Thesis, UNISA, 1994.
Maritz, Manie ‘My Lewe en Strewe’ Pretoria 1939
Marks, Steven. “Workers of the World Fight and Unite for a White South Africa”: The Rand Revolt, the Red Scare, and the Roots of Apartheid. Clemson University. 2020.
Meer, F. Portrait of Indian South Africans. Durban: Avon House. 1969
Meintjes, Johannes. President Paul Kruger: A Biography. London. 1974.
Monama, FL. Wartime Propaganda in the Union of South Africa, 1939 – 1945 (Dissertation for the degree of history, University of Stellenbosch. Stellenbosch, 2014)
Mouton FA, ‘Beyond the Pale’ Oswald Pirow, Sir Oswald Mosley, the ‘enemies of the Soviet Union’ and Apartheid 1948 – 1959, Journal for Contemporary History, 43, 2 (2018).
Mouton, F.A. The Opportunist: The Political Life of Oswald Pirow, 1915-1959. Pretoria: Protea Boekhuis. 2022
Milton, Shain. A Perfect Storm – Antisemitism in South Africa 1930-1948. Jonathan Ball. 2015
O’Connor, Damian. A short history of South Africa 1902 – 1989. Independent Publisher. 2019
O’Mally Collection on-line: The leader of the Ossewabrandwag Johannes Frederik Janse Van Rensburg
Pakenham, Thomas. The Boer War. Random House Publishing Group. 1979
Plaut, Martin. Promise and Despair. The First Struggle for a Non-Racial South Africa – a review by Professor Milton Shain. The Journal of the Helen Suzman Foundation. Issue 80. 2017.
Pugh, M. ‘Hurrah for the Blackshirts!’ – Fascists and Fascism in Britain Between the Wars. Pimlico. 2006.
Reitz, Francis William. A Century of Wrong. London, “Review of reviews” office, 1899.
Roberts, Andrew. Salisbury: Victorian Titan. Phoenix Press. 2000.
Sampson, Philip J. The Capture of De Wet. The South African Rebellion 1914 – Published Edward Arnold, London, 1915.
Schreiner, Olive. Closer Union – A Letter on the South African Union and the Principles of Government. William Brendon and Son Publishers, London. 1909.
Swart, Sandra. Desperate Men: The 1914 Rebellion and the Polities of Poverty’ in South African Historical Journal, Vol 42.
Theal GM. History of South Africa since 1795. London Allen & Unwin, 1915.
Thias Kgatla & Anderson Magwira. The defining moments for the Dutch Reformed Church mission policy of 1935 and 1947. Missionalia (Online) vol.43 n.3 Pretoria 2015.
Trapido, Stanley. Imperialism, Settler Identities and Colonial Capitalism: The Hundred Year Origins of the 1899 South African War. Cambridge University Press. 2011
Goolam, Vahed. Power and Resistance: Indentured Labour in Colonial Natal, 1860 – 1911. Man In India, 92 (2).
Guyot, Yves. Boer Politics. London. 1900
van Donk, M. Land and the church: The case of the Dutch Reformed Churches. Cape Town: Western Province Council of Churches. 1994.
van Heyningen, Elizabeth et al. Measles Epidemics of Variable Lethality in the Early 20th Century, November 2013 American Journal of Epidemiology, 179(4).
van den Heever, C.M. General J.B.M Hertzog: Official biography. Johannesburg: A.P. Boekhandel, 1943.
van der Merwe, Werner. Herrenvolk Bloed vir die Afrikaner: Veertig Jaar Duitse wees kinders (1948-1988) UNISA on line journal
Watson, R.I. ‘I Will Gather All Nations and Tongues’: Christian Missions and Racial Integration in the Cape Colony in the Aftermath of Abolition. Kronos vol. 31 n.1. Cape Town. 2005