Recounting South African sacrifice on the HMS Cornwall
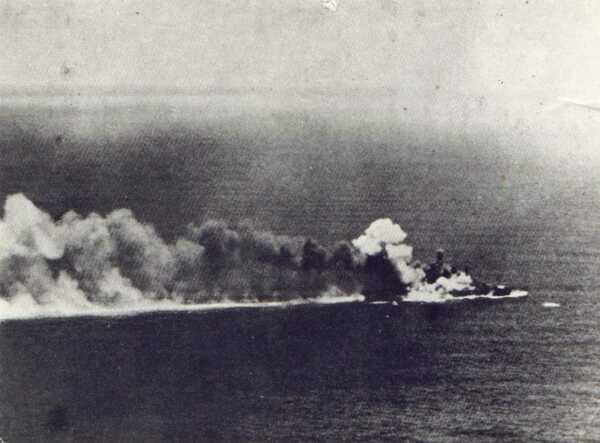
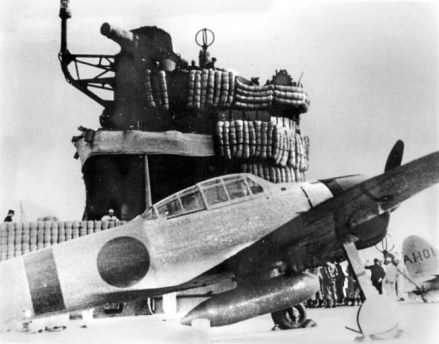
This is an image of the HMS Cornwall under attack just prior to her sinking, it was taken by the Japanese attack aircraft. A number of South African Navy personnel were lost with this ship whilst seconded to the Royal Navy during World War 2.

As Simonstown in South Africa was a British Naval base thousands of South Africans in WW2 served in the Royal Navy as well as in the South African Naval Forces (SANF). The loss of a heavy Cruiser the size of the HMS Cornwall is bound to include a South African honour roll and unfortunately this one does. Read on for their story.
HMS Cornwall Short History
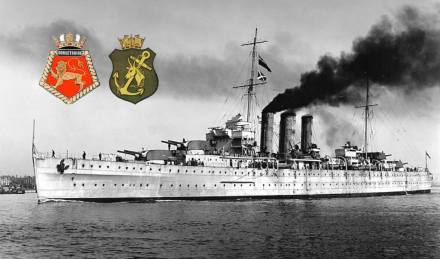
 HMS Cornwall was a heavy cruiser of the Kent-subclass of the County-class. When World War 2 began in September 1939, Cornwall was transferred from her pre-war China Seas operations to the Indian Ocean and joined Force I at Ceylon.
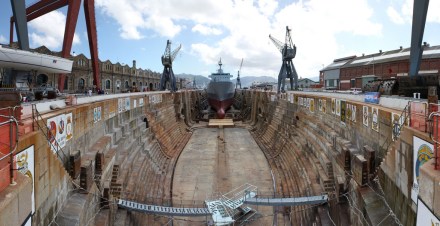
On 5th October 1939, she was involved in the search for the German pocket battleship Admiral Graf Spee. Between the 8th and 14th February 1940, she was docked at the Selborne dry dock at Simonstown, South Africa. Its was here that she would have taken onboard a large contingent of South Africans either volunteering for the Royal Navy or seconded to the Royal Navy as members of The South African Naval Forces stationed there.
In September 1940, together with HMS Delhi, she intercepted Vichy-French light cruiser Primauguet and tanker Tarn, forcing them to return to Casablanca, Morocco. By January 1941, HMS Cornwall returned to the Selborne dry dock in South Africa for refitting, at the same time taking on more South African personnel.
Sinking of the German Auxiliary Ship Pinguin
The HMS Cornwall was on patrol in the Indian Ocean of Seychelles when she engaged and sank the German ship ‘Pinguin’ on the 8th May 1941, Pinguin was known to the German Navy as Schiff 33, and designated HSK 5. The most successful commerce raider of the war, she was known to the British Royal Navy as Raider F.
Unfortunately, without the knowledge of Cornwall’s crew, Pinguin sank along with 200 Allied prisoners of war in addition to 232 Germans lost (60 German crew members and 22 Allied prisoners were rescued). She returned to Durban, South Africa to repair her stern, which was damaged during the battle against Pinguin; the repairs lasted until 10th June 1941.
HK Pinguin
On the 25th November 1941, Cornwall intercepted the Vichy-French merchant vessel Surcouf in the Indian Ocean off the east coast of Somalia. Surcouf was originally en route to Djibouti with food, but was forced to sail to Djibouti instead.
Between January and March 1942, Cornwall escorted convoys between Ceylon and the Sunda Strait in the Dutch East Indies. In March 1942, she was sent to Colombo, Ceylon in preparation for a possible Japanese attack into the Indian Ocean.
The Easter Sunday Raid
With Japan’s entry into the war, and especially after the fall of Singapore, Ceylon (now Sri Lanka) became a front-line British base. The Royal Navy’s East Indies Station and Eastern Fleet was moved to Colombo and Trincomalee.
Admiral Sir James Somerville was appointed as the commander of the British Eastern Fleet, and he decided to withdraw main component the fleet to Addu Atoll in the Maldives, leaving a small force to defend Ceylon (Sri Lanka) consisting of an aircraft carrier, the HMS Hermes, two heavy cruisers – the HMS Cornwall and HMS Dorsetshire, one Australian Destroyer the HMSAS Vampire and the flower class corvette, the HMS Hollyhock.
The Royal Navy’s own ‘Pearl Harbour’
The Imperial Japanese Navy, in much the same way and with the same objectives that were used at Pearl Harbour against the American fleet planned a decisive attack of the British Eastern Fleet to end their presence in the North Indian and Pacific oceans. Unaware that the main body of the British fleet had moved to the Maldives, they focused their plan on Colombo (the commercial capital of modern-day Sri Lanka).
The planned Japanese attack was to become collectively known as the Easter Sunday Raid and the Japanese fleet comprised five aircraft carriers plus supporting ships under the command of Admiral Chuichi Nagumo.
In an almost exact copy of the raid on the American fleet at Peal Harbour (as if no learnings were made by the Allies), on 4 April 1942, the Japanese fleet was located by a Canadian PBY Calatina aircraft, the Catalina radioed the position of the Japanese Fleet to The British Eastern Fleet which alerted the British to the impending attack before it was shot down by six Japanese Zero fighters from the carrier Hiryu,
However, despite the warning Nagumo’s air strike on Colombo the next day, Easter Sunday 5th April 1942 they did manage to achieved near-complete surprise (Pearl Harbour was also attacked on a weekend). The British Radar installations were not operating, they were shut down for routine maintenance (another parallel with the attack on Peal Harbour).

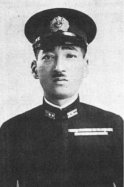
Captain Mitsuo Fuchida
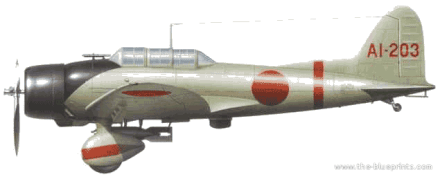
The first attack wave of Japanese planes took off in pre-dawn darkness (30 minutes before sunrise) from the aircraft carriers Akagi, Hiryu and Soryu, moving about 200 miles south of Sri Lanka. The first attack wave of 36 fighters, 54 dive bombers, and 90 level bombers was led by Captain Mitsuo Fuchida the same officer who led the air attack on Pearl Harbour.
The Heavy Cruisers, HMS Cornwall and HMS Dorsetshire set out in pursuit of the Japanese. On 5 April 1942, the two cruisers were sighted by a spotter plane from the Japanese cruiser Tone about 200 miles (370 km) southwest of Ceylon. A wave of Japanese dive bombers led by Lieutenant Commander Egusa took off from Japanese carriers to attack Cornwall and Dorsetshire, 320 km (170 nmi; 200 mi) southwest of Ceylon, to sink the two ships.
In the attack, the Japanese airman flying Japanese D3A-1 ‘VAL’ dive bombers, then dropped 9 bombs on the HMS Cornwall itself ( 250- and 550-pound bombs) and six near misses, the HMS Cornwall becoming dead in the water within minutes, the HMS Cornwall sank in about 12 minutes after the first hit (and Dorsetshire suffered the same fate).
An eye-witness account from a South African officer on board the Cornwall recounts the ferocity and speed of the attack:
Sub-Lieutenant R. Ellis Brown, son of the mayor of Durban, said he was down below in the control room of the high angle guns when the warning was flashed that aircraft were attacking.
“Almost immediately afterwards there was a terrific explosion and the ship lifted out of the water and listed to port, “ he said. “This was followed almost immediately by another hit. The lights went out and I continued on to the sick bay. I went forward from there to contact the control officer and shortly after I left, a bomb dropped on the sick bay, killing most of the men there. I could not get through on account of the flames, so went to the aft deck. Here we managed to get a whaler and also five or six floats. We got the men off and I looked up and saw a dive-bomber coming down at me. I saw the bomb released at about 700 feet and it appeared to be coming straight at me. Although I knew that if a bomb appeared to be coming straight at you it would actually fall far beyond. I must say I did not like it one bit. The men jumped into the water and finally the two other officers and myself left on this deck followed them.”
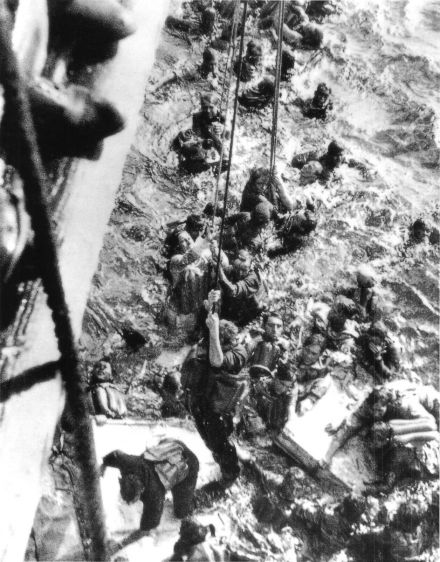
Sub-Lieutenant Ellis Brown said that the men were in the water for about 30 hours. The wounded were placed in a motor boat which had floated off when Cornwall sank. The remainder stayed in the water, hanging on to debris and floats. To the discomforts the men suffered in the water was added the horror of knowing they were in shark-infested waters. He recalls, “We saw several fins cutting the water but as soon as they came near, the men would kick and shout and they would make off.”
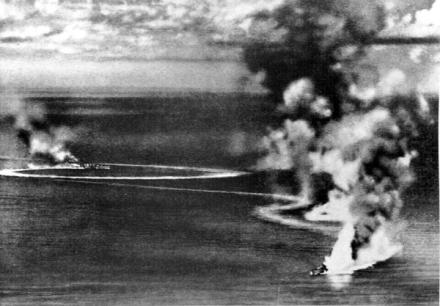
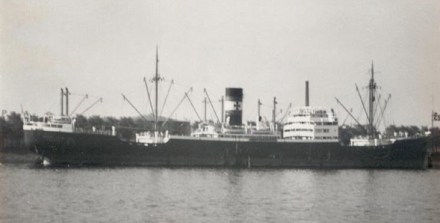
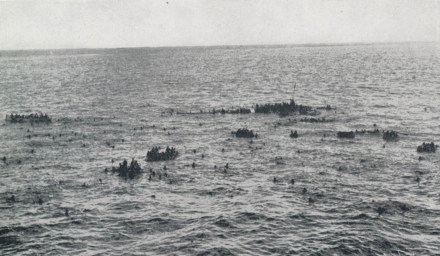
Japanese combat photograph showing the Royal Navy heavy cruisers HMS Dorsetshire and HMS Cornwall on fire and sinking
HMS Cornwall was sunk in position 01º54’N, 77º45’E. All boiler and engine rooms were out of action within minutes, thereby resulting in a lack of power to the pumps and fire fighting equipment. In all the men spent 30 hours in the water, before a combined rescue of the HMS Dorsetshire men (also in the water) and HMS Cornwall’s men by the HMS Enterprise, HMS Paladin and HMS Panther. In total 192 of Cornwall’s men were lost, of a very high proportion – 23, were South African. Here is the South African Naval Forces honour roll (MPK means ‘Missing Presumed Killed’) from the sinking;.
HMS Cornwall – South African Navy Personnel Lost, Honour Roll
 BESWETHERICK, Hedley C, Ordinary Seaman RNVR, 86671 (SANF), MPK
BOTES, John S, Stoker 2c RNVR, 68924 (SANF), MPK
COMMERFORD, Noel P, Able Seaman RNVR, 66493 (SANF), MPK
CRAWFORD, Cecil E, Act/Engine Room Artificer 4c RNVR, 67922 (SANF), MPK
DU PREEZ, Charles P H, Able Seaman, 68175 (SANF), MPK
DUTTON, Charles C, Stoker 2c RNVR, 68949 (SANF), MPK
HANSLO, Raymond F, Able Seaman RNVR, 68295 (SANF), MPK
KEITH, Kenneth I B, Able Seaman RNVR, 66742 (SANF), MPK
KENYON, Graeme A B, Able Seaman RNVR, 68002 (SANF), MPK
KIRSTEN, Monty G W, Able Seaman RNVR, 68917 (SANF), MPK
LAW, Edward, Act/Engine Room Artificer 4c RNVR, 66760 (SANF), MPK
MCDAVID, William K, Stoker 2c RNVR, 69138 (SANF), MPK
MITCHELL, William A, Stoker 1c RNVR, 68796 (SANF), MPK
PALMER, Walter A, Able Seaman RNVR, 68344 (SANF), (rescued, aboard HMS Enterprise), Died of Wounds
SPENCE, Noel W, Ordinary Seaman RNVR, 68732 (SANF), MPK
SQUIRES, John E, Ordinary Seaman RNVR, 68728 (SANF), MPK
STEPHEN, Eric B, Ordinary Seaman RNVR, 68861 (SANF), MPK
SWANN, Lawrence T, Stoker 1c RNVR, 68710 (SANF), MPK
THORPE, Maurice, Stoker 2c RNVR, 69140 (SANF), MPK
VERSFELD, Peter H S, Able Seaman RNVR, 68859 (SANF), MPK
VINK, Benjamin F, Ordinary Seaman RNVR, 68860 (SANF), MPK
WILLSON, Gerald F, Stoker 2c RNVR, 69006 (SANF), MPK
WRIGHT, Thomas H, Able Seaman RNVR, 68039 (SANF), MPK
In earlier incidents on HMS Cornwall two South Africans lost their lives they are also remembered here:
AINSLIE, Roy, Petty Officer, 66382 (SANF), died on 5 September 1940
HAWKINS, Reginald D, Able Seaman, 66700 (SANF), died of illness 4 March 1942
Some South Africans may not accounted in the above list as they may have been Royal Navy personnel having volunteered to serve in the Royal Navy, there is a long list of South Africans not accounted on the Navy’s honour rolls because of the complication of citizenship, the position of the South African Union in supporting the war and the nature of Simonstown as British territory.
Related work
The Japanese Easter raid was to bring a terrible toll on not only the Royal Navy, but also on the South African Navy whose personnel were involved. It remains the South African Navy’s darkest days, as not only were the HMS Cornwall and HMS Dorsetshire full of SANF personnel, so too were the other two ships sunk later in this engagement on the 9th April 1942 by the same Japanese raiders – the HMS Hermes, see related article by clicking this link (“Dante’s Inferno”; Recounting South African sacrifice on the HMS Hermes) and HMS Hollyhock, see related article by clicking this link ( “She immediately blew up”; Recounting South African sacrifice on the HMS Hollyhock).
The HMS Dorsetshire is featured in a full Observation Post article, follow by clicking this link (“They machine gunned us in the water”; Recounting South African Sacrifice on the HMS Dorsetshire).
In Conclusion
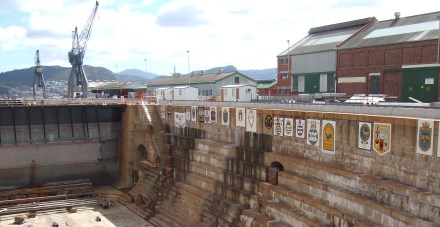
This history is lost to most South Africans, however good work is now been done to try and correct and up-date these honour rolls and recount the full depth of South Africa’s involvement in warfare at sea during World War 2. We, as South Africans, do however have an excellent tradition at the Selborne Graving Dock, the dry docks in Simonstown, allowing visiting crews to paint their ships emblems on the docks walls, it is an excellent record of many of the proud Royal Navy fighting ships who visited our shores in World War 2 and on whom many South Africans served. Next time you are there look out them, including the HMS Cornwall.
Their names have not been forgotten.
Written and researched by Peter Dickens, with extracts taken from Wikipedia, Force-z survivors official webpage, the British Broadcast Corporation account on the war (BBC) WW2 The Peoples War. Casualty Lists of the Royal Navy and Dominion Navies, World War 2 by Don Kindell.

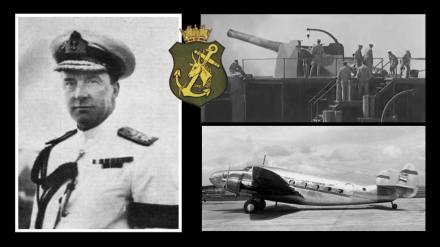
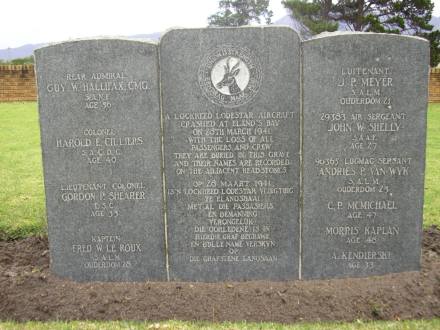
 This Easter we also remember Rear Admiral Guy Hallifax, the most senior South African Naval officer to lose his life during World War 2. His contribution to the Navy is significant as he literally is one of the founding fathers of the modern South African Navy as we know it.

 The HMS Dorsetshire was a heavy cruiser and after commissioning in 1930 became the flagship of the 2nd Cruiser Squadron Atlantic Home Fleet. Before the war, from 1933 until 1936, HMS Dorsetshire served on the Africa Station. Her first recorded docking in the Selborne dry dock at Simonstown, South Africa was on 5 January 1934.
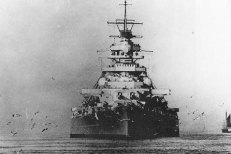

 Their names have not been forgotten.
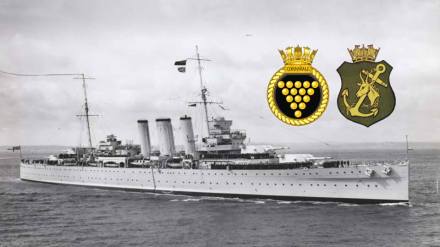
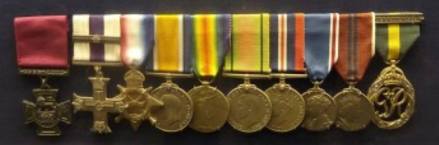
 This South African’s Victoria Cross turns 100 on the 21/22 March 2018, so today we honour another true South African hero and Victoria Cross recipient, and this man, Captain Reginald Frederick Johnson Hayward VC MC & Bar is one very extraordinary South African.
 CITATION
 Reginald worked at the British Broadcasting Corporations (BBC) Publications Department from 1947 to 1952 and as games manager of the Hurlingham Club from 1952 to 1967.