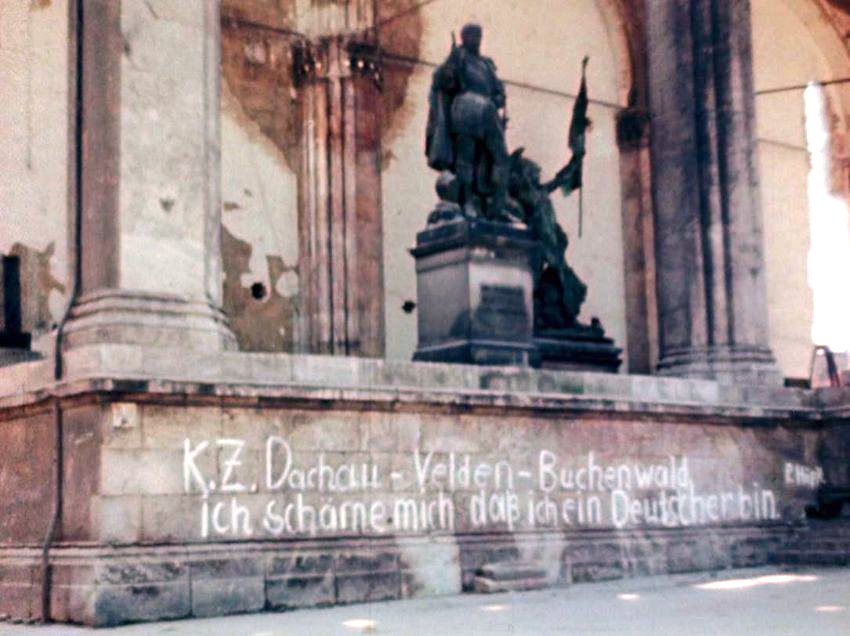
The Holocaust, the reason Freemasonry became a ‘secret’ order – World War 2 (1939-1945).
By Peter Albert Dickens
Incorrectly understood by many is the idea that Freemasonry is a “secret organisation” – however understood by only a few is why it is regarded as secretive in the first place. Upfront there’s noting secretive about it, Masonic temples and halls can be found the world over – hundreds of them, clear as a bell they stand openly in towns and suburbs all over the place, anyone is free to enquire. Of the organisation itself – many of its members are very public, and as an organisation with charity as its primary purpose they operate perfectly happily and openly in their communities and they do essential and good charity work. You can even jump onto ‘google’ and find everything you need to know from the freemasons themselves just using a simple search bar – or just buy a credible book or read a proper thesis on it – its all there, secrets included. So what’s with the big ‘Secret’ when clearly there is nothing really secretive about it?
Here’s the thing, anyone researching Freemason history will find a time before the Second World War (1939-1945) when Freemasons and masonic lodges were overtly in the public space. They participated in parades and fetes wearing all their regalia, took part in community events, photographs of all the lodge members and their names are easily found in countless local newspaper and magazine articles, the ‘worshipful masters’ quoted on many community affairs and even speaking publicly, keynote people in their society – just about everyone knew who belonged to their local lodge and they made no secret about it.
So what happened?
The answer lies in World War 2 (1939-1945), it lies in the relationship between the Holocaust and Freemasonry and how this impacted Freemasons in South Africa and in the rest of the world during and even after the war. The war is the primary reason Freemasonry “went dark” and “secret” – it is not because of any sinister illuminati’s plan to take over the world or a strange Hollywood inspired desire to protect Jesus’ bloodline by ‘rose’ hall.
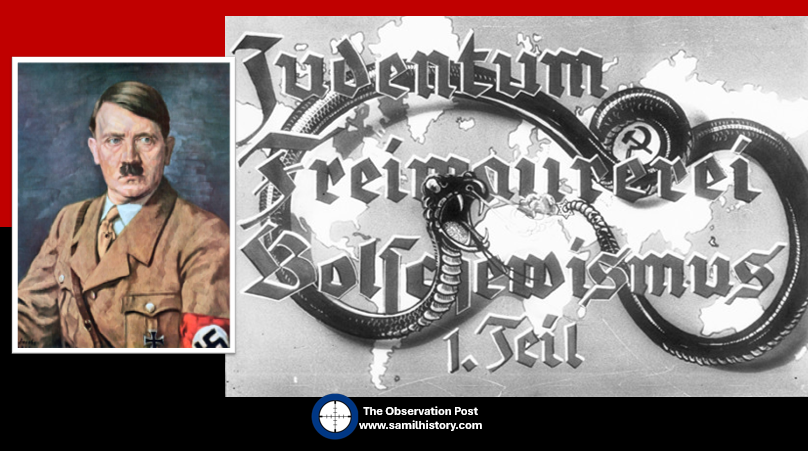
Adolf Hitler and Nazi anti-Judaism, anti-Freemasonry and anti-Bolshevik propaganda
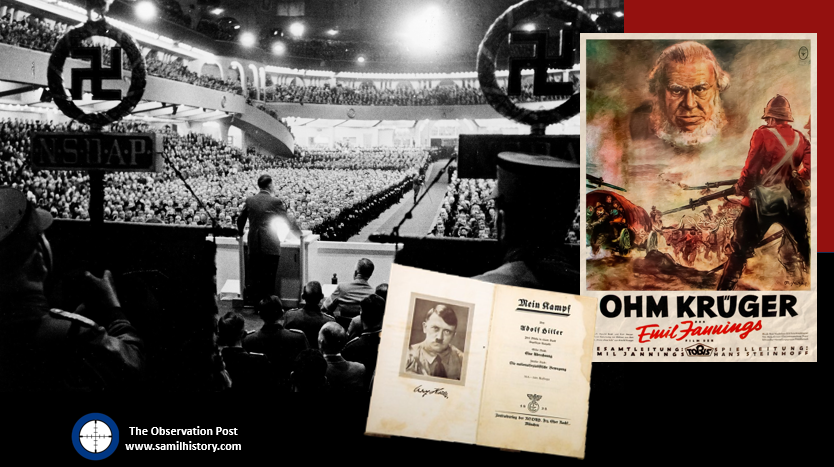
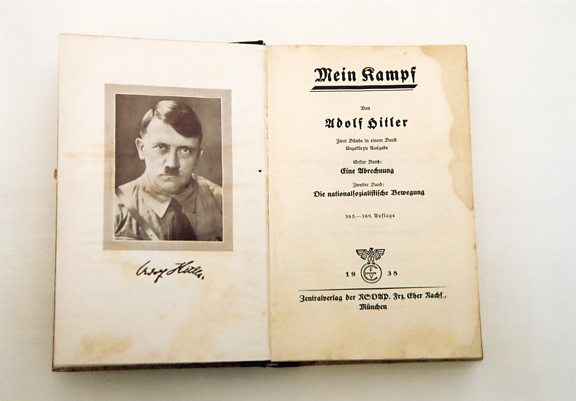
The balance Freemasons enjoyed between themselves and the societies in which they function was fundamentally changed by Adolf Hitler and his cabal. Hitler began by associating a Freemason’s conspiracy with that of a Jewish conspiracy in his political testament Mein Kampf. He said:
“To strengthen (the Jew’s) political position, he tries to tear down the racial and civil barriers which for a time continue to restrain him at every step … in Freemasonry, which has succumbed to (the Jew) completely, he has an excellent instrument with which to fight for his aims and put them across. The governing circles and the higher strata of the political and economic bourgeoisie are brought into his nets by the strings of Freemasonry, and never need to suspect what is happening.”1
Hitler would even declare that the League of Nations, the source of Germany’s dishonour, was controlled by Freemasonry. He said in a speech to Nazi faithfull in Munich in 1928:
“All of Germany is being delivered to the Freemasons through the League of Nations.”2
As early as the 5 August 1934, in a speech delivered at Essen, Dr. Wilhelm Frick, the Reich Minister of the Interior, declared:
‘It is inappropriate that a secret society with obscure aims should continue to exist in the Third Reich. It is high time that the Freemasons’ Lodges should disappear in Germany just as they have disappeared in Italy. If this is not realised in Masonic circles, I will soon help them in this direction”.3
By 28 October 1934, Frick issued a decree defining the Masonic lodges as “hostile to the state” and hence subject to closure and having their assets confiscated.4
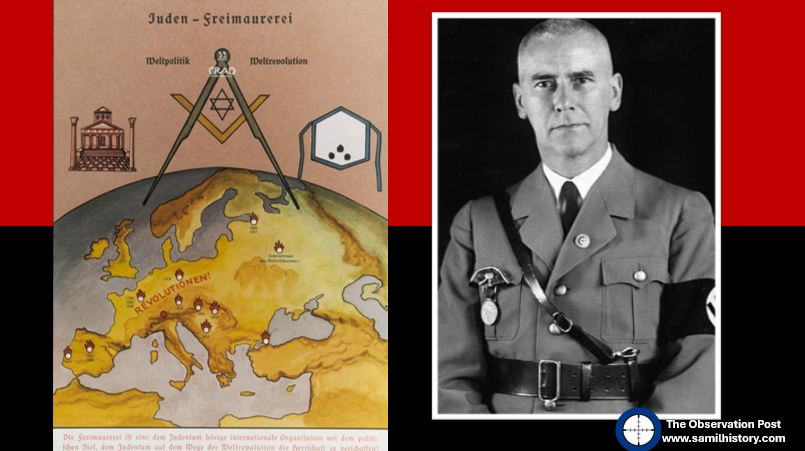
Anti Masonic propaganda poster no. 64 and portrait of Dr. Wilhelm Frick.
Nazi propaganda stated on political poster no. 64 in a series of issued posters entitled “Erblehre und Rassenkunde” (Theory of Inheritance and Racial Hygiene), published by the Verlag fuer nationale Literatur (Publisher for National Literature), Stuttgart in 1935:
‘Freemasonry is an international organisation beholden to Jewry with the political goal of establishing Jewish domination through world-wide revolution.’5
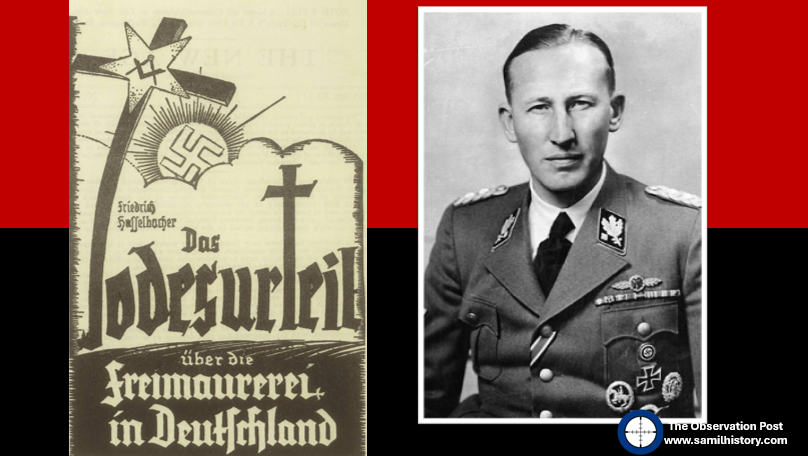
Chief of Security Police and SD, Reinhard Heydrich regarded the Masons, along with the Jews as the
“most implacable enemies of the German race.”
In 1935 Heydrich argued for the need to eliminate and root out these “enemies” from the German world. Heydrich then created a special section of the SS Security Service (Sicherheitsdienst; SD), Section II/111, to deal specifically with Freemasonry.6
Nazi anti-Masonic propaganda and portrait of Reinhard Heydrich.
The SD argued that Freemasonry, through control of the media and exercising political influence was now in a position to provoke war, subversion, and revolution. In 1939, the SD amalgamated with another SS security department – Section VII B 1 of the Reich Security Main Office (Reichssicherheitshauptamt; RSHA), and it continued to devote itself to investigating Freemasonry.
The Exhibitions
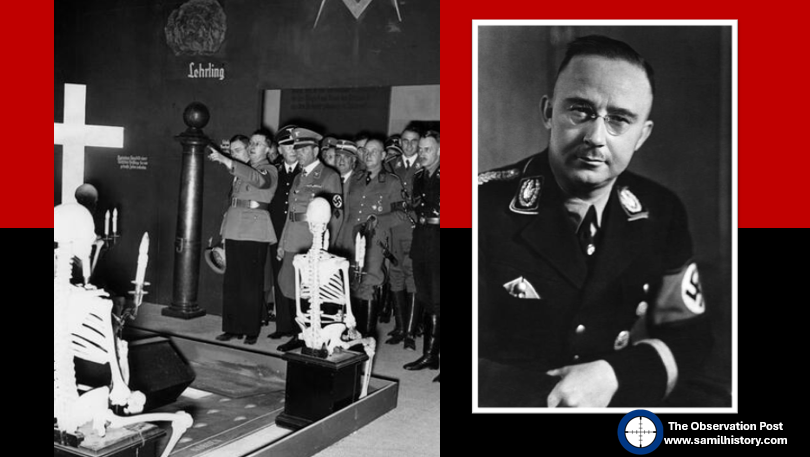
From 1938 as Nazi Germany conquered Europe, the Germans forcibly dissolved Masonic organisations, ransacked lodges and confiscated their assets, monies and documents. Cultural artefacts and Masonic items were seized and sent to Berlin for a special rather sinister and ghoulish exhibition at the Berlin Museum. This in turn was sent to other capital cities in occupied Europe. Paris, France hosted an anti-Masonic exhibition in October 1940, as did Brussels in February 1941, so too did Nuremberg. Other anti-masonic exhibitions took place in Hannover, Düsseldorf and Erlangen all of which were aimed to ridicule and direct hatred towards Freemasons and to heighten fears of a Jewish-Masonic conspiracy.
In fact one complete lodges’ interior was removed from the Isle of Jersey for a “British” Freemasonry exhibition in Germany, this occurred after a night of heavy bombing on 29th June 1940, and the Island was invaded by Nazi Germany. Despite promises given by German commanders that Freemasons and Masonic property were not at risk, the Masonic Temple was completely ransacked and shipped off to Germany.7
The role of seizing all this wealth for the Reich was given to Heinrich Himmler, the Reichführer of the Schutzstaffel (the SS), Himmler had special dislike for Freemasons, and happily ransacked Masonic lodges out of both greed and his personal ideology.8
Nazi anti-Masonic exhibition and portrait of Heinrich Himmler
In all this Himmler and the SS established an interest in non-negotiable lodge property in order to further their study of Freemasonry. In 1935, guidelines were published as to the categorising of Lodge items, photos taken of them “in situation” and then removed for the anti-masonic (and anti-Jew) “exhibitions” and “museums”.
It is also worth noting that the ransacking of Masonic lodges did not just include the taking of items for exhibition, it also included the raiding of Lodge bank accounts, the taking of valuable jewels and artworks and the seizing of bank accounts of predominant Freemasons. Most lodge contents went to private homes, auction blocks or the smelter, documents and archive materials went to the Geheimenreichsarchiv (The Nazi Top Secret Government archive).9
Himmler acted as a broker for valuable acquisitions, but “he also had a special interest in lodge rituals. He was convinced high-degree Masonry involved a “blood ritual” in which:
‘the candidate cuts his thumbs and lets a little blood drop into a cup. Wine is then mixed in the bowl. Next a bottle containing the blood of the other brothers (from when they first performed this ritual) is added to the cup. The candidate then drinks the liquid, thus imbibing the blood of all Freemasons, including Jews. Thus the triumph of the Jews is complete.’10
Himmler pointed to this ritual as the means whereby Jews use Freemasonry to literally taint the blood of Aryans and to him this wildly unhinged idea of a Freemason ritual was proof positive of this. ‘The truth of the matter is that some do indeed have rituals that involve drinking wine, but references to blood are symbolic, much like the rituals performed in Christian churches.’11 This of course did not deter Himmler whose obscure view of Freemasonry was used to “study freemasonry” by ransacking lodges and looting their bank accounts for wealth.
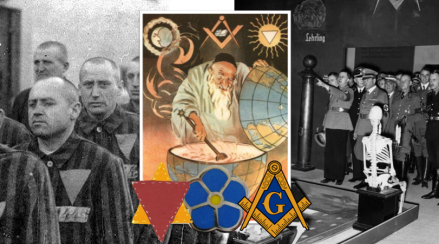
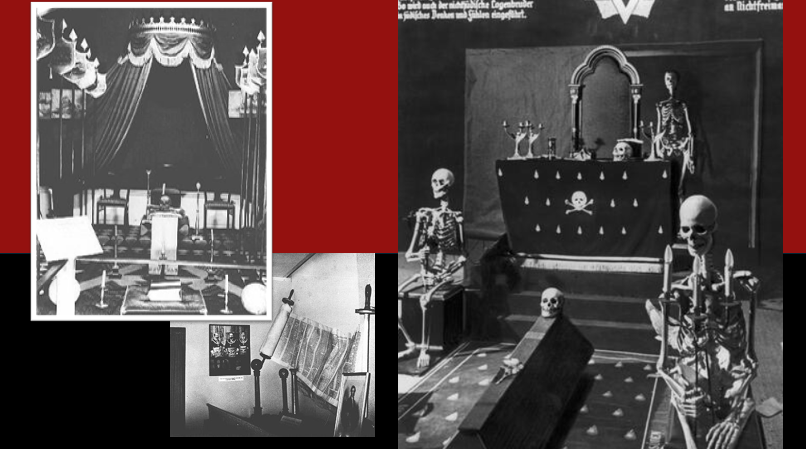
Anti-Masonic exhibitions, note the placement of skeletons in chairs and sculls and crossbones on alters to bring up the macabre and sinister – setting a scene for the occult. Note also the extensive combination of the Jewish Magen David and the Torah, Menorah etc. with Masonic items and symbology – the compasses and square etc.
One of the most infamous foreign exhibitions was the The Grand Anti-Masonic Exhibition, opened in Belgrade, in occupied Serbia on 22 October 1941. Financed by the Germans and opened with the support of collaborationist leader Milan Nedić it featured an estimated 200,000 brochures, 108,000 copies of nine different types of envelopes, 100,000 flyers, 60,000 copies of twenty different posters, and 176 different propaganda films that had previously been seen during ‘The Eternal Jew’ exhibitions in Munich and Vienna in 1937. Although being anti-Masonic in its title, the primary purpose was to promote antisemitic ideology using the Protocols of the Elders of Zion to rationalise and intensify hatred of Jews.
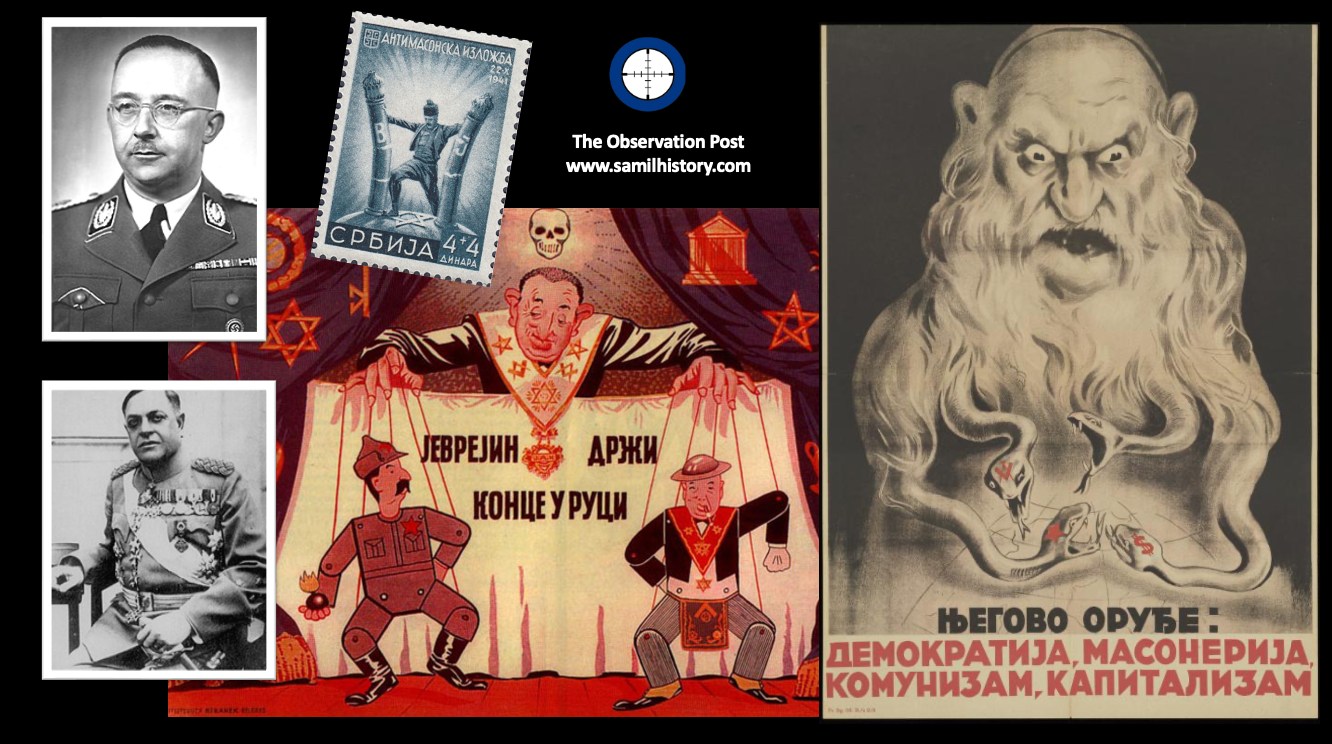
Artefacts from the Grand Anti-Masonic Exhibition. Insert pictures show Heinrich Himmler and Milan Nedić respectively.
Depicted in the image are three key artefacts from the Grand Anti-Masonic Exhibition, the Serbian anti-Semitic propaganda poster “His Weapons: Democracy, Masonry, Communism, Capitalism” issued for the Grand Anti-Masonic Exhibition opening. It has a caricature of an evil looking Jewish elderly man with a long beard that turns into snakes with symbols for Capitalism, Communism and Freemasonry.
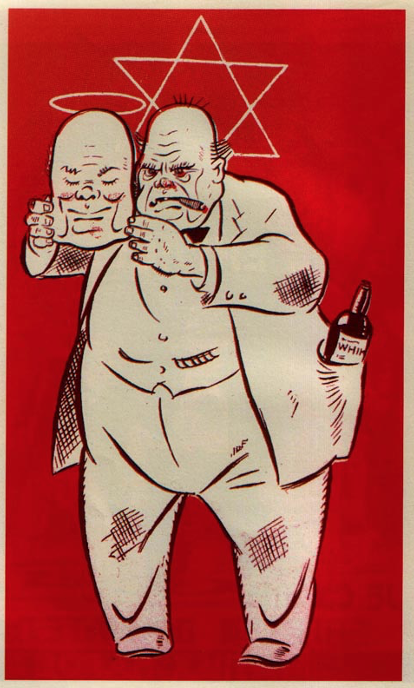
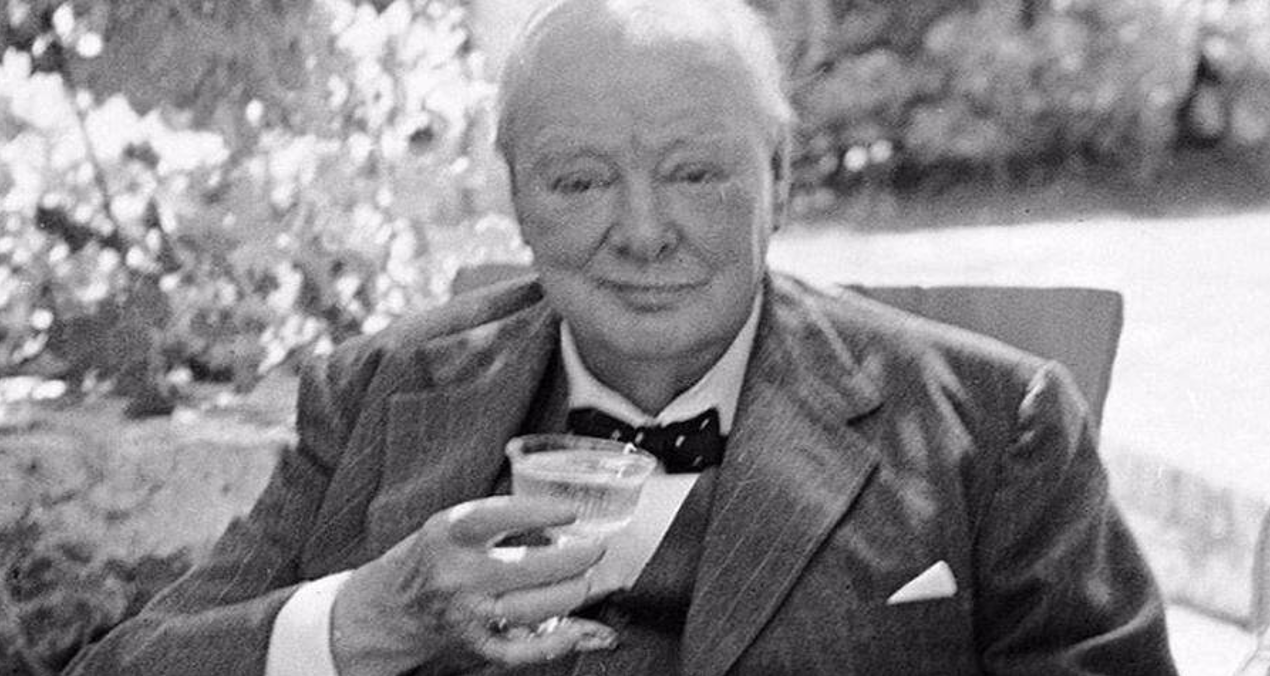
The second poster shows the Jews and Masons controlling the Soviet Union and the United Kingdom, with marionettes of Stalin and Churchill, also depicted as a Freemason (it’s unrelated but in fact he was a mason for a short time). The caption reads: “The Jew is holding the strings. Whose strings and how? He’ll answer you. The anti-masonic exhibit”.
The final artefact is a stamp of a triumphal Serbian pushing over the two Pillars of King David’s temple, a symbol pertinent to Freemasonry and lodges, four stamps were issued by Serbian authorities and put into circulation to promote the ‘Grand Anti Masonic Exhibition’ – all depicting Judaism as being the source of all evil in the world and portraying a “strong and victorious Serbia triumphing over the plot of world domination.”
An estimated 80,000 people, including Milan Nedić and some of his ministers, visited the exhibition prior to its closure on January 19, 1942.
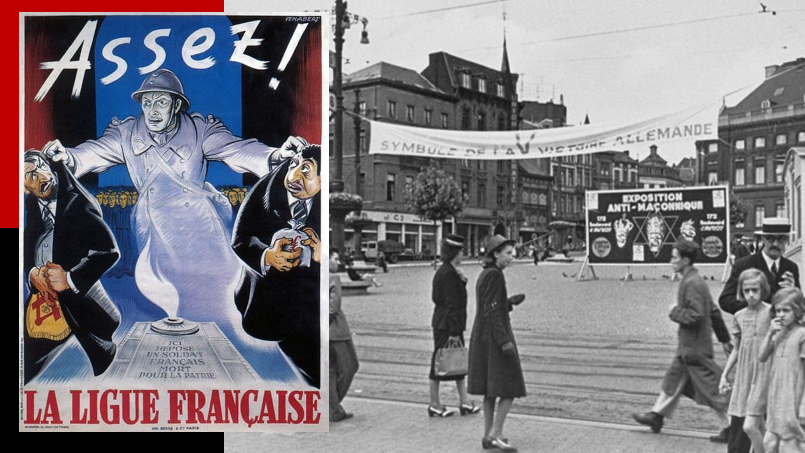
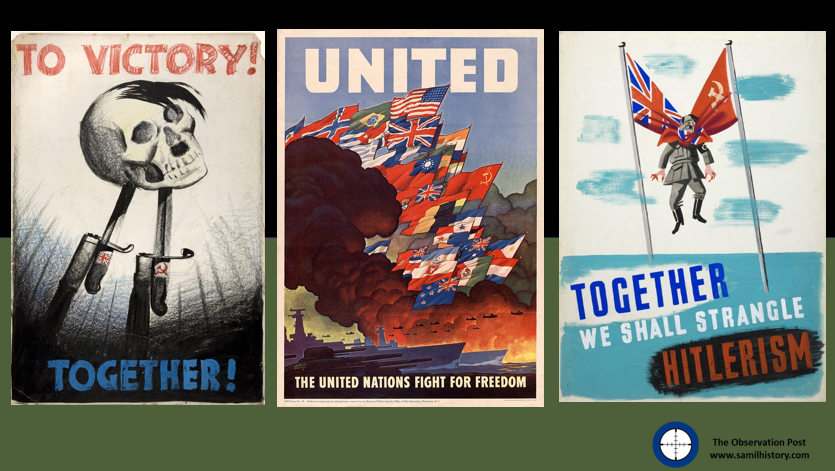
European anti-Masonic and anti-Jewish exhibition in Europe and related French League propaganda.
The central idea of all these museums and exhibitions was to promote an antisemitic work called ‘the protocols of Zion’ in which a Masonic and Jewish world order was exposed and these morbid displays brought it to life.
The Protocols of the Elders of Zion
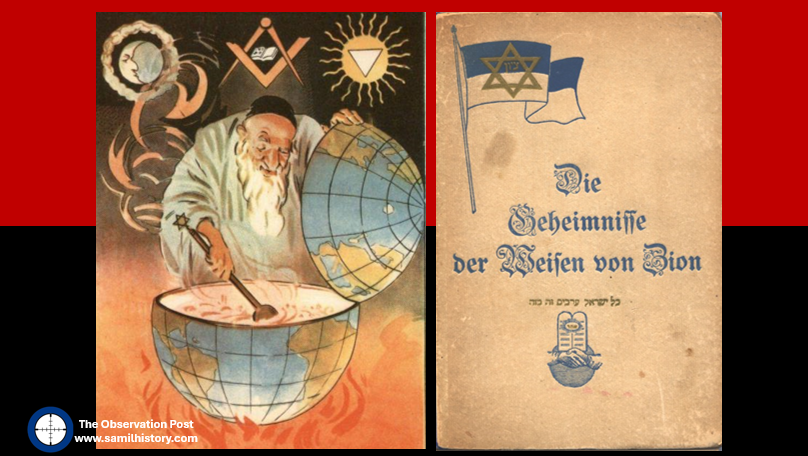
The Protocols of the Elders of Zion, also known as ‘The Protocols’ are a fictional work, it’s a combination of a number of documents targeting Jews primarily, but also Freemasonry. It purports to be the minutes of meetings of 24 speeches made by Jewish leaders during the First Zionist Congress in 1897. It actually had its roots as early as the 1860’s in a anti-Napoleon III pamphlet and became a forged rational for the Russian pogroms against Jews. By 1903 the Protocols appeared as an appendix in an anonymous Russian antisemitic pamphlet called The Great Within the Minuscule and Antichrist. The ‘Protocols’ eventually found their way into a German antisemitic book called TheSecrets of the Wise Men of Zion – the first documented version of ‘The Protocols’ published outside of Russia and published in Charlottenburg, Germany in 1920 – which was subsequently read and used widely by Hitler and the Nazi Party in Germany.
Protocols of the Elders of Zion German booklet and anti-Masonic and anti-Jewish conspiracy propaganda poster.
The Protocols of the Elders of Zion often found itself in a pamphlet format of some 70 pages. The pamphlet detailed a Satanic plot by Jewish/Zionist/Freemason conspirators to conquer the world. Alleging that Jews controlled much of the world’s finance, the media, the educational institutions, the court systems and many of the world’s governments, the Protocols claimed that the Jews indulged in all forms of trickery and deceit to tighten their hold. The Jews deliberately spread diseases and immorality to weaken Gentiles, and did not hesitate to use murder and terrorism to destroy all religions except their own. Jews were striving to establish their own autocracy based on a false Messiah, the “Son of David”, and posed a fiendishly devious omnipresent peril to the rest of mankind.12
Although exposed many times as a forgery, by the 1930’s it found its way into Nazi philosophy, and Adolf Hitler upfront supported its validity – now as a ‘truism’ in both Nazi Germany and occupied Europe – the ‘Protocols’ formed the groundwork to the Jewish ‘final solution’ and the holocaust.
The protocols also found their way into all sorts of propaganda, and not just Germany before and during the war, but it also found favour in antisemitic circles all over Europe and Russia – here are two French examples of it:
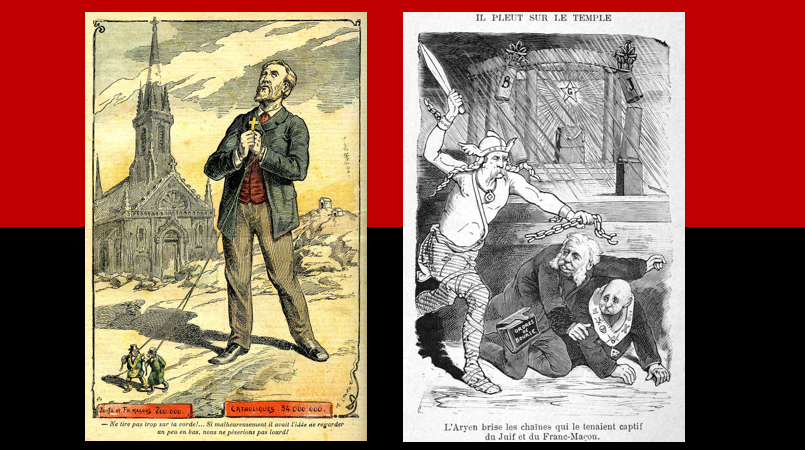
European anti-Masonic and anti-Jewish propaganda
On the left is a poster which shows an international Freemason and Jewish conspiracy (involving only 200,000 Jews and Masons) leading innocent and God fearing Catholics (the majority 34,000,000) to their nefarious ends. On the right is a French poster, very much in Nazi lore, which shows the pure ‘Aryan’ warrior striking the chain bonds of the Jew being held captive by the Freemason.
The Protocols of Zion in South Africa
In South Africa, the three main protagonists behind promoting the validity of the Protocols of the Elders of Zion are General Manie Maritz – the 1914-15 Afrikaner Revolt leader and leader of the Boerenasie Party, Louis Theodor Weichardt, a National Party stalwart who breaks away believing the party should focus all its attention on National Socialism and forms the ‘Greyshirts’ and finally the Afrikaner Nationalist ‘Broederbond’ under the Germanophile Dr. Nico Diederichs.
The Boerenasie Party
General Manie Maritz, a veteran of the South African War and influential leader of the failed 1914-15 Afrikaner Rebellion, also admired German National Socialism. A converted antisemite, he even blamed the South African War (1899-1902), commonly called The Boer War on a Jewish conspiracy. Defeated after the Afrikaner Rebellion, Maritz would become a hardened admirer of National Socialism (Nazism) and Adolf Hitler – initially joining Theodor Weichardt and his SANP Grey-shirts, and after falling out with Weichardt over a Führerprinzip (leadership principle) conflict he joins a more hardline Nazi ‘Shirt’ movement called the ‘Black-shirts’ – the ‘South African National People’s Movement’ (Suid Afrikaanse Nasionale Volksbeweging), started by Chris Havemann in Johannesburg.
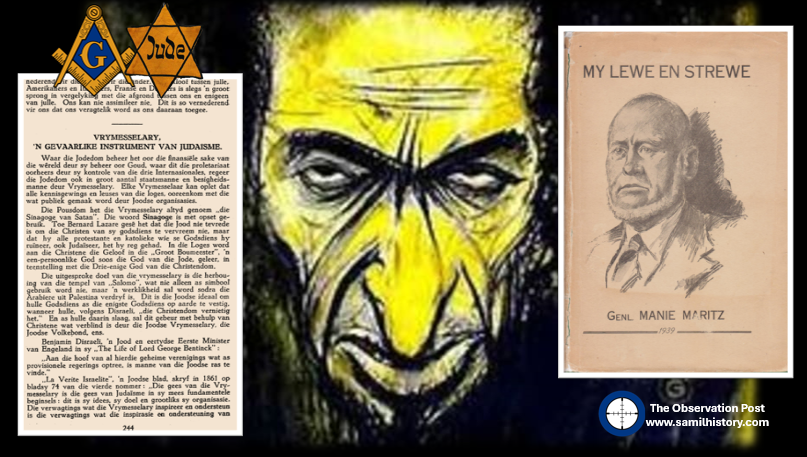
By July 1940 Maritz founded the anti-parliamentary, pro National Socialist, antisemitic ‘Volksparty’, in Pietersburg. 13This evolved and merged into ‘Die Boerenasie’ (The Boer Nation), a party with National Socialist leanings originally led by J.C.C. Lass (the first Commandant General of the Ossewabrandwag) but briefly taken over by Maritz until his accidental death in December 1940. Thereafter it was headed up by S.K. Rudman. 14 Maritz would also detail his Antisemitic and National Socialist views in his autobiography ‘My Lewe en Strewe’ (My life and Aspiration/Purpose) published in 1939 and modelled on Hitler’s own ‘Mein Kampf’.15
In 1924, Maritz would become a convert to the racist and anti-Semitic myth ‘the Protocols of the Elders of Zion’ and convinced of a Jewish and Freemason conspiracy to world domination, when he was shown the Protocols by the Kristelike-bond (Christian Bond) in Pretoria.16 He would make the ‘Protocols of Zion’ as his life’s meaning and make it his mission to educate the Afrikaner people (his ‘Volk’) to it – in it he would blame the ‘hidden hand’ of the Jews as the true conspiracists behind starting the Boer War. In ‘my Lewe en Strewe’ Maritz frames up the entire rational as to why the Jews are responsible for all the ills that have befallen the Afrikaner ‘Volk’ – and the ‘Protocols of the Elders of Zion’ are the way forward to understanding the Jewish, Freemasonry, and Communist conspiracy against Afrikaners. It starts with Maritz using a quote from President Kruger’s speech at the Johannesburg market square in February 1899, where he declared:
‘If it was possible to throw the Jewish monopolists out the country with everything they own (Sak en Pak), without getting into a war with England, then the problem of perpetual peace in South Africa be resolved’.17
Maritz then grounds his entire argument on the simple premise that even President Kruger foresaw the Jewish Problem and forewarned his people. His own warning then follows, and in the machinations of Maritz’ mind he declares:
‘Socialists, anarchists, communists, Bolsheviks, Marxists, Freemasons and super-capitalists are the key antagonists and they are none other than all Jews.’
Then Maritz concludes by way of a warning that by helping and entertaining the Jews and their requests Smuts and Botha and other Boer Generals are committing Christian fratricide :
‘… thus carry out the Jewish prescriptions and policies, perhaps unknowingly. They are the “Slavishly obedient politicians” of which the Jew speaks in his “Protocols”. One Christian must exterminate the other.’18
Part 1 of ‘My Lewe en Strewe’ covers Maritz’ autobiography – pages 1 to 96, but Part 2, the bulk of his book from pages 97 to 270 covers Maritz’ politics and ‘purpose’ and it begins with a chapter titled ‘The hidden hand of the Jew’ … and this particular theme does not stop, Part 2 covers the ‘Protocols of the Elders of Zion’ – literally translated and edited into Afrikaans with some South African references here and there to give them local flair. Abridged Protocols number 1 to number 23 and the alleged global Jewish/Freemasonry conspiracy are mapped out for simpleton consumption. Maritz also used large extracts lifted from ‘The Key to the Mystery’ 19 another discredited work on a Jewish, Communist, Freemason conspiracy and worldwide domination written by a leading Canadian antisemite – Adrian Archand.
Manie Maritz and extract of his on the evils of Communism, Judaism and Freemasonry from his autobiography.
The South African Jewish Board of Deputies attempted unsuccessfully to have ‘My Lewe en Strewe’ banned for inciting race hate in South Africa. In South West Africa they were a little more successful, when taken to court Maritz was found guilty in August 1939 in Windhoek of ‘promoting a strong feeling of hostility against the Jewish race.’ and fined.20 Although Judge Hoexter described ‘My Lewe en Strewe’ as ‘filthy, contemptable and venomous racial propaganda’ according to Die Volksblad demand in South Africa for the book was off the charts, and its selling spree was only curtailed during World War 2 when it was finally banned under Smuts’ emergency regulations.21
The Grey-shirts
As a committed antisemite, Louis Theodor Weichardt founded the South African Christian National Socialist Movement when he broke with the National Party on the 26 October 1933. This included a paramilitary ‘security’ or ‘body-guard’ section (modelled on Nazi Germany’s brown-shirted Sturmabteilung) called the “Gryshemde” or “Grey-shirts”. In May 1934, the paramilitary Grey-shirts officially merged with the South African Christian National Socialist Movement and formed a new enterprise called ‘The South African National Party’ (SANP). The SANP would continue wearing Grey-shirts as their identifying dress and would also make use of other Nazi iconography, including extensive use of the swastika.22 Overall, Weichardt saw democracy as an outdated system and an invention of British imperialism and Jews.23
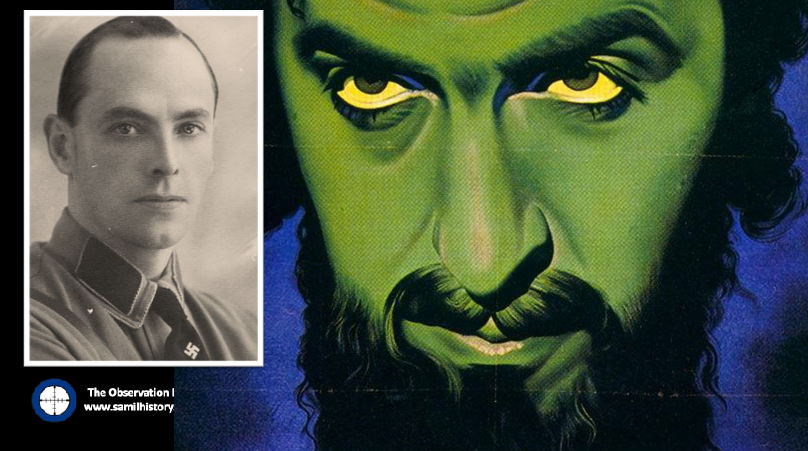
Louis Theodor Weichardt and the Nazi anti-Semitic propaganda movie poster ‘Jew Suss”
Weichardt also pitched the SANP as a fully bilingual organisation appealing to both English and Afrikaans speakers, he found favour in some English speaking corners with hardened antisemites, however for the most part his organisation and its ideology appealed to Afrikaners. Their primary communication mouthpiece was a newspaper called ‘Die Waarheid/The truth’ which was nothing more than a vehicle to spread Nazi doctrine in South Africa – the Nazi emblem emblazoned on the masthead.
Louis Weichardt would spell out his National Socialist vision in the ‘Die Waarheid/The truth’ and trace South Africa’s problems to one source – the Jews. He claimed Jewish ‘domination’ of the legal, medical, dental, commerce, trading, liquor trade etc. as between 60% to 100%, and he would write:
“We are determined to put the Jew in his place. We are not going to tolerate bootlicking, Gentile South Africans – English or Dutch speaking – are no longer prepared to play second fiddle to these aliens”.24
As to the The Protocols of the Elders of Zion, in March 1934 when the SANP held a rally in Aberdeen in the Eastern Cape, Harry Victor Inch – one of the Greyshirt leaders – announced that he had in his possession a ‘stolen’ document from a Port Elizabeth synagogue – signed by its Rabbi – which outlined a secret plot by the Jews to destroy the Christian religion and civilisation.
The Rabbi in question was not in fact a Rabbi, he was a Jewish Reverent, Reverent Abraham Levy, and he took the SANP Grey-shirt leadership in the Eastern Cape to court in Grahamstown in a landmark case. The SANP accused; Johannes von Strauss Moltke who was the Regional SANP leader, Harry Inch, who allegedly ‘stole’ the document and David Olivier, who had printed the document for circulation as the owner and publisher of “Rapport”, another media organ of the ‘shirt’ movements. All now have to account for themselves – the case billed as a mighty ‘Gentile vs. Jew’ showdown and a legal test of the ‘Great Jewish Conspiracy.’ `
‘Die Waarheid/The truth’ would pick up this ‘Protocols of the Elders of Zion’ and really twist it for a South African audience claiming:
“the disastrous Anglo-Boer War 1899-1902 was deliberately brought about by the Jewish mine magnets who circumvented Rhodes and Kruger alike”.25
In addition, Jews were accused of inciting blacks against whites and controlling the economy, exploiting ordinary Afrikaners as part of an international Jewish conspiracy. The ‘Die Waarheid/The truth’ statements were accompanied by a propaganda leaflet printed by the SANP and distributed in Port Elizabeth.
The ‘stolen’ document was scrutinised legally, it was found to be based on the entirely discredited antisemitic ‘international Jewish conspiracy’ document – ‘the Protocols of the Elders of Zion’ and given a South African twist by the SANP. In a carefully considered 30,000 word judgement, the court concluded inter alia;
“the protocols are an impudent forgery, obviously published for the purposes of anti-Jewish propaganda”.26
As a result the three Grey-shirt leaders were all fined, Harry Victor Inch was found guilty of perjury and forging documents defaming the Jewish race and swearing under oath that those documents were genuine – and fined £1,000, later also receiving a short prison sentence. 27 David Hermanus Olivier was fined £25 for acting improperly and printing the document and Johannes von Moltke was fined £750 for “playing a leading role in the plot”.
The SANP Grey-shirts on trial in Grahamstown and the Nazi anti-Semitic propaganda poster ‘the eternal Jew’.
The result was widely hailed in South Africa as a complete vindication of the Jewish people of a global plot and of Rev. Abraham Levy who brought the lawsuit against the Grey-shirt leaders.
The Afrikaner Broederbond
The Afrikaner Broederbond (AB) would also find itself immersed into this fabricated Jewish and Freemason worldwide conspiracy and it too would act. Dr. Nico Diederichs would become the Chairman of the Broederbond in 1938, in that same year he would visit Nazi Germany and became an admirer of Adolf Hitler and National Socialism. He would later meet the Nazi German ministerial delegate in South Africa – on 19 May 1939, Herr. H. Kirchner – in that meeting he confided that the Broederbond had been compromised in the past by Freemasons in the Broederbond (presumably by all the Dutch Constitution Freemasons in it, Jews were banned from the Broederbond upfront).
He declared the bond as having now been purged of its Freemasons, he had personally seen to it – and the Bond was ready to do its work on promoting anti-semitism and the National Socialist anti-democracy principle in the Afrikaner Nationalist sphere.
In fact he reassures the German delegate that the National Party had hung its hat completely on the anti-Semitic principle, and he even squashes concerns that Dr D.F. Malan was not strongly antisemite enough, confirming that he in fact is one. He goes on state that it is the Broederbond’s mission as a secret society is to both infiltrate and undermine the goals of the Smuts government and the state.28
Not to lose sight of Dr Nico Diederichs, he became a National Party MP stalwart, served as the first chancellor of the Rand Afrikaans University and became ceremonial State President of South Africa from 1975 to 1978.
The male fraternity war between the various fraternal societies in South Africa is interesting – especially the disposition of the Afrikaner Broederbond (AB) to the Freemasons – an uneasy relationship caused by the more “verlighte” (liberal) Afrikaners being members of the Dutch Freemason Constitution – and these included powerful and highly politically regarded figures over the course of the history of the OFS, ZAR and then Union, including Presidents and Prime Ministers – none of whom really favoured “Afrikaner Nationalism” as it was defined by the more “verkrampt” (conservative) Broederbonders.
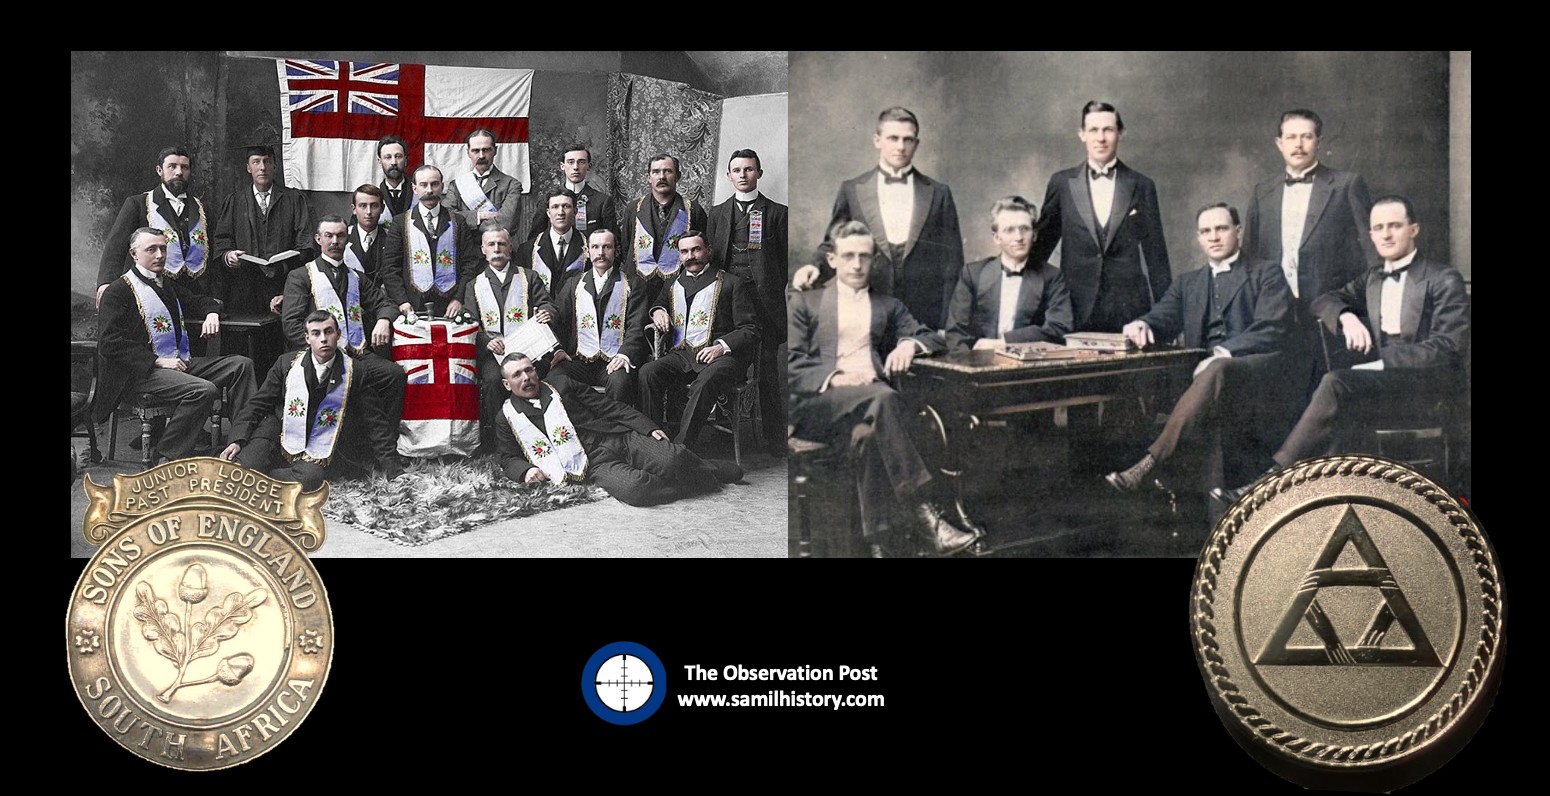
That all aside, the real opponent of the AB was not the Freemasons, the real ‘cultural’ opponent is a little understood and rarely discussed “English” fraternity called “The Sons of England” – the SOE. The full name – the Sons of England Patriotic and Benevolent Society – was a fraternal society for English Protestants residing in Commonwealth countries. It was originally founded in Toronto, Canada in 1874 but it especially took root in South Africa, starting in 1881 in Uitenhage and eventually establishing a Head Office in Durban and lodges in ever major metropole. Their goal was to bring Englishmen together for mutual support, networking, and to provide financial relief to them and their families if they fell on hard times. The society acted as a cultural organisation and was run along Masonic Lodge principles, regalia and rites – it aspired to preserve and celebrate the Anglo-Protestant cultural heritage of its members – which was diametrically opposite to the Broederbond who sought to do exactly the same thing, but for the promotion and preservation of Afrikaner-Protestant cultural heritage for its members. The key difference, the SOE was not ‘secret’, it was very openly public, whereas the AB was indeed ‘secret’.
Insert picture – the original Broederbond Commitee members (right) and a SOE Lodge (left) – both marked with some of their respective symbols
Historically, the AB had three objects: to unite all Afrikaners who have the welfare of their people at heart; to foster national awareness; to implant a love of language, religion, tradition and fatherland; and to promote all of Afrikanerdom’s interests. Within the purely domestic Afrikaner arena, it acted as a secret coordinating council to weld Afrikaners into a single integrated insulated laager and as the guardian of the Nationalist spirit.29
The AB would however also lock itself in mortal combat with Freemasonry, which as a fraternity was open to men of any religion, race or creed including a great many Afrikaners in the English, Scottish, Irish and Dutch constitutions. Freemasons were specifically denied membership of the AB by the bond’s recruitment policy which was restricted to upstanding white Afrikaner adult males, protestants only, anti-Communist and specifically not a Freemason. The result of this, is that although many Afrikaner Freemasons enjoyed membership of the National Party, they did not really find themselves in key leadership roles of it – no National Party Prime Minister or President post 1948 was ever a Freemason, yet they were all Broederbonders to a man.
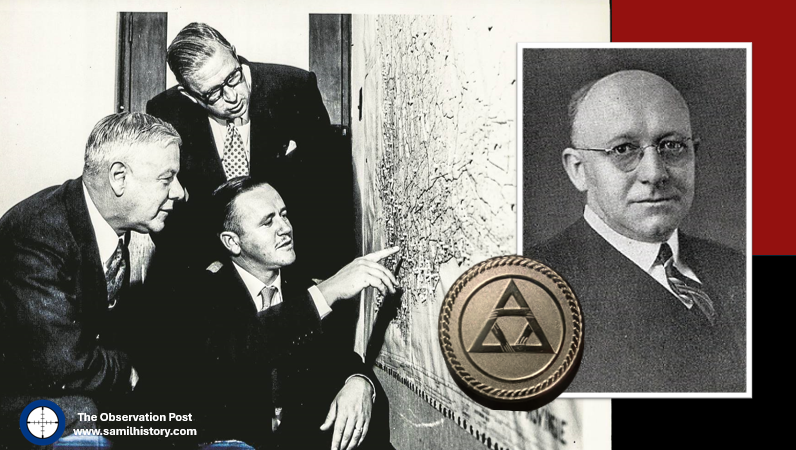
Dr. H.F. Verwoerd and fellow Broeders planning. Insert picture. Dr. Nico Diederichs and a symbol used by the Broederbond in later years as to its ‘secret’ iconography
The AB eventually even took to aggressively targeting Freemasons when it put out a circular warning its members of Freemason conspiracies and to take action via the Dutch Reformed Church, it reads:
‘Freemasons are pouncing on school committees and city councils and are not slow to seek control of cultural organisations. These fronts must be watched carefully therefore against Freemasons! Freemasonry, however innocent it might appear, is fundamentally anti-Christian and action must be taken with that in mind … action against Freemasonry must start at (Dutch Reformed) church level.’30
Inside the AB, a task force, headed by Professor F.J. van Zyl, was even set up ‘to combat communism, liberalism and other enemies such as Freemasonry.‘31
The campaign becomes murderous
By August 1940, the Vichy France regime also issued a decree declaring Masons to be enemies of the state. Later in Germany during 1942, Hitler authorised Alfred Rosenberg to wage an “intellectual war” against all Jews and Freemasons. This transitioned in a police response under the authority the German Armed Forces (Oberkommando der Wehrmacht – OKW) to fulfil the objectives of this war by way of a ‘final solution’.
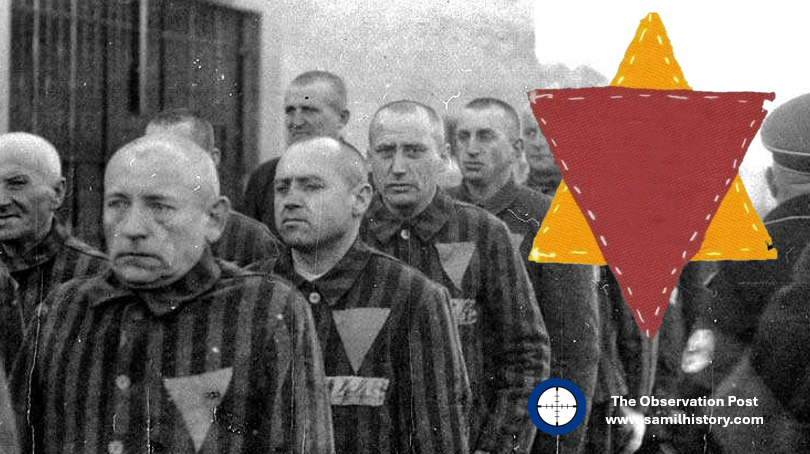
Thousands of Freemasons were arrested as ‘enemies of the state’ all over Germany and occupied Europe and sent to concentration camps. They were made to wear a red triangle on their prison uniforms to signify them as ‘political prisoners’. Jewish Freemasons were made to wear a red and yellow triangle in the shape of a Star of David – in all it is estimated that 150,000 Freemasons were murdered by the Nazi regime in their death camps by their death squads alongside 6,000,000 Jews.
Political prisoners in a Nazi concentration ‘death’ camp wearing red ‘political’ triangles and the inverted triangles to show a Jewish Freemason with kind permission of Bro. Andrew Bergman.
After World War II, Soviet forces found much of the Masonic material that had been stolen by the Nazis. ‘They transported it to archives in Russia and Poland where the material remained unseen for more than 40 years. The Soviets, like the Nazis before them, wanted to learn about the Fraternity because, in a strange twist, they too, found Freemasonry threatening to their totalitarian government.’32
For this reason, European freemasonry including British Freemasonry, which anticipated an invasion of the British Isles by Nazi Germany decided to “go dark” in order to protect its members and its artefacts. To identify themselves Freemasons took to wearing small ‘forget-me-not’ flowers as lapel pins.
Forget me not
As Freemasonry across Europe (and in the UK and its Commonwealth) went “dark” and “secret” to protect itself from Nazi persecution – Freemasons in Europe (and in Commonwealth countries including South Africa) started to use the ‘Forget-me-Not’ flower as a lapel pin so they could recognise one another. Some lodges even became known as ‘Forget me Not’ Lodges (even in South Africa).
But why the ‘Forget-me-Not’ flower? The origins have a sinister and Nazi beginning. During the war, three Lodges were actually secretly formed inside German Nazi concentration/POW camps – to classify and identify inmates as Freemasons the Nazis used the inverted red triangle, which was reserved for ‘political prisoners’.
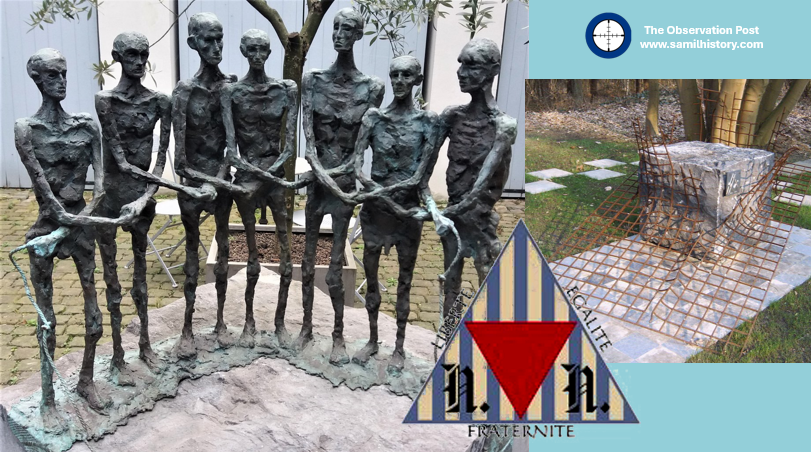
Masonic Holocaust remembrance at Esterwegen Cemetery.
The first and more famous lodge was the Liberté Chérie or Beloved/Cherished Liberty Lodge one of very few lodges founded inside a Nazi concentration camp. It was established inside Hut 6 at Esterwegen (a political prisoner concentration camp). Founded November 1943 by 7 Belgian Freemasons and resistance fighters. During its existence it ‘Entered’, ‘Passed’, and ‘Raised’ at least 2 additional members. A memorial and sculpture is now part of the memorial site of the Esterwegen Cemetery.33
The Obstinate Lodge, L’Obstinée was another Masonic Lodge founded inside the walls of a Nazi prisoner-of-war (POW) camp. Oflag X-D POW camp near Hamburg. Founded by members of the Grand Orient of Belgium. L’Obstinée was a the second Masonic Lodge and was founded in the Oflag XD camp by members of the Grand Orient of Belgium which recognised the Lodge on14 July 1946.34
The third Lodge was “Les Frères captifs d’Allach” and who’s register is now located at the Grand Orient of France museum.35
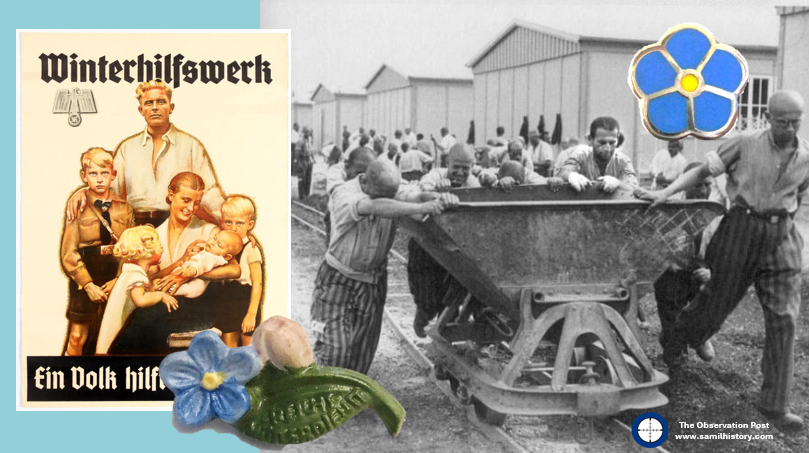
The small forget me not flower had been used obscurely in masonic symbology in Germany from 1926. However, by a stroke of luck and irony the National Socialist (Nazi) German government decided to use a ‘Forget-me-Not’ flower as the symbol for its annual Winterhilfswerk (Winter Relief) campaign. A charitable, food, coal and clothing campaign with the slogan “None shall starve nor freeze”. Set for the harsh winter months (see insert pic of the forget-me-not used by the Winterhilfswerk charity from 1938).
The forget-me-not worn for the Winterhilfswerk campaign and the one worn by Freemasons in remembrance of brothers in concentration camps.
As the flower pin was common to anyone supporting the winter relief campaign in Germany, this enabled some Freemasons to openly wear the Forget-me-Not as a secret sign of Freemasonry membership during the holocaust and avoid persecution or identification. The use of the Forget-me-Not lapel pin did not only occur in Germany, but Freemasons picked it as a symbol the world over during the war.36
The Forget-me-Not even appeared after the war at the first Annual Convention of the United Grand Lodges of Germany. It has continued to be worn by Freemasons world over to remember those that suffered in the name of Freemasonry.
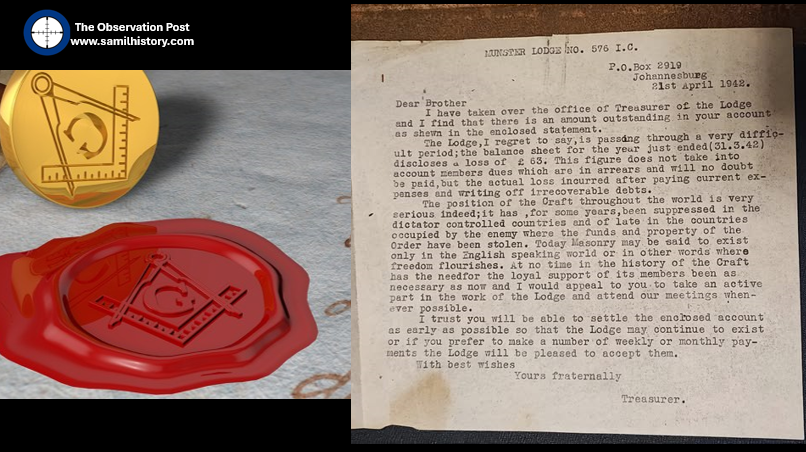
In South Africa the Freemason fraternity would endure their remembrance duties and lament the situation in Europe, here is interesting piece of Masonic lore at Kensington Masonic Hall. It comes from Munster Lodge Irish Constitution and essentially it is a letter between a Brother and the Treasurer regarding the non-payment of his dues, it is written on the 21st April 1942 mid way though the war. It gives a grave picture of Masonry world-wide and in the occupied countries and urges the need to retain membership against difficult times. A second letter, also held at the Kensington Masonic Hall, is a set of minutes and funds raised for the family of a Freemason killed in action.37
Kensington Masonic Hall artefact – with permission from Bro. Eric Cleaver
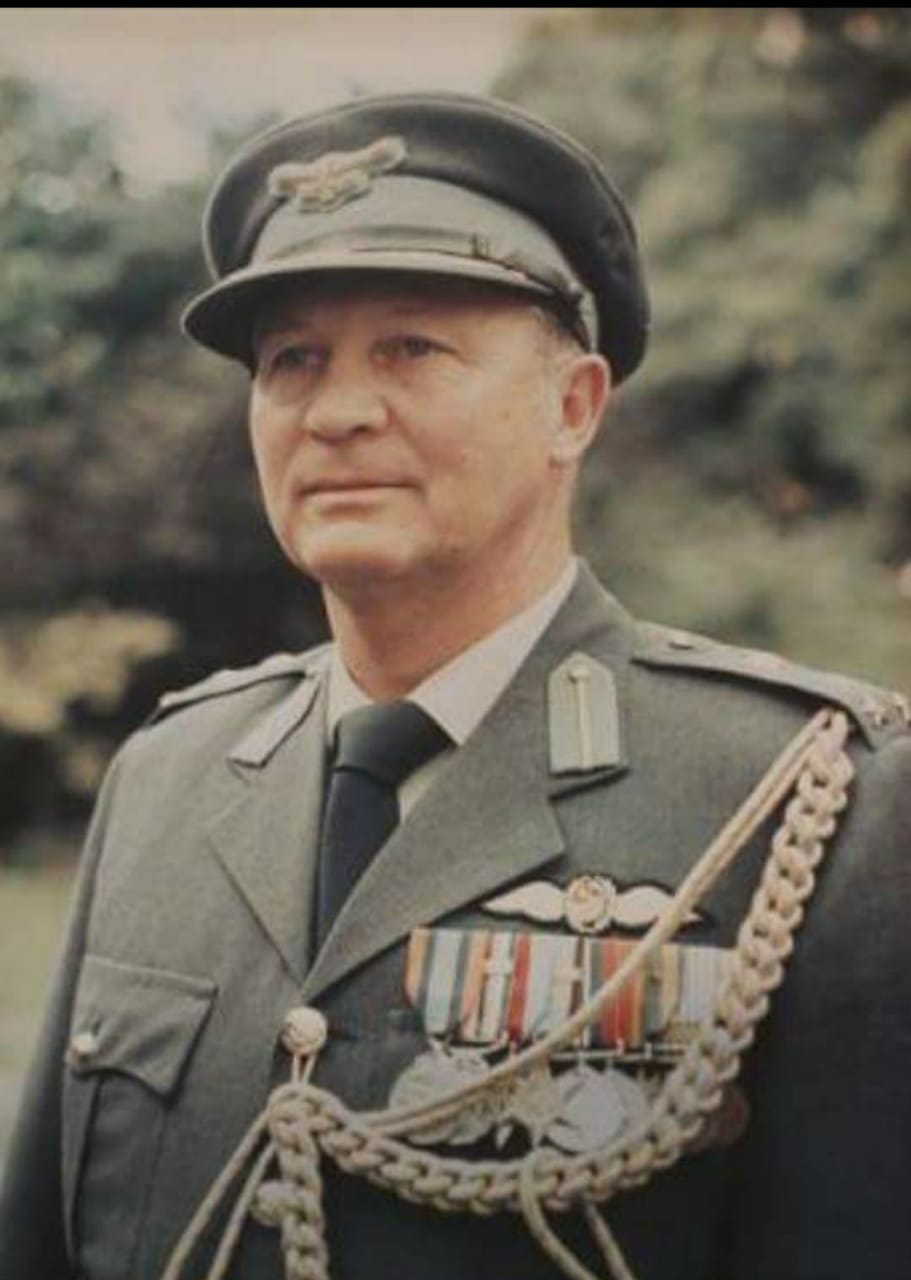
Numerous South African Freemasons served in the South African Union’s Defence Force during World War 2, and seconded to British Armed Forces, many attaining high accolade and Masons can also count many fallen amongst themselves. A notable World War 2 Freemason was the very popular Maj. General Dan Hermanus Pienaar, his role in the Battle of Al Alamein would contribute to the turning point of the war and the ultimate Allied victory. Dan Pienaar was a member of Lodge Rising Star (English Constitution) in Bloemfontein, initiated on 1 October 1935 and raised 14 April 1936. He was tragically killed during the war in an aircraft accident. 38
In Conclusion
It took some time after the war for the “all clear” to be given and for Freemasons to return to their normative position in society and open up their lodges and memberships, even as late as 2018 the United Grand Lodge of England was still calling officially for the end of discrimination of Freemasonry.
Freemasonry operates as a charity – not unlike a Lions Club or Rotary, it operates in public and as Freemasons put it – Freemasonry is organisation with secrets, but not a secret society. Freemason’s secrets are gestures, words and handshakes so they can recognise where each fellow mason is on their respective masonic journey and for the delight and surprise of the candidate passing his degrees. Freemasons have exposed their rituals, temples and gestures multiple times, and although not encouraged, the public can easily source them.
It is important to note, as often Freemasonry is not factored in the lexicon on the Holocaust which usually focusses on the victims as being Jews, Homosexuals, Gypsies and Political Prisoners generally – it is important to stress that every single Führer Order in respect of the Holocaust started with the following words:
Shain, Milton. ‘A Perfect Storm’, Antisemitism in South Africa 1930-1948, (Johannesburg: Jonathan Ball Publishers, 2015) , 55–58. ↩︎
Bouwer W, National Socialism and Nazism in South Africa: The case of L.T. Weichardt and his Greyshirt movements, 1933-1946. (MA Thesis, University of the Free State, Bloemfontein 2021), 18. ↩︎
Smith, Gary. Freemasonry and the Holocaust By W. Bro. Gary W. Smith, Pr.D.G.D.C. ↩︎
Smith, Gary. Freemasonry and the Holocaust By W. Bro. Gary W. Smith, Pr.D.G.D.C. ↩︎
Smith, Gary. Freemasonry and the Holocaust By W. Bro. Gary W. Smith, Pr.D.G.D.C. ↩︎
Smith, Gary. Freemasonry and the Holocaust By W. Bro. Gary W. Smith, Pr.D.G.D.C. ↩︎
The Forget-Me-Not and Anti-Freemasonry in Nazi Germany – The Square Magazine on-line. ↩︎
With the kind permission of Bro. Eric Cleaver – Germiston Charity Lodge. ↩︎
Rossouw, B (compiler). 250 Years of Freemasonry in South Africa, a Heritage Collection 1772 – 2022. Grand Lodge of South Africa. 2022. Page 1031 ↩︎
Smith, Gary. Freemasonry and the Holocaust By W. Bro. Gary W. Smith, Pr.D.G.D.C. ↩︎
Bibliography and References
Bloomberg, Charles. Christian Nationalism and the Rise of the Afrikaner Broederbond in South Africa, 1918-48. Palgrave Macmillan. 1990.
Bouwer, Werner. National Socialism and Nazism in South Africa: The case of L.T. Weichardt and his Greyshirt movements, 1933-1946
Bunting, Brian. The Rise of the South African Reich. Penguin Books. 1964
Feng, Albert. Freemasonry: Survival and Compromise – Freemasonry in the Third Reich.
Hitler, Adolf. Mein Kampf (Ralph Manheim Translation), Houghton Mifflin Company, New York, 1925 original publication, translation published 1999.
Hitler, Adolf. Speech at an NSDAP meeting in Munich, February 29, 1928. Hitler, Reden, Schriften, Anordnungen, Vol. II/2, 706.
Maritz, Manie. ‘My Lewe en Strewe’ Pretoria 1939
Rossouw, B (compiler). 250 Years of Freemasonry in South Africa, a Heritage Collection 1772 – 2022. Grand Lodge of South Africa. 2022.
Scher, David, M. Echoes of David Irving – The Greyshirt Trial of 1934. December 2004.
Thomas, Christopher, Campbell. Compass, Square and Swastika: Freemasonry in the Third Reich. Doctorate of Philosophy thesis. Texas A&M University. 2011
Milton, Shain. A Perfect Storm – Antisemitism in South Africa 1930-1948. Jonathan Ball. 2015
Smith, Gary. Freemasonry and the Holocaust By W. Bro. Gary W. Smith, Pr.D.G.D.C
United States Holocaust Museum – on-line resource, 2024
The Square Magazine (on-line). The Forget-Me-Not and Anti-Freemasonry in Nazi Germany
Wilkins, Ivor. The Broederbond. Jonathan Ball Publishers, Johannesburg. 1978
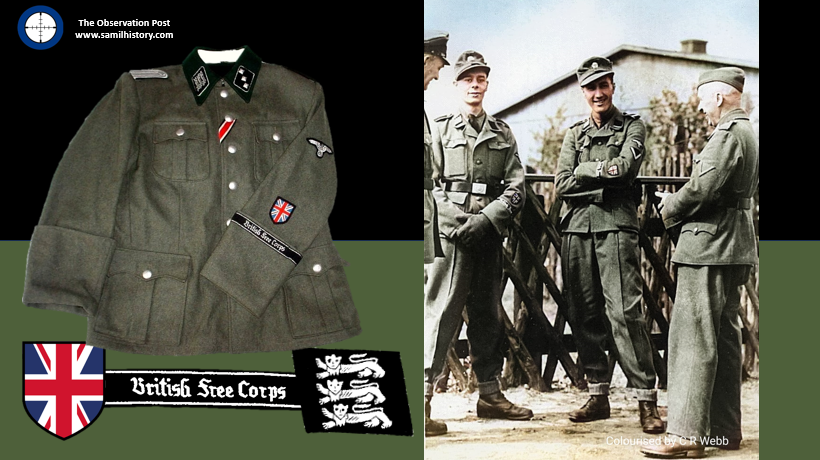
Springbok Renegades: South Africans serving in the British Free Corps of the Waffen SS during the Second World War.
By Peter Albert Dickens
Introduction
In military history circles, there is an often asked question. How many South Africans served in Nazi Germany’s Armed Forces? This is usually followed by an enquiry on these “renegades” and if they were ever brought to book.
Because of all the publicity it generated many people are aware of Robey Leibbrandt – the firebrand Afrikaner insurgent who trained as a German Paratrooper and special forces operator, sent to South Africa to take over the Ossewabrandwag and direct a Afrikaner Nationalist revolt to topple Smuts. His capture and sentencing a well known aspect of Afrikaner Nationalist lore, so too his eventual pardon by the National Party in 1948.
Some are aware of Leutnant (Lt.) Heinz Werner Schmidt, who was one of Field Marshal Erwin Rommel’s personal aids in the North African conflict – and that’s because after the war he re-settled back in South Africa and published a book “With Rommel in the Desert”. As a standard Wermacht officer (Germany Army – Statutory force) with a dual national status (known as Volksdeutsche – a foreign national with German heritage) he was often just viewed with interest. There were also a small number of South West Africans (Namibians) who found their way into German forces because of their German national heritage – notably here is another member of Rommel’s staff, his driver Leutnant (Lt.) Hellmut von Liepzig.
But what of the rest? Surely there are more.
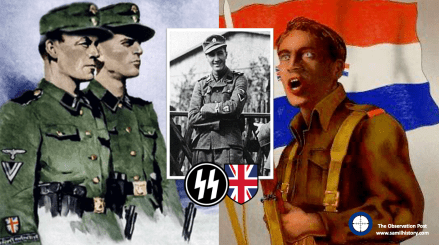
The truth is there are some more, not many mind – but there are more – known as ‘Renegades’ they can be found in all sorts of Nazi German military and propaganda structures. After the war some South Africans were arrested, some having served in the German Waffen SS, and they surrender to the Allied forces occupying Germany in 1945, to a man all claiming they were just fighting against the Communist onslaught of the Red Army. Theirs is an interesting story and also a complex one, as they do not volunteer to join Germany upfront, they all join the South African Army upfront, and they have no dual German nationality or stated German affinity – they are South African soldiers pure and applied – affectionately known at the time in South Africa as ‘Springboks’ – mid way through the war they change sides, put on German uniforms, and take up arms against their own country and its Allied forces – they all join the infamous Nazi German Waffen SS (the Nazi party and Hitler’s personal army) in a special ethnic unit set aside for ‘British’ renegades – but why this extraordinary ‘volte-face‘?
It’s a very complex question, to understand their motives for committing such an act of treason we need to understand the background as to Nazism and anti-Communism in both South Africa and the United Kingdom – and the political landscapes driving each.
The bedrock of Nazism and anti-Communism in South Africa
The background to South African Nationals joining the Nazi German Waffen SS, and other German forces for that matter, lies against the background and popularity of National Socialism and Fascism as ideologies prior to the Second World War in South Africa and in the United Kingdom respectively. Within this context we find a variety of home grown National Socialist and Fascist movements incorporating fierce anti-Communist and anti-Semitic ideologies. Even the mainstream opposition and governing political parties in South Africa and the United Kingdom had strong anti-Communist leanings. This socio-political dynamic forms the backdrop to understanding the motivations of British, South African, and other Commonwealth citizens joining the German forces during the war. In the Waffen SS, an overarching proposition put to foreign recruits, and to motivate them join, was to fight alongside Nazi Germany forces to prevent the onset of Bolshevism (Communism).
Prior to the Second World War, South Africa was governed by a Fusion party created between General James Barry Munnik Hertzog’s National Party (NP) and General Jan Christian (JC) Smuts’ South African Party (SAP) in 1933, this party came about to tackle the economic challenges of the Great Depression and also sought to maintain a Afrikaner led hegemony in the interests of South Africa’s white population.1 Hertzog led this fusion undertaking as Prime Minister with Smuts as his deputy. Known as the United South African National Party, or simply the “United Party”2 it contained within it a component of Afrikaner nationalists harbouring republican desires and a component within it of Afrikaners satisfied with Union and South Africa’s status as a British Dominion.
Afrikaner nationalists to the political far right of their colleagues who had now joined the United Party were unhappy with the idea of Fusion. Led by Dr. Daniël François (D.F.) Malan this grouping of dissatisfied nationalist broke away from Hertzog’s old National Party and reconstituted themselves as the ‘Purified’ National Party (PNP) in 1935.3 The ,central objective of the PNP was a complete break with Britain and the establishment of an independent oligarchy Republic under a white Afrikaner hegemony.4 Anglophobia was a critical ideology underpinning DF Malan’s PNP. This resulted from the scorched earth policy used during The South African War (1899-1902) by British forces, and Malan sought to exclude English speakers from the PNP completely.5 The Purified Nationalists became the official opposition after the General Election held on 18 May 1938.6
Since the Union of South Africa’s declaration of war against Imperial Germany in 1914, and the invasion and annexation of German South West Africa (GSWA) shortly thereafter, a bitter internal debate had raged amongst Afrikaner Nationalists across the political spectrum. The invasion of GSWA was led by General Louis Botha and General Jan Smuts and supported by the ruling party – the SAP. Primary motivations included supporting Britain and France’s war effort. However, another key objective for South Africa’s invasion of GSWA was a domestic one as the war presented an opportunity for South Africa’s own territorial ambitions. The 1909 Conference for a Closer Union and the establishment of the Union of South Africa in 1910 had within its construct the initial inclusion of GSWA in addition to Southern Rhodesia, Delagoa Bay, Bechuanaland, Lesotho and Swaziland in the Union.7
However, for cultural and historic grounds large swathes of the white Afrikaner community held sympathies for Germany. They believed Germany had supported them during the South African War and hence sought neutrality instead.
The resultant failed Afrikaner Rebellion of 1914, pitching Afrikaner against Afrikaner over the invasion of GSWA, left a long legacy of more bitterness and even deeper political polarisation. The country was further divided on racial fault lines with the majority of the black indigenous population groups on the political periphery, with little attention paid to their political aspirations and emancipation.
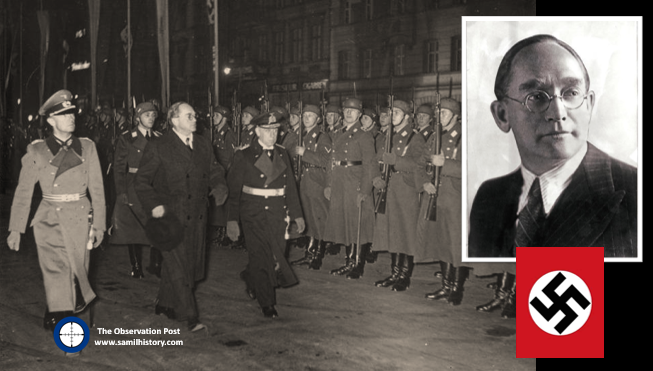
In the inter-war years (1918-1939), and with the rise of National Socialism in Germany and Fascism in Italy from the mid 1920s, many Afrikaner Nationalists increasingly came under the influence of Adolf Hitler and his specific brand of German National Socialism (Nazism). With this came their abhorrence for Communism. Oswald Pirow, Hertzog’s Minister of Defence (1933-1939), was one of the most influential Afrikaners to fall under Hitler’s spell. Pirow met with Hitler, Hermann Göring, Benito Mussolini and Francisco Franco8 as an envoy on behalf of the United Party government. Pirow received Germany’s feedback on GSWA and the ‘new order’ should Germany go to war with Britain and her allies. Pirow gambled his career on a Nazi Germany victory in what he saw as an inevitable war. On 25 September 1940, he founded the national socialist ‘New Order’ (NO) for South Africa. He positioned it as a study group within the reformulated National Party (HNP), and based it on Hitler’s new order plans for Africa.9 During the Second World War, Pirow also positioned the NO as a defender of whites in Africa against the threat of Communism.10In terms of the NO’s values, Pirow espoused Nazi ideals and advocated an authoritarian state.11
Oswald Pirow inspecting Nazi German Forces
In addition to Oswald Pirow’s NO, other leading and influential Afrikaner Nationalists were forming German National Socialist movements with distinctive antisemitic and anti-communist leanings in South Africa during the interwar period. As a committed antisemite, Louis Theodor Weichardt founded the South African Christian National Socialist Movement when he broke with the National Party on the 26 October 1933. This included a paramilitary ‘security’ or ‘body-guard’ section (modelled on Nazi Germany’s brown-shirted Sturmabteilung) called the “Gryshemde” or “Grey-shirts”. In May 1934, the paramilitary Grey-shirts officially merged with the South African Christian National Socialist Movement and formed a new enterprise called ‘The South African National Party’ (SANP). The SANP would continue wearing Grey-shirts as their identifying dress and would also make use of other Nazi iconography, including extensive use of the swastika.12 Overall, Weichardt saw democracy as an outdated system and an invention of British imperialism and Jews.13
Weichardt also pitched the SANP as a fully bilingual organisation appealing to both English and Afrikaans speakers, he found favour in some English speaking corners with hardened antisemites, however for the most part his organisation and its ideology appealed to Afrikaners.
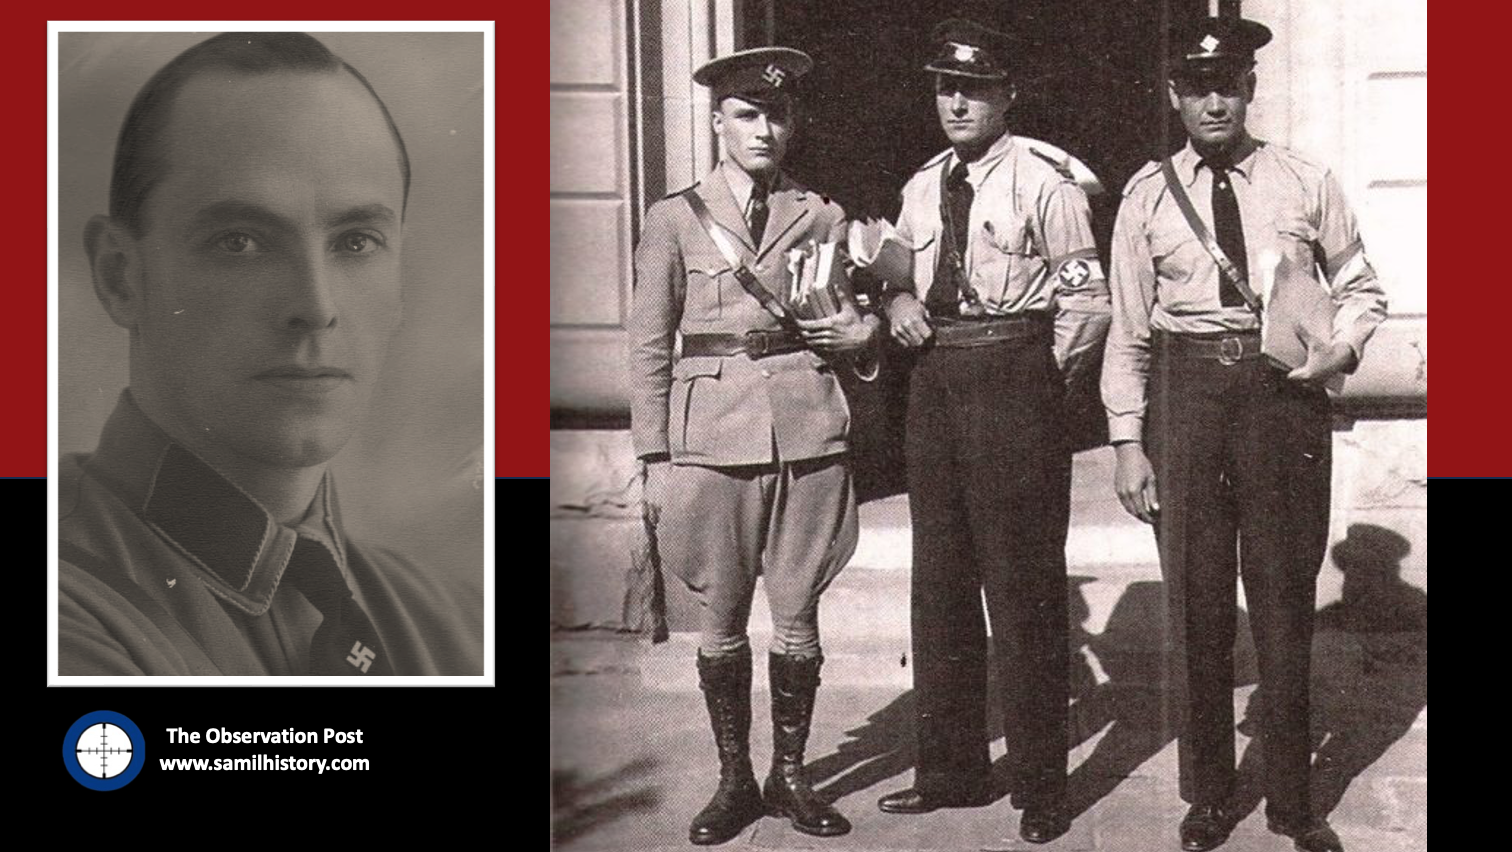
Grey-shirt leadership outside the courts in Grahamstown. Left to Right – standing outside the courthouse in Grahamstown in full SANP dress is Johannes von Strauss Moltke, Harry Inch and David Olivier. Insert picture Louis Theodor Weichardt
Other neo-Nazi and fascist groupings either spun out of the SANP Grey-shirts, or mushroomed as National Socialists movements with the German model front and centre in their own right. Also included was Manie Wessels’ ‘South African National Democratic Movement’ (Nasionale Demokratiese Beweging) formed in Johannesburg. They became known as the “Black-shirts”, and operated in the Orange Free State and the Transvaal. The ‘Black-shirts’ form in opposition to the ‘Grey-shirts’ anti-democracy position and look to a more “purified” whites only democracy free of Jewish and Capitalist influence.14
The Black-shirts themselves would splinter into another Black-shirt movement called the ‘South African National People’s Movement’ (Suid Afrikaanse Nasionale Volksbeweging). Started by Chris Havemann and based in Johannesburg, these Black-shirts advanced a closer idea of National Socialism. By 1937 this Black-shirt splinter group boasted 265 branches mainly in the Transvaal. ‘The Swastika’ was their official mouthpiece.15
Another National Socialist movement known as the ‘African Gentile Organisation’ was also formed in Cape Town by HS Terblanche in September 1934, Dr AJ Bruwer formed the ‘National Workers Union’ (Bond van Nasionale Werkers) in Pretoria – also known as the “Brown-shirts”. Additionally, Frans Erasmus formed another national party militant group called the “Orange-shirts”.16
Two National Socialist movements broke away from the SANP Grey-shirts, when the SANP leader JHH de Waal resigned and formed the ‘Gentile Protection League’. Their sole aim was to fight the ‘Jewish menace in South Africa’.17 Johannes von Moltke, Weichardt’s right hand man, then broke away from the SANP along with most of his Eastern Cape constituency. They formed a new organisation called ‘The South African Fascists’ who wore Nazi iconography, blue trousers, and Grey-shirts.
Additionally, Manie Maritz, a veteran of the South African War and influential leader of the 1914 Afrikaner Rebellion, also admired German National Socialism. A converted antisemite, he even blamed the South African War on a Jewish conspiracy. He founded the anti-parliamentary, pro National Socialist, antisemitic ‘Volksparty’, in Pietersburg in July 1940.18 This evolved and merged into ‘Die Boerenasie’ (The Boer Nation), a party with National Socialist leanings originally led by JCC Lass (the first Commandant General of the Ossewabrandwag) but briefly taken over by Maritz until his accidental death in December 1940. Thereafter it was headed up by SK Rudman.19 Maritz would also detail his Antisemitic and National Socialist views in his autobiography ‘My Lewe en Strewe’ (My life and Aspiration) published in 1939 and modelled on Hitler’s own ‘Mein Kampf’. 20
Aside from all these various parties, the Ossewabrandwag (OB, the Ox-Wagon Sentinel) was the largest and most successful Afrikaner Nationalist organisation with pro-Nazi sympathies prior to and during the Second World War. The Ossewabrandwag was formed on the back of the 1938 Great Trek Centennial celebration – the centennial was planned under the directive of the “Afrikaner Broederbond” (Brotherhood) and championed by its Chairman, Henning Klopper. They sought to use the centenary anniversary of the 1828 Great Trek to unite the “Cape Afrikaners” and the “Boere Afrikaners” under the pioneering symbology of the Great Trek and to literally map a “path to a South African Republic” under a white Afrikaner hegemony. The trek re-enactment was very successful, and Klopper managed to realign white Afrikaner identity under the Broederbond’s Christian Nationalist ideology calling on providence and declaring it a ‘sacred happening’.21
The OB was tasked with spreading the Broederbond’s (and the PNP’s) ideology of Christian Nationalism like “wildfire” across the country (hence the name Ox wagon “Firewatch”’ or “Sentinel”). The OB’s national socialist leanings are seen in correlation with other world ideologies of the time, and specifically to that of Nazi Germany.22 Afrikaner Christian Nationalism, although grounded in “Krugerism” as an ideology, can be regarded as a derivative of German National Socialism and Italian Fascism and is identified as such by OB leaders like John Vorster in 1942.23 Earlier, the future leader of the OB, Dr Hans Van Rensburg, whilst a Union Defence Force officer, had met with Adolf Hitler and became an avowed admirer of both Hitler and Nazim. As leader of the OB, he then later infused the organisation with National Socialist ideology, whereafter the organisation took on a distinctive fascist appearance, with Nazi ritual, insignia, structure, oaths and salutes.
Ideologically speaking the OB adopted a number of Nazi characteristics: they opposed communism, and approved of antisemitism. The OB adopted the Nazi creed of “Blut und Boden” (Blood and Soil) in terms of both racial purity and an historical bond and rights to the land. They embraced the “Führer Principle” and the “anti-democratic” totalitarian state (rejecting “British” parliamentary democracy). They also used a derivative of the Nazi creed of “Kinder, Küche, Kirche” (Children, Kitchen, Church) as to the role of women and the role of the church in relation to state. In terms of economic policy, the OB also adopted a derivative of the Nazi German economic policy calling for the expropriation of “Jewish monopoly capital” without compensation and adding “British monopoly capital” to the mix.24
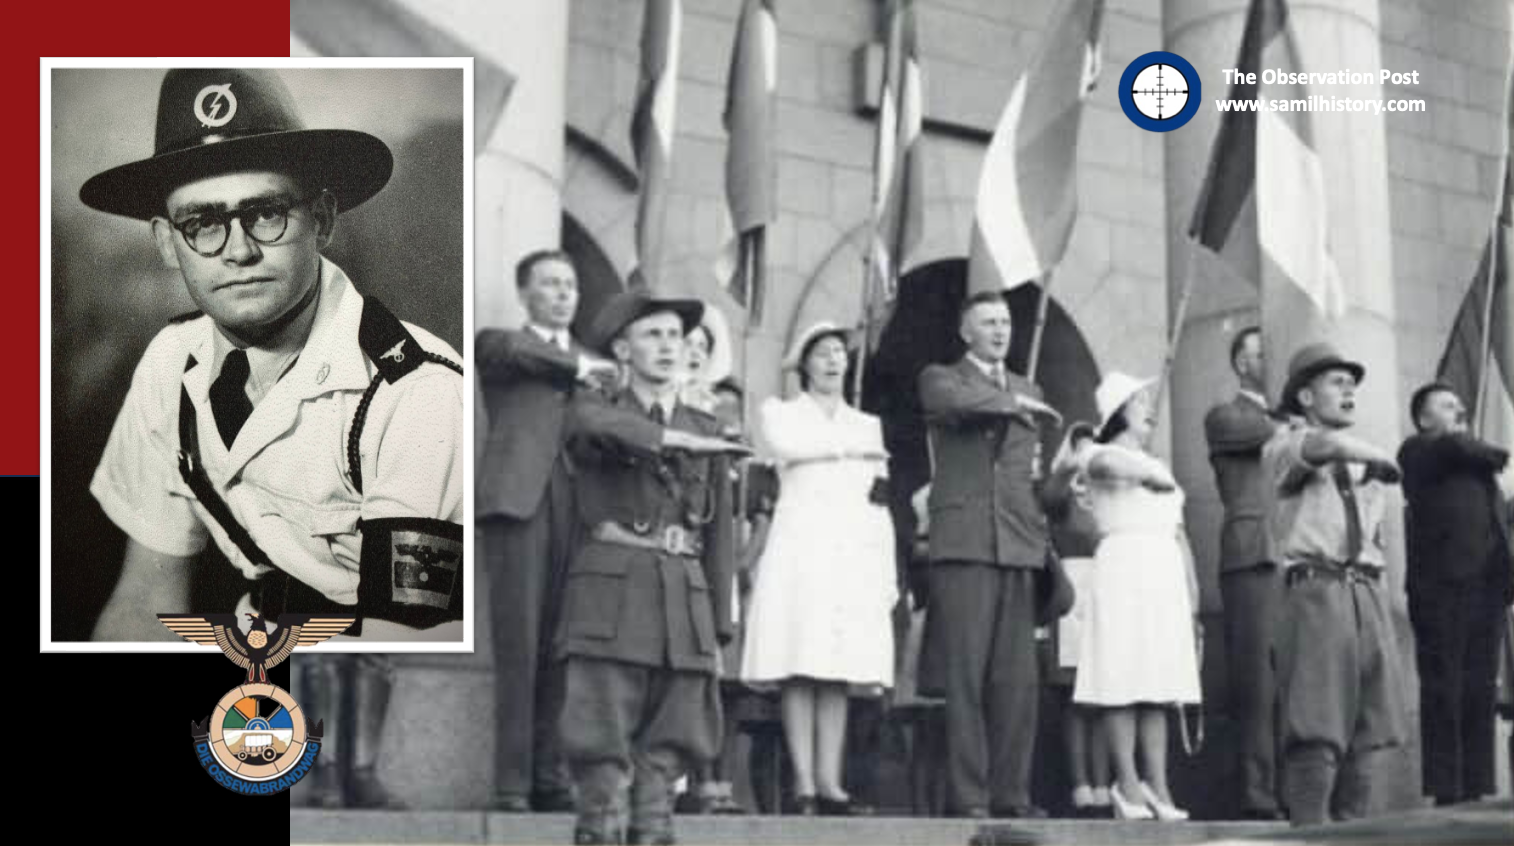
Ossewabrandwag dress and bearing
Although the OB never pitched itself as a National Socialist party, the OB is regarded as a Nazi-sympathising grouping.25By the early 1940’s the OB gained its own militaristic wing, called the “Stormjaers”, who countered the South African war effort through sabotage of infrastructure, targeting Jewish businesses and assassinations. The OB during the war also directly aided the Nazi war efforts aimed at sedition, espionage, spy smuggling, and collecting intelligence in the Union. The post-war Barrett Commission investigation into South African renegades even contains a personal confession ‘van Rensburg vs. Rex’ as to van Rensburg’s regular and treasonous collaboration with Nazi Germany over a set period of time during the war.26
By July 1939, the Black-shirts were formally incorporated into the OB and focussed on the recruiting of “Christian minded National Aryans” into the OB infusing it with more National Socialist “volkisch” Nationalism. This took the OB well beyond its original intention of functioning as a wholesome cultural organ of Afrikanerdom and the National Party.27
The bedrock of Fascism and anti-Communism in Britain
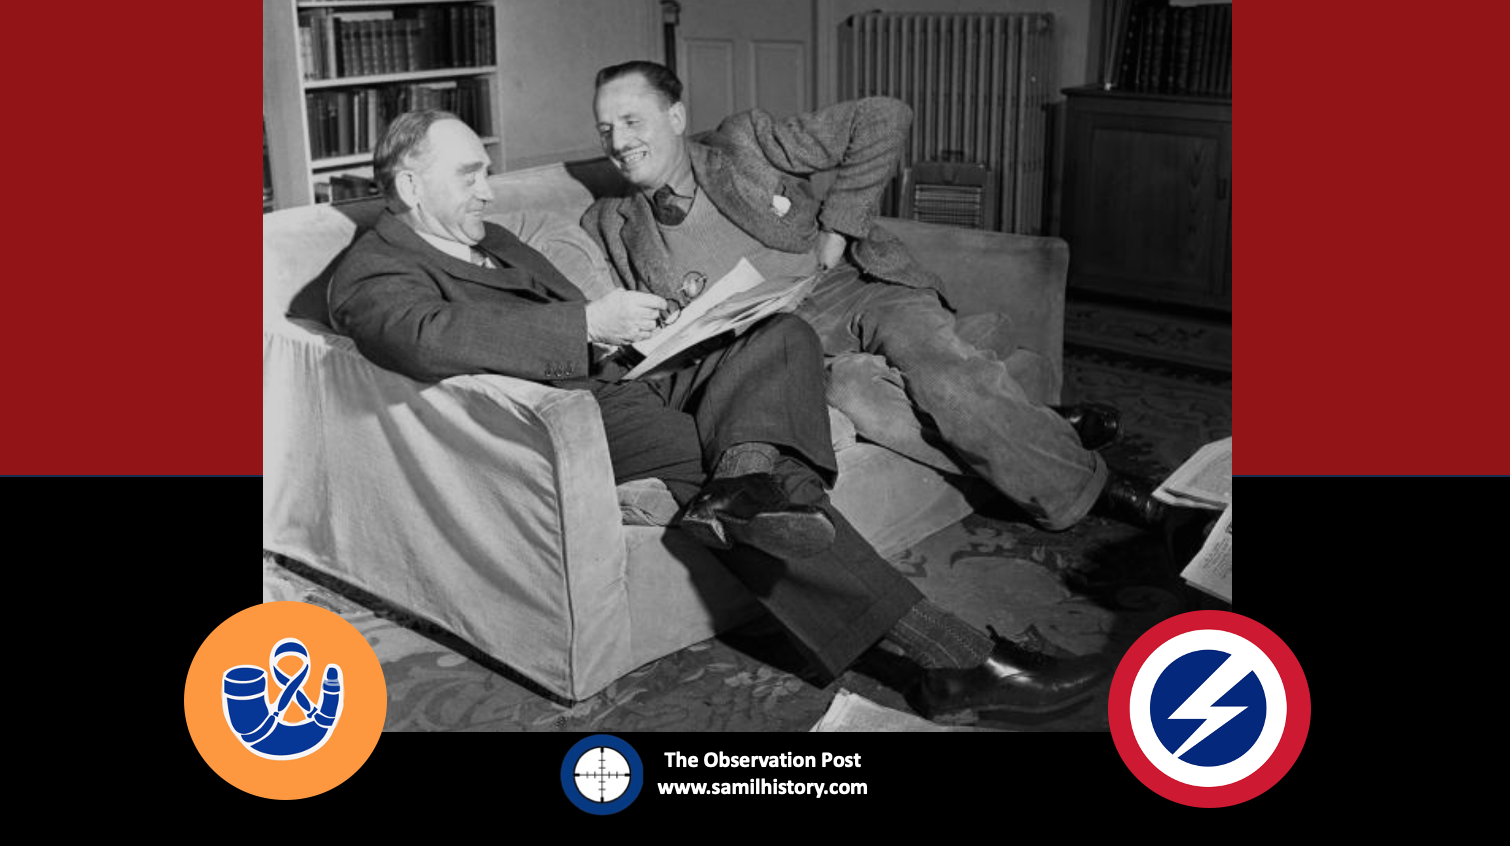
Following the Great Depression in the early 1930s, the United Kingdom and Europe too saw a spike in support for the ideals of fascism. Initially small, these early British fascists pointed to the success of emerging autocracies in Italy and Germany. They saw this mode of fascism as a solution to the economic ramifications of the Great Depression. In Britain, Oswald Mosley was a popular Labour Party Member of Parliament and he brought what may have remained an insignificant fascist voice to prominence.28
During the early 1930s, Mosley became convinced that this new fascist ideology offered the way forward for economic and political reform. The severe economic and unemployment crisis caused by the Great Depression in Britain led Mosely to believe in a centralised political power based on a Keynesian economic state, yet with a broader emphasis on deficit spending and socialism.29
Mosley resigned from the Labour Party in early 1931. On 28 February 1931 he formed the “New Party” and, based on his memorandum of economic reforms, this party in turn became increasingly influenced by fascism. In January 1932, Mosley met with Benito Mussolini in Italy.30 Mosley wrote a new manifesto “The Greater Britain”, which inspired him to fold the New Party and form the British Union of Fascists (BUF), on 1October 1932.31 By 1934, the BUF hit a very popular chord with a segment of the British public, and initially grew to around 40,000 members. Mosley had previously advocated for a corporate state, but rejected the essential Marxist tenet of class conflict and the BUF switched to an anti-Communist leaning.32 Mosely had also previously advocated that trade with the Soviet Union conflicted with his plans for a self-sufficient imperial economic system.33 The BUF followed the dictatorship principle, and Mosley’s system thus called for a powerful executive figure called “The Minister”.34 Mosley also adopted the Italian Fascist Corporate system, or “Corporativismo”, which allowed for capitalism, but where it failed, or worked against the state, then the state would intervene in economic production.35
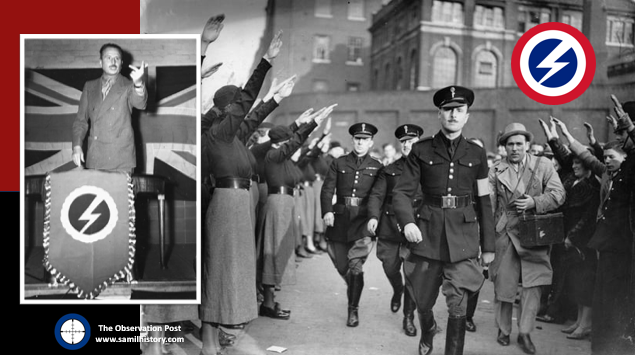
Oswald Mosely and his British Black-shirts
However, his movement eventually became a haven for lunatic antisemites and far right-wing extremists from the fringes of British society. It was not Mosley’s carefully outlined fascist policies, nor his vision of an industrial and economic utopia, which came to represent the BUF. Instead, it was their reputation for violence and the forcible removal of hecklers at rallies by uniformed BUF strongmen also called “Black-shirts”. The general public began to perceive the BUF as little more than violent thugs on the fringe of society. By 1937 the BUF had further distanced itself from popular favour and moved from a benign, harmless curiosity, to a para-military menace. Mosley also increasingly embraced violent change and anti-Semitism. By the end of 1936, the general public associated the BUF and Mosley with German National Socialism and Hitler, and both he and the BUF became a hated national pariah on the fringe of British society.36
Such was the universal British hatred for Mosley’s movement on the home front that it initially turned the British public against Nazism and Fascism as ideologies, more so than Hitler or Mussolini. By the start of the Second World War in 1939, the BUF membership declined to about 20,000 members.37
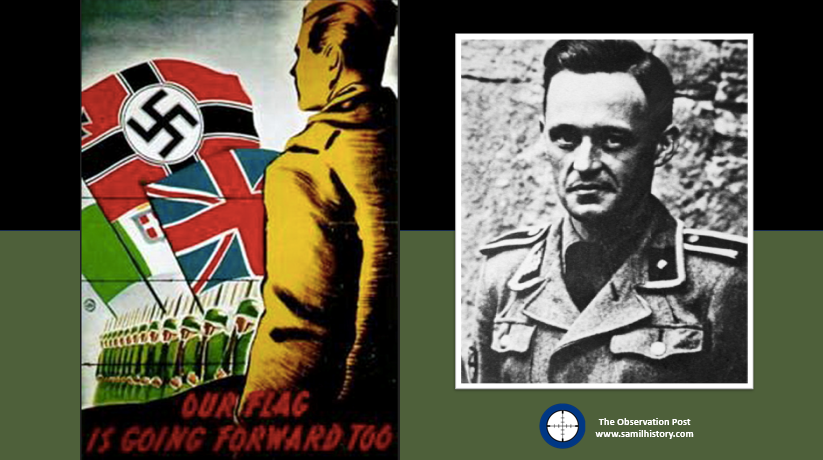
Although Fascism was a fringe ideology in the United Kingdom, other Britons were also romanced by German National Socialism and Italian Fascism, the most significant individuals here are John Amery, Eric Pleasants, and William Brooke Joyce. American born Joyce was a member of the BUF whilst he lived in Britain, and later would infamously became known as ‘Lord Haw-Haw’ – a propagandist broadcasting from Nazi Germany during the war. All three would play a key role in the future “British Free Corps” (BFC) of the Waffen SS.
Road to War
In South Africa and in the United Kingdom this fierce polarisation over Nazi Germany came to a head when Britain and France declared war against Nazi Germany on 3 September 1939. In Britain the activities of fringe fascists were relatively easily curtailed when on the 23 May 1940, Mosley and 740 other BUF members were interned under the Defence Regulation 18B. On 10 July 1940, the organisation was declared unlawful, whereupon it ceased to exist with no real resistance.
The South African case was an entirely different matter. The polarisation over Nazism and Germany was especially felt in the Afrikaner Nationalist community who, through the various neo-Nazi movements in the Union described above, had become enamoured and invested in Nazi Germany. When Britain declared war on Germany, the United Party found itself in a dilemma and a parliamentary three-way debate would take place almost immediately after Britain’s’ declaration. This debate, primarily between the two factions in the United Party (Hertzog’s cabal and Smut’s cabal) and the Purified Nationalists, was whether South Africa should go to war against Germany or remain neutral. As the United Party was loaded with Hertzog’s Nationalists, and there was also Malan’s Nationalists in opposition, Prime Minister Hertzog was very confident he had the majority to carry a motion of neutrality.
Hertzog would argue in his speech that Hitler’s invasion of Poland, and annexations of Austria and Czechoslovakia, was not an indication that the German leader aspired to world conquest, and that the Afrikaners well understood Germany’s right to struggle for their own self-determination against the hostility of the outside world. He also argued that Germany’s actions constituted no threat to South African security whatsoever, and that a policy of neutrality under these circumstances was the only logical policy to adopt. General Smuts would reply in his speech that since the fate of South West Africa would depend on the outcome of the war, South Africa’s interests were virtually involved. Furthermore, South Africa was part of the British Commonwealth whose fate now hung in the balance. To stand aside from the conflict would be to expose the whole “civilised” world to danger.38 Smuts’ amendment to Hertzog’s Motion of Neutrality was carried by 80 votes to 67 votes on the 4 September 1939, and as a result South Africa thus found itself at war against Nazi Germany. Surprised at the outcome, Hertzog promptly resigned and along with 36 of his supporters left the United Party, thereby leaving the South African Premiership and the leadership of the United Party to Smuts.39 The Union officially declared war on Nazi Germany on 6 September 1939.40 Later, on 10 June 1940, Italy declared war on France and Britain, and in response as an Allied country, South Africa declared war on Italy the next day.41
Hertzog moved to form a new party – the “Volksparty” and successfully reconciled with the “Malanites” in the PNP to then form the “Herenigde Nasionale Volksparty” (HNP)42 or Reunited National Party. However, on 5 November 1940 at the HNP’s Convention in Bloemfontein, Hertzog reaffirmed his position on English-speakers rights, and falling on deaf ears, he grabbed his hat and walked out of the National Party forever. In retirement and angered by his treatment at the hands of HNP and Malan, he performed a remarkable volte-face and issued a press release in October 1941 in which he championed National Socialism.43 In the release Hertzog excoriated “liberal capitalism” and the democratic party system, praised National Socialism as in keeping with the traditions of the Afrikaner, and argued that South Africa needed the oversight of a one-party state dictatorship.44
As happened in the United Kingdom, the Union instituted emergency regulations to the curtail Nazi sympathetic organisations and their leaders during the war – even imprisoning some. However unlike in Britain, this was met with home grown resistance in South Africa when pro-Nazi organisations like the SANP and OB moved into active and direct support of both Nazi Germany and Fascist Italy’s war efforts. They did this either through espionage, sedition, or through armed actions and sabotage. On the political stage the HNP continued with its neutrality position whilst at the same time it tacitly supported Nazi Germany.
Approach to Recruitment – South Africa, Britain and Germany
With war declared, in South Africa attention was given to recruiting and bolstering South Africa’s statutory forces, which were undercapitalised and under resourced by the National Party during the inter-war years. On 14 March 1940, Smuts forced Pirow out of his position as Minister of Defence for mismanaging his parliamentary portfolio and his failed “bush cart strategy”.45 Smuts concluded that the re-bolstering and recruitment of the Union Defence Force (UDF) had to be done using volunteerism and not conscription – especially given the sensitivities of Afrikaners to both Germany and Great Britain. Using this strategy, Smuts was able to ultimately call up nearly a quarter of the white adult population for voluntary wartime service – half of which were Afrikaners. Their motivations and political dispositions for joining the Union’s war effort varied considerably. Some held indifferent views as to National Socialism, many held strong views as to anti-Communism, and many joined solely for economic reasons – mainly employment given the ‘poor white’ problem which had historically hobbled the white Afrikaans speaking community.46
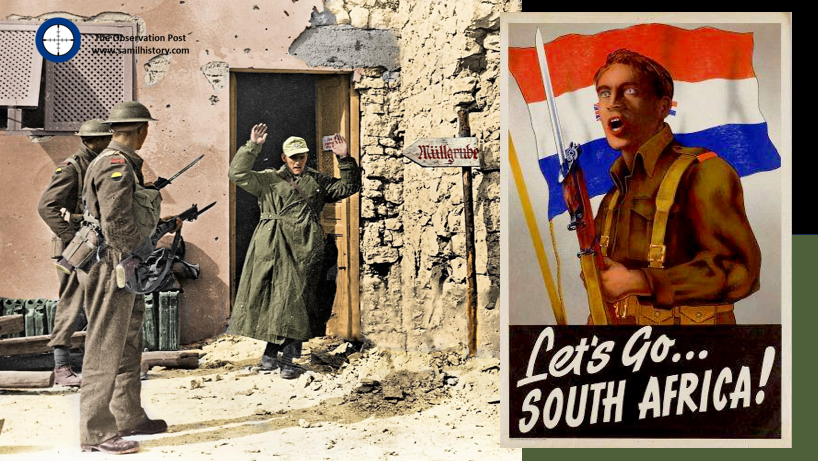
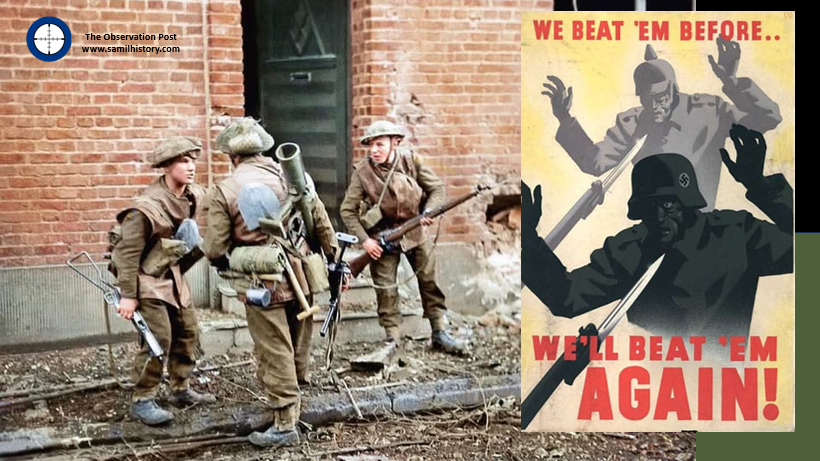
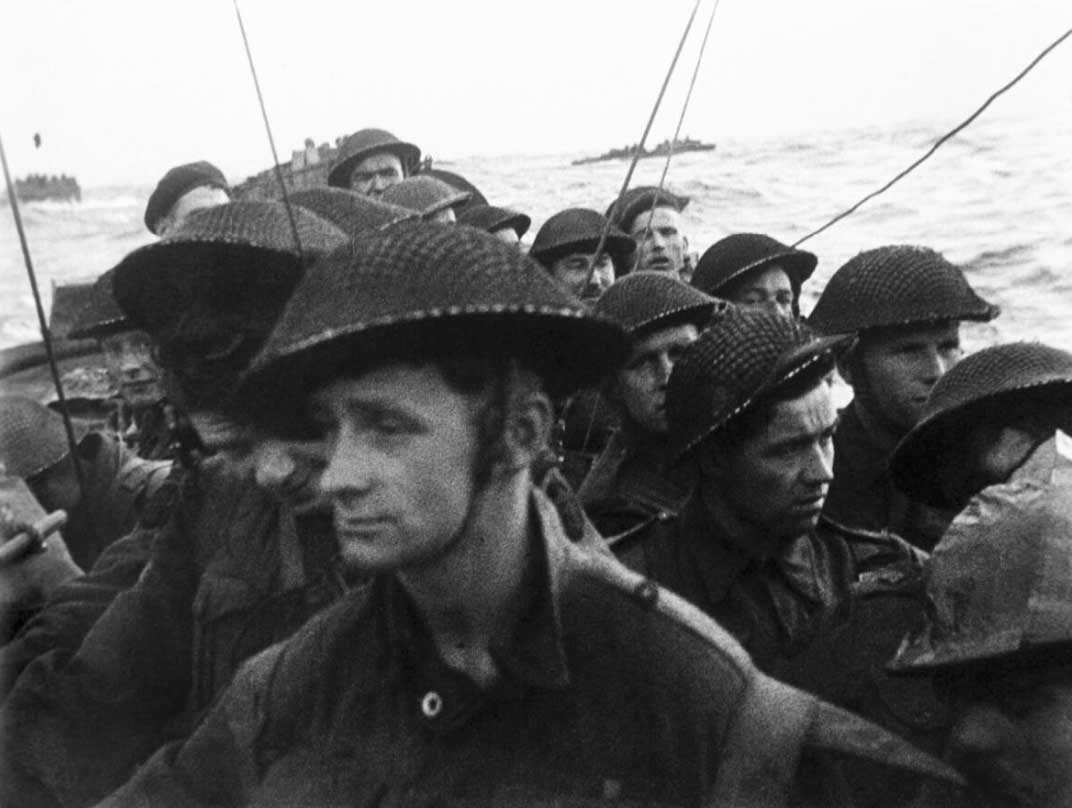
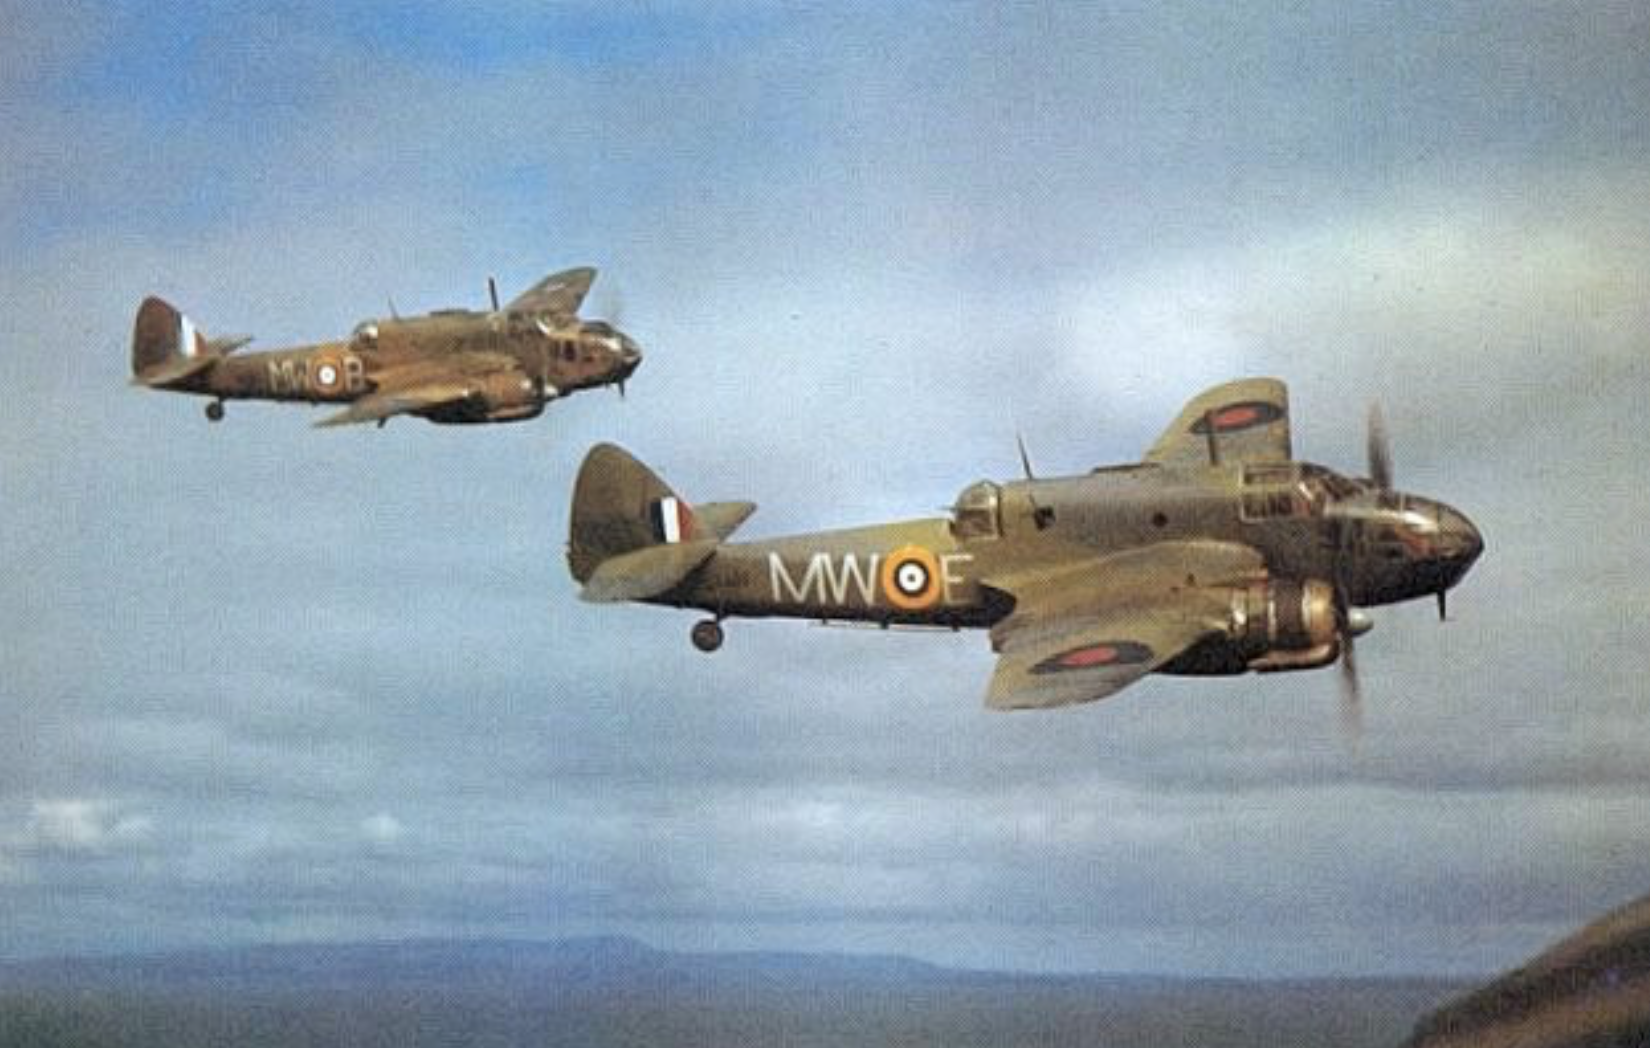
South African recruitment poster and South Africans in action in north Africa – colour photo by Photo Redux
With war declared, in Britain the process of recruitment was somewhat different to South Africa. As with South Africa, the inter-war period and austerity measures had left Britain’s armed forces woefully unfit for purpose. Consequently, on 3 September 1939, Britain immediately turned to conscription. The day Britain declared war on Germany, Parliament passed The National Service (Armed Forces) Act and imposed conscription on all males aged between 18 and 41,47 regardless of their political affiliations and/or dispositions to Nazism, Fascism, or Communism.
With war declared and as the war progressed, Germany’s approach to resourcing its armed forces was also somewhat different. Conscription into military service into the statutory German armed forces (Wehrmacht) had begun as early as 16 March 1935, and it initially applied to all German men of “Aryan”’ classification aged between 18 and 45.
British propaganda poster and troops in action
In parallel to the Wehrmacht, the Schutzstaffel (SS) was born under the leadership of Heinrich Himmler, and was essentially a police force and not a military one. One arm of the SS, the SS Verfugungstruppe (SSVT), emerged as a paramilitary wing and, on 17 August 1938, prior to the infamous “Kristallnacht”, Hitler decreed that the SSVT was not purely that of a police force, nor of an army unit. Rather, it was a National Socialist German Workers’ Party (Nazi Party) political unit at his personal disposal.48 The SSVT would be the forerunner of the Waffen SS when it began to take on an increasingly military guise. On 19 August 1939, just before the invasion of Poland, on an order from Hitler, the Oberkommando der Wehrmacht (OKW), placed the SSVT under the commander-in-chief of the Army (Heer) to fight alongside the Wehrmacht.49
The formation of the Waffen SS and the British Free Corps
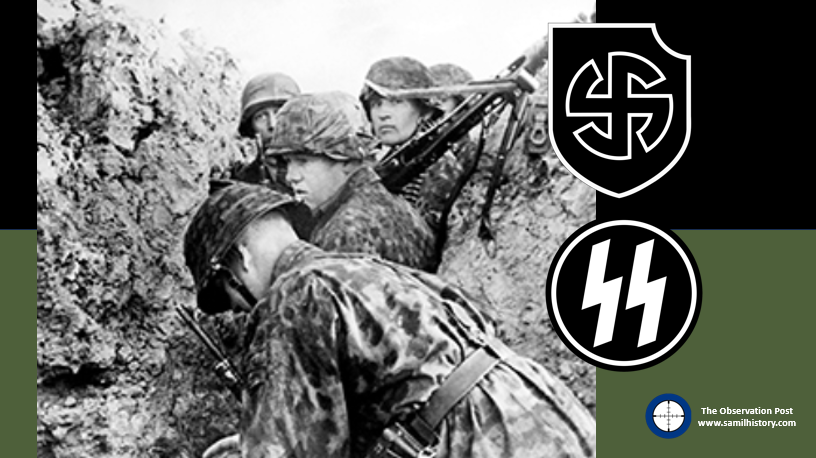
Broadly speaking, once the war was underway the SS had evolved into three groups – the Allgemeine SS (General SS), which was a general police force also enforcing Nazi racial policy; the Waffen SS, which consisted of militarised combat units with special allegiance to Hitler and the Nazi Party; and finally, the SS Totenkopf (Death Head) units that were in charge of concentration camps and the extermination of Jews and other undesirables according to Nazi philosophy.
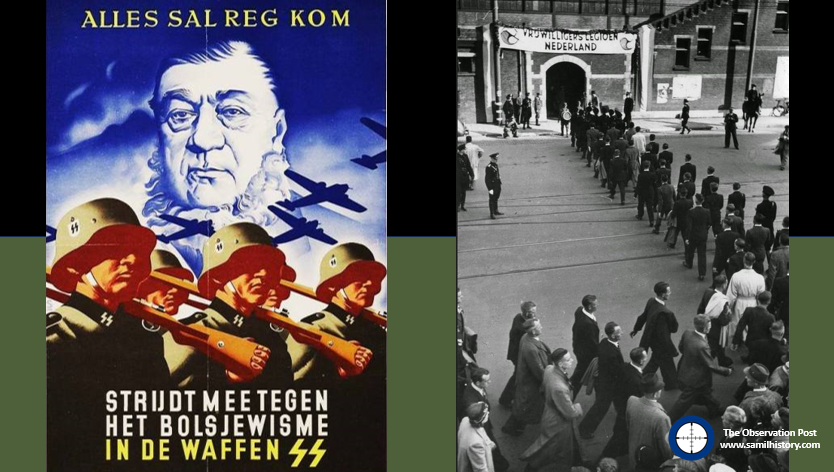
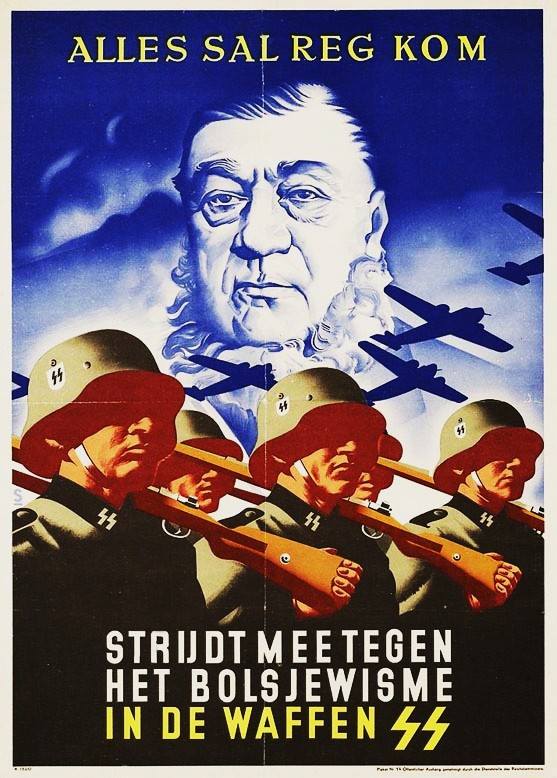
The Waffen SS would grow from just 3 Regiments to a mammoth para-military army with 22 Corps, just over 38 Divisions, 16 Brigades and about 14 Foreign Legions during course of the war. Initially recruitment was limited to ethnic Germans of “Aryan ancestry”. Yet this was relaxed from 1940, and then widened again after Operation Barbarossa was launched in June 1941. After the invasion of the Soviet Union, the Waffen SS was pitched as a crusade against the onset of Bolshevism (Communism in effect). More foreign volunteers, and even eventually foreign conscripts, were raised from occupied countries and/or countries deemed as having population demographics which met with Nazi Aryan dogma. Many of these foreign national volunteers and conscripts joined the various ethically and culturally differentiated Waffen SS structures.
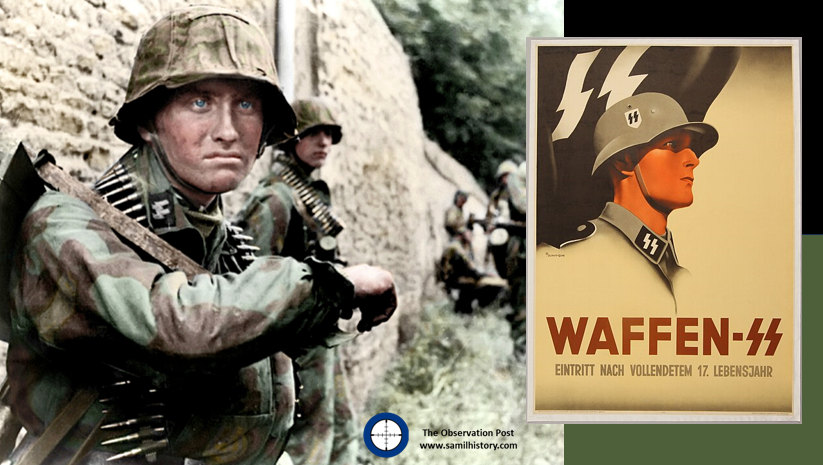
Waffen SS recruitment – colour of Waffen SS in action – image by Doug
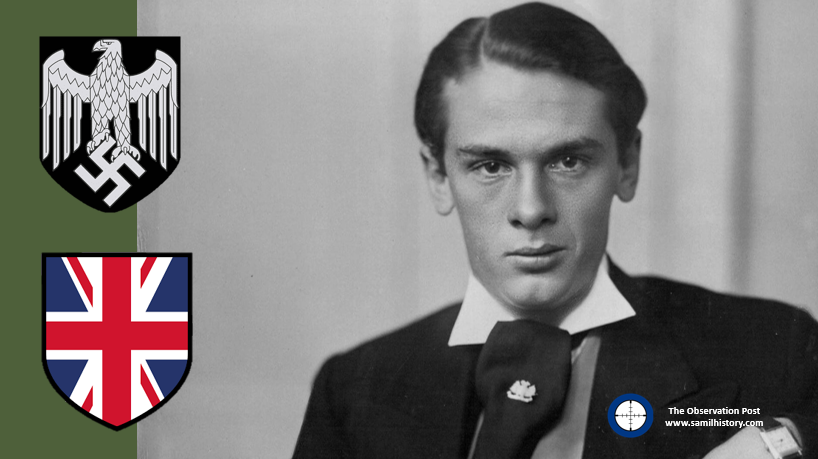
One such Waffen SS unit focussed on British Commonwealth and Allied volunteers who displayed a positive disposition to National Socialism and anti-bolshevism, and met the Nazi “Aryan” recruitment ideals. The unit was originally conceived as the “Legion of St George” by John Amery. Amery was born into the British political elite, the son of Leo Amery, and older brother of Julian Amery, both of whom served as Tory (Conservative) Ministers of Parliament. John Amery was considered a troubled and difficult youngster and became a committed fascist and staunch anti-Communist. Moving to France after he was bankrupted, he was reputed to have joined Franco’s Nationalists during the Spanish Civil War in 1936, eventually returning to France, and was there when Germany occupied France in June 1940.50
John Amery travelled to Berlin in October 1942 and proposed to the “German English Committee” the formation of a British volunteer force to help fight bolshevism. Remaining in Germany, Amery made a series of pro-German and anti-Communist propaganda radio broadcasts to British listeners. After meeting Jacques Doriot in January 1943, Amery modelled his concept on the “Legion of French Volunteers against Bolshevism” – a German Wehrmacht unit consisting of French collaborators. Called the “Legion of St George”, Amery released a proclamation primarily targeting British and Commonwealth prisoners of war (POW), from which cohort he aimed to recruit about 100 members.
John Amery
In his proclamation Amery appealed to these POWs and warned that their wives and children at home are menaced by the invasion of the “Hordes of Bolshevik Barbarity” and the “Dragon of Asiatic and Jewish Bestiality”. He urged these POWs to join the Legion of St George to fight on the German-Finnish front alongside the German and Finnish people against the Soviet Union. He issued a mistruth, stating that hundreds of their countrymen had already joined his legion for the purposes of upholding the British Empire.51
Amery’s recruiting drive, despite persistence, did not yield the hundreds of volunteers as he had hoped, as his message simply did not resonate with the British, Commonwealth and Allied prisoners. However, he managed to prick the interest of a handful of POWs, notably Kenneth Berry – a young and impressionable British merchant mariner and William Charles Brittain, a British Royal Warwickshire Regiment member, captured in Crete in 1941. The first POW recruits were accommodated at what was pitched as a “holiday camp” in Genshagen, Berlin in August 1943.52 By November 1943, they were moved to a requisitioned café in the Pankow district of Berlin.53 Amery’s link to the unit ended in October 1943, after the Waffen SS decided they did not need his services. The unit subsequently officially become a military unit of the Waffen SS on 1 January 1944, and was re-named the “British Free Corps” (BFC).54
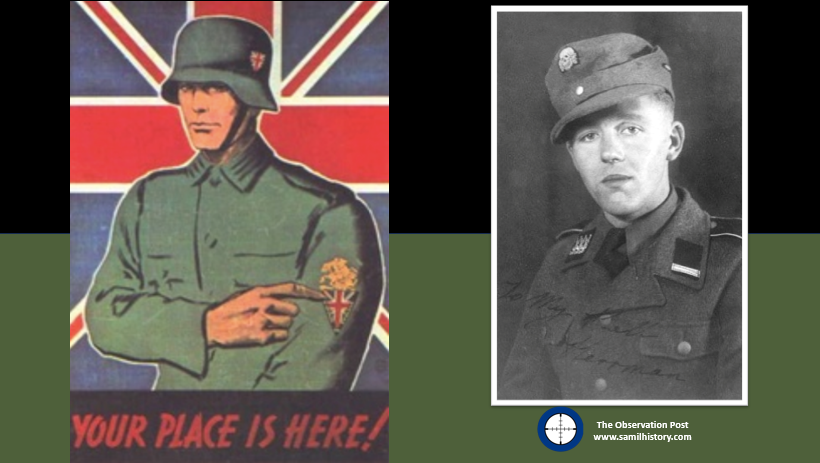
William Brittain in BFC uniform and BFC recruitment poster.
In addition to Amery, it is also noted that the infamous BUF stalwart, the American born Joyce was also in Germany at this time. He, like Amery, was also involved in Nazi propaganda radio broadcasts. Joyce and his wife Margaret became German citizens on 26 September 1940, and his reach expanded with script writing for a trio of stations: Radio Caledonia, Workers’ Challenge, and the New British Broadcasting Service. He also helped write propaganda to assist in the recruitment British POWs to enlist in the BFC and published a book, “Twilight Over England”, in which he contrasted the ideal of Nazi Germany versus the Jewish-dominated, capitalist enemy state.55
Resourcing the BFC
The first Commander of the BFC was Hauptsturmfurer SS Hans Werner Roepke, an English-speaking German.56 Continuing to recruit British and Commonwealth POWs to the BFC, the unit was equipped and repeatedly moved between Hanover and Dresden, and by 8 March 1945 they were billeted near Berlin.57 From its conception to the end of the war, a period of nearly fifteen months, the BUF could account on only 39 people who ultimately served in it.58
Initially only six men joined the BFC, and they became known as the “Big 6”: Thomas Cooper,59 a British born member of Mosley’s BUF with a German mother. He joined the Waffen SS as a Volksdeutsche (a foreign national with German heritage) and transferred to the BFC. Roy Courlander,60 a Lance Corporal with strong anti-Communist leanings serving with the New Zealand Armed Forces in their Intelligence Corps prior to his capture. Before joining the BFC, he was involved in broadcasting Nazi propaganda to his countrymen. Edwin Martin,61 a Private in the Canadian Army, who served in the Essex Scottish Regiment prior to his capture. Frank McLardy,62 another member of Mosley’s BUF and a Sergeant the Royal Army Medical Corps prior to capture. Alfred Minchin,63 a captured British merchant mariner who is accredited with selecting the name of the BFC.64 Finally, John Wilson, a British trooper serving with the Royal Marines No. 3 Commando prior to his capture.65
Roy Courlander in his BFC uniform and BFC recruitment poster
By February 1944, the BFC boasted only eight members, however, soon thereafter more recruitment of Allied POW took place and Robert Heights (British), Robert Lane (British), Norman Rose (British), Lionel Wood (Australian) and Thomas Freeman (British) joined the unit. Freeman, also a BUF member prior to the war, did so to sabotage the project. Freeman and Wilson recruited two Australians, Robert Chipchase and Albert Stokes, and then Theo Ellsmore – a Belgian who masqueraded as a South African. Chipchase only spent a couple of days in the BFC. Stokes was Freeman’s friend and he also initially intended to sabotage the project.66
Leading up to June 1944, William How (British), Ernest Nichols (British), Herbert Rowlands (British) – he had also been a BUF member before the war, and Roland Barker (an Australian, regarded as man of limited intelligence) all joined the BFC. In June two Britons, John Leister and Eric Pleasants (another former BUF member) joined the unit – both were convicted thieves serving time in France in a merchant navy POW camp.67
Other POW recruits over this period included Harry Dean Bachelor (British), Hugh Cowie (British), Roy Futcher (British), Frank Maton (British, also a BUF member before the war) and Tom Perkins – of this group only Maton stood out for his pro-Nazi convictions. In June 1944 the BFC total compliment reached 27 men.68
Eric Pleasants in BFC uniform and BFC recruitment poster
In June 1944, and after the D-Day landings and the commencement of Operation Overlord, the BFC was marred by mutiny. Freeman, Courlander, Maton, and Rowlands all escaped from the unit. Other members returned to and/or requested to be transferred back to the POW camps. Some of the troublesome members were transferred to isolation and labour camps. Some members joining the BFC complained about being blackmailed into it, while others were identified as being mentally unstable.69 A stable, conformist and homogeneous military unit, the BFC was not.
Enter the South Africans
By November 1944 the BFC stabilised somewhat, and some members even returned to it from their respective POW camps. During the summer of 1944/1945 new members started to arrive, and of importance at this time was a trio of South African Prisoners of War – Pieter Labuschagne, Lawrence Viljoen, and, of specific importance is Mardon, a South African with fierce Russophobia, attributed to the contact he had with Russian POWs.70 By the end of January 1945, the BFC reached its zenith in terms of numbers on the ground – 27 members,71 which is only about the size of a single platoon.
Other South Africans have been involved in the recruiting of BFC members, these include Sgt. F.W. Lochrenburg, Gnr B.J.F Brandsma and Pte. S.P.J. van Dyk, however they do not join the BFC and are instead used by the German and BFC authorities as stool pigeons to lure recruits to the BFC.
On the three South Africans that do join the BFC, all come from varying backgrounds:
Douglas Mardon was born in Durban on 22 May 1919, he’s of British heritage. He saw service as member of 2nd Transvaal Scottish and when war broke out he attested with the 1st Battalion of the Royal Durban Light Infantry in 1940, having had attained the rank of Lance Corporal. He is in North Africa fighting for his unit when he is captured during the Battle of Gazala on 6 June 1942. Initially in a POW camp in Italy and thereafter he is transferred to Museburg in Austria – it was here that he made contact with Russian POW whom he learned to detest. He was moved to Stalag 8B and discovered a pamphlet for the BFC inserted into a packet of cigarettes and it perked his interest in joining the BFC.72
Labuschagne is born 4 January 1922, of Afrikaans heritage from Zastron and attests with the President Steyn Regiment (later with Louw Wepener Regiment). Captured on 23 November 1941 at the Battle of Sidi Rezegh in North Africa. Initially in a POW camp in Italy, he is later transferred to Germany. He learns about the BFC from a distributed pamphlet which is left on his bed.73
Viljoen was listed as a Constable and attests as a Private in the 1st South African Police Battalion, Afrikaans by heritage, born on 19 June 1917. Viljoen is from Laingsburg and later lives in Worcester in the Western Cape.74
Mardon on 8 March 1945 received a promotion to Unterscharführer and was given command of a section of the BFC, the other two are given the rank of ‘SS Mann’ (the equivalent of a private).
On 13 February 1945, whilst the BFC was billeted in Dresden on their way to the Eastern Front, now outside Berlin, the city came under air attack by Allied bombers – during this attack Viljoen disappeared. His colleagues thought he was dead, but this turned out not to be the case.75
BFC Combat deployment
By March 1945, the BFC was deployed to Berlin for combat. At this stage, some of its members had already started to have second thoughts on the prospect of fighting a losing battle, which prompted some members to request to be returned to their POW camps or transferred to other non-combat units. With a corium of committed BFC members having volunteered to fight Communism on 15 March 1945 the BFC was deployed to Berlin and billeted on the eastern front alongside the III (Germanisches) SS-Panzer Korps. Under-resourced, they are not formally given ammunition, the BFC use initiative and secure limited stocks of ammunition.76
On 22 March 1945, the BFC was ordered to reinforce a reconnaissance battalion of the 11th SS Volunteer Panzergrenadier Division Nordland, which was regarded as one of the most multicultural divisions in the Waffen SS. The 11th SS Volunteer Panzergrenadier Division Nordland was commanded by Brigadefürer Joachim Ziegler and fell under the III (Germanisches) SS Panzer Corps under the overall command of Obergruppenführer Felix Steiner.
11th SS Volunteer Panzergrenadier Division Nordland in action and their insignia
Only one BFC combat engagement is found in contemporary accounts, and it is unclear as to the full role of the BFC. On 22 March whilst the BFC section under Mardon’s command was entrenching itself alongside the 3rd Company of SS-Panzer-Aufklärungs-Abteilung 11 “Nordland” – the reconnaissance battalion it was attached to. They were now situated in the village of Schoenburg near the west bank of the Oder Canal.77 This 3rd Company of the SS-Panzer-Aufklärungs-Abteilung 11 “Nordland” was partially overrun by an advance element of the Red Army who had blundered onto its position by accident. Although taken by surprise, the Waffen SS troopers launched a spirited counterattack driving off the Soviets. It is however unclear if any BFC members were involved in the fight and to what extent, as interviews with BFC members after the war point to minimal if any involvement in actual combat (although this reasoning was also used by BFC members as an excuse to evade charges of treason), according to court statements they were located in the second trench line behind the primary line on the Oder canal, and the second trench line never came under attack by the Red Army.78
Whilst the BFC was entrenched outside Schoenburg with the 3rd Company of the SS-Panzer-Aufklärungs-Abteilung 11 “Nordland”, Cooper managed to convince the Division’s Commander, Brigadefurer Joachim Ziegler, that the BFC was indeed unfit for combat and it was withdrawn from the line and sent to Tempin 79 on 16 April 1945 to join the transport company of Obergruppenführer Felix Steiner’s Headquarters staff (Kraftfahrstaffel StabSteiner).80 The BFC moved with the transport company to Neustrelitz whereupon on 29 April 1945 Obergruppenführer Steiner orders his Panzer Corps to break contact with the Soviets and to head west into Anglo-American captivity. By 2 May 1945, Cooper and the remnants of the BFC surrendered to the 121st Infantry Regiment of the United States of America near Schwerin.81
After the war ended, numerous commissions were instituted by the British and the Commonwealth countries to round up and interrogate all their nationals who aided any of the Axis powers by any means during the war. Those accused of High Treason were brought to justice. In the case of those who had joined the Waffen SS, and specifically those having joined or were associated to the BFC, the sentences and outcomes varied from acquittal, to time served, to fines, to various degrees of incarceration and hard labour, and even capital punishment. The gallows were a fate awaiting Amery, who hanged on 19 December 1945, as well as Joyce, who hanged on 3 January 1946, Cooper was also given the death sentence, but his execution was stayed at the last minute on 20 February 194682 and commuted to life in prison.
John Amery (top left) and William Joyce (bottom left) were both executed, Thomas Cooper (top right) had his death sentence commuted to life.
In the end they all fall onto the “wrong” side of history, and can be best summed up by John Amery’s epitaph written by his father Leo Amery (who by co-incidence also penned the Times history of the South African War 1899-1902):
‘At end of wayward days he found a cause – ’Twas not his Country’s – Only time can tell if that defiance of our ancient laws was as treason or foreknowledge. He sleeps well.‘
Communism – not our creed
As in Britain, in South Africa at the start of the war Communism is perfectly legal. It is however regarded with disdain by moderate and right wing white South Africans, however it does find a home in some white supporters of the Labour Party and in the small community of Jewish immigrants who are highly unionised (especially in the garment industry) and have liberal leanings. White South Africans in general are in support of the United Party and fearful of Communism and its growing support amongst aspirant and politicised Black South Africans.
As to the fear of Communism, the invasion of the Soviet Union by Nazi Germany on 22 June 1941 causing the Soviet Union to side with the Allies proves a problematic and awkward question in South Africa. The ruling party, the United Party, as well as its primary opposition party, the Reformed National Party – are all principally anti-communist, in fact they are very vocally anti-Communist. General Jan Smuts would try and give reason to his and his country’s own anti-Communist sentiments and siding alongside the Soviet Union in July 1941 when he said:
‘Nobody can say we are now league with the Communists and fighting the battles of Communism. More fitly can the neutralists and the fence sitters be charged with fighting the battle of Nazism. If Hitler has driven Russia to fight in self-defence, we bless her all success, without for a moment identifying ourselves with her Communistic creed. Hitler has made Russia his enemy and not made us friendly to her creed’.83
The Soviet flag was raised over the Reichstag 30 April 1945 – insert letter from the Union of South Africa in support of the USSR.
What remains a truism throughout the war, is that although Communism is an anathema to the United Kingdom, United States and the South African Union’s mainstream and right wing politics, the Soviet Union remains a key supported ally, and inside South Africa the Red Cross raises support for the Soviet Union and Smuts’ United Party even expresses solidarity with the Soviet Union after a meeting held on 16 October 1942 and they notify the Consul General of the USSR in Pretoria of their unwavering support.84
South African Renegades – The Rein and Barrett Missions
After the end of the Second World War, all the Allied nations embarked on a Nazi hunt to prosecute war criminals. This included high profile war crimes, but it also included hunting all nationals who, by siding with Nazi Germany and the Axis forces, had committed an act of High Treason. South Africa’s post war hunt for its nationals assisting or joining Nazi Germany and other Axis forces remained relatively undocumented and under-researched, however this does not mean that South Africa did nothing to find and prosecute its war criminals.85
In December 1945, it was agreed that those South Africans who had committed treason as Union nationals, would be dealt with by the Department of Justice, whereas those who qualified as ex-Union Prisoners of War who joined German forces would be dealt with by the Union Defence Forces’ Military Disciplinarian Code.86 In February 1946 the Rein Mission left for Europe to work alongside British MI5 to identify South African War criminals, this opened the way to a more comprehensive mission, called the Barrett Mission aimed primarily at South Africans who whether directly or indirectly aided the German War effort.87 These South Africans were referred to by historian Ian van der Waag as ‘Hitler’s Springboks’ and they included Radio Zeesen Afrikaner broadcasters, stool pigeons, collaborators and members of the Waffen SS (and BFC).88
‘Hitler’s Springboks’ then constituted a small number of South African citizens in Nazi Germany who were swept up by Allied forces, having either caught up with them through various interrogations or them having surrendered to Allied Forces directly. Previously embargoed or restricted archival material, now in the Department of Justice archives indicates that by 21 July 1945 the Department of Military Intelligence of the Union Defence Force started formulating lists of South African Union Nationals in Nazi Germany during wartime and requesting the British MI5 Intelligence Service to supply more information on them and that they had to hold them for interrogation. These primarily included name lists of South African Nationals or German Nationals with South African heritage or background who had in some way played a role in influencing South African Prisoners of War (POW) in various POW camps in Germany. This was achieved either through propaganda, through printed media, and/or radio broadcasting with the expressed purposes of forwarding Nazi German war aims and trying to influence them to join Germany’s armed forces.89
Of interest here are the various Afrikaner broadcasters of Radio Zeesen, Eric Holm, Johannes Snoek, Michael Pienaar, Francois Schaefer, Betty Blackburn (Marshall), Isa Goos, Danie Michell, and Marjorie Sanna (Hofmeyr), along with three German academics with South African backgrounds – Onderfuehrer Becker, Professor Bruxmer and Captain Brauer who play a key role in trying to influence South African POWs at various POW camps in Germany. Also swept up in this request to MI5 are a handful South African Nationals with German heritage (Volksdeutsche) who had been in Germany at the start of the war and had joined standard German Wehrmacht units, notably Carl Johannes Hugo and Konrad Rust.90
The Justice Department meets on 19 March 1946 at the Ministry of Justice (including Barrett), whereby a decision is taken to issue Police dockets and prosecute through the Ministry all identified ‘High Treason’ Union Defence Force renegades who had served in German Armed Forces. Those Union renegades identified with lessor infractions of the military code of conduct would be prosecuted by the Union Defence Force.91
The Rein Mission and MI5 British Intelligence had forwarded their initial findings on South African Union renegades in BFC to the Union from their preliminary investigations to the South African Union’s Justice Department – these include 62 sworn affidavits and 53 police statements from 166 interviews to the Rein Mission.92 Identified British Free Corps (BFC) South African Union nationals who qualified as renegades having potentially committed High Treaso, they are – L/Cpl D.C. Mardon, Pte P.A.H. Labuschagne and Pte L.M. Viljoen.93
Other South African Union Defence Force (UDF) members are identified as having joined or having been recruited to the BFC, of these the notable members are; Sgt. F.W. Lochrenburg, Gnr B.J.F Brandsma and Pte. S.P.J. van Dyk, however the initial investigations indicate they acted as stool pigeons94 – In addition, the chaotic nature of the BFC, and their short flirtations with it, there is insufficient evidence. This compels the Justice Department to believe there is an insufficient case for High Treason and they leave their cases to the UDF to investigate under their disciplinary code.95
By 4 July 1946, the case against South African nationals who had been recruited and/or joined the British Free Corps (BFC) of the Waffen SS had been fully reviewed by the Barrett Mission. Mr. L.C. Barrett, acting as the Senior Professional Assistant for the Attorney General in Pretoria issues a relatively comprehensive report on the BFC, outlining its history and intent, the grounding of the founders in British Fascism, its recruitment procedures, leadership, and deployment. These findings gleaned primarily from British Intelligence and confessions of BFC members in the United Kingdom who had already been interrogated. On the issue of South African Union Defence Force members who had served in the BFC or had been stool-pigeons in the recruitment process for the BFC, he concludes that there is a certainly a case to be made of high treason for Mardon, Labuschagne and Viljoen back in the South African Union.96
On Trial for High Treason
After Mardon, Labuschagne and Viljoen were arrested and repatriated back to South Africa a decision had to made as to how the charges and trials against them would proceed, especially in light of the unique socio-political landscape in South Africa and Prime Minister Jan Smuts’ continual reconciliation and appeasement of the Afrikaner right in order to establish ‘racial harmony’ and reconciliation, an approach he had taken to this demographic which had its roots going back even as far back as the 1914 Maritz Revolt.97 An approach which had not changed much by the end of World War 2 given Smuts’ cautious approach taken to political opponents who had flirted with Nazism like Hans van Rensburg, the Commandant General of the Ossewabrandwag and the ever increasing case of high treason stacking up against him, so much so that ‘van Rensburg was indeed guilty of high treason’.98
In addition Smuts had taken a lenient approach to Robey Leibrandt, the leader of the National Socialist Rebels whose death sentence for high treason he commuted to life in prison instead, the underpinning reason – he had fought alongside Leibrandt’s father during the South African War (1899-1902, seeking harmony instead with this highly disgruntled anti-British demographic of Afrikanerdom.99
Given this background, the decision was taken to prosecute all renegade cases of high treason using a special court.
The charges against Mardon, Labuschagne and Viljoen broadly covered three areas of High Treason Firstly, that whilst members of the South African state’s statute forces, they joined the statute forces of the German state, whilst South Africa was in a state of war against Germany (the enemy). Secondly that they joined military structures controlled by the enemy German state. Thirdly that they wore the uniform of the enemy German State. Fourthly that they underwent military training offered by the enemy German State. Fifthly, they bore arms against an allied state of the Union of South Africa.100
Mardon in his defence insisted that his sole motivation was to fight against Bolshevism (Communism), which he saw as a threat to his homeland in South Africa as it would bring with it “black domination”. He also claimed he did not take the oath of allegiance to Nazi Germany and Hitler. The crown found that regardless, he had displayed “hostile intent” to both the Union of South Africa and her Allies by taking up arms and donning a German uniform – albeit with some adaptions showing a Union Flag on the sleeve and the British lions on the collar instead of the usual Waffen SS lightening bolts. The court did take into account that it was Mardon’s wish to only fight Communism and he wished no harm on his countryman and that he was true to this conviction having been assured by his German handlers that this was the sole purpose of his recruitment into the Waffen SS. As to anything unclear to what constituted ‘high treason’ the court found that any act which was designed to assist the enemy:
‘positively by giving help of any kind, or negatively by obstructing or weakening forces arrayed against (the enemy), is an act of high treason’. 101
In this key respect to this Mardon is found guilty of High Treason.
Oswald Pirow is one of the members of the renegades defence council, he applies for postponement of the verdict and withdraws when its refused. Barrett acts for the crown. The verdict is announced on 14 April 1947. On the charge of High Treason: Mardon is found guilty, he is given a fine of £75 or 9 months in prison.
In handing down a light sentence, Justice Ramsbottom finds mitigating factors in Mardon’s intentions to only fight against Communism and not the Union in his age and cites naivety of youth, he also considers the Prisoner of War position and the lack of uncensored ‘news’ available to persons in a POW camp and they been susceptible to enemy propaganda. Furthermore, he finds mitigation in the fact that the South African renegades only join the BFC late in the war, when the advancing Red Army is a well established fact, and their intentions were only to fight communism. Mardon’s time in prison of 3 months to date is also factored and the Judge looks to the case of another BFC member Kenneth Berry who is given a 9 months sentence by a British court as an appropriate benchmark for his verdict.
Noted here, Kenneth Berry’s case is a little unique in that does not advance in rank in the BFC and remains a ‘SS Man’ (a private) whereas Mardon is made a non-commissioned officer – a Unterscharführer and was given command of a section (10 men of the BFC). Berry receives what was considered at the time by Rebecca West to be the ‘lightest sentence conferred on any traitor’102 in the United Kingdom on account of his age. Berry is regarded by the Director of Public Prosecutions ‘as an irresponsible youth who was easily led.’103
Kenneth Berry has served his sentence by the time Mardon, Labuschagne and Viljoen are brought to trial, and he is brought to South Africa as a witness in their case, so too is William John Miller, another BFC member (British) who was a Royal Artillery Gunner prior to his capture – he was deemed so “useless” that Mardon refused to deploy him in a combat role.104 Harry Dean Batchelor, a British Royal Engineers sapper who joined the BFC also appears as a witness, so too does a German, Wilhelm August ‘Bob’ Rössler, a German Heer signaler, wounded he is attached to the BFC as an interpreter as his English was very good.105
Of interest is Kenneth Berry as a very wayward young man, he is positively disposed to the British Union of Fascists and John Amery, and even writes to Amery to give him a progress on how he is doing in the BFC and enjoying it.106 Berry spends much of his testimony on the difference between the German “Heer” (Statutory Army) and the Waffen SS, in addition to the differences in BFC insignia and that of other Waffen SS units.
Kenneth Berry (centre) in a propaganda photograph in his BFC uniform with SS-Sturmmann Alfred Minchin, an ex British Merchant sea-man talking to German officers, during a recruitment drive in Milag, April 1944. – the uniform and insignia of the BFC left.
In fact during the case, the issue of the British Union of Fascists (BUF) surfaces as there are so many members of the BFC who were BUF members – so much so it starts to take a strong BUF disposition and the unit’s leadership has to make it clear that it is not a ‘fascist’ undertaking but an anti-Communist undertaking so as to attract non-fascist and non-BUF British and Commonwealth Prisoners of War.107
Labuschagne’s charges follow the same as Mardon’s and he found guilty of High Treason on exactly the same terms as Mardon – that he joined an organisation controlled by the enemy (the BFC) for the purposes of fighting against the Soviet Union – an Ally of South Africa, that he was deployed in service of the enemy, that he donned the enemy’s uniform and that he underwent military training whilst in service of the enemy. In addition, Labuschagne is also found to have actively tried to recruit other South African Union POW to join the BFC. In all the court also concludes ‘hostile intent’. One difference is that Labuschagne at times uses the alias “Smith” however the court concludes that whilst this could be seen as a sinister move to cover his tracks, they also accept that he uses the alias as many of his British counterparts could not pronounce his surname.108
One key mitigating factor is brought up in Labuschagne’s case, when the BFC unit is been prepared for deployment to fight on the Berlin front, all the BFC members are called in and informed whether they have been selected to go, and although all of them have volunteered to go, Labuschagne is informed he has to stay behind at the base. The reason cited for this is Labuschagne is unliked by the men, especially Mardon who does not rate him and finds him to be a disrupter – so for the sake of maintaining a positive esprit de corps Labuschagne is removed from the line.109
Labuschagne’s is found guilty of High Treason, and his verdict is also announced on 14 April 1947. Like Mardon his sentence is also very light, and its in fact lighter than Mardon’s sentence – Labuschagne is given a fine of £40 or 4 months in prison.
Viljoen’s charges follow the same outline as Mardon and Labuschagne – that he joined an organisation controlled by the enemy (the BFC) for the purposes of fighting against the Soviet Union – an Ally of South Africa, that he was deployed in service of the enemy, that he donned the enemy’s uniform and that he underwent military training whilst in service of the enemy. Viljoen is however found to have absconded from the BFC during the Dresden Air Raid and was never really operationally deployed. His verdict, his charges are withdrawn and he’s acquitted.
The Oswalds
Of importance in also understanding the socio-political context of the treason trials of Mardon, Labuschagne and Viljoen, and that of other South African renegades, is the political disposition of their defence council. Oswald Pirow in almost all instances of the renegade defences acts as legal counsel, and Pirow has a special relationship with Oswald Mosley.
In terms of historic sweep, Pirow is a highly accredited advocate and counsellor, however, he is also the previous National Party Defence Minister under Hertzog and the founder of the National Socialist ‘New Order’ think tank within the National Party prior to the war. Oswald Mosley, on the other hand is the previous leader of the British Union of Fascists (BUF) which had played a significant role in influencing many of the British nationals to join the Waffen SS and the BFC. After the war (and his imprisonment) Mosley releases his book “The Alternative” in October 1947, which is a re-hashed National Socialist ‘New Order’.110 Prior to the war, Oswald Pirow and Oswald Mosely, even as early as 1938, have been in contact collaborating with one another. Just after defending the BFC South African renegades treason cases in April 1947, Pirow makes contact with Mosley again and they collaborate on a paper for a fascist and racially separated African order.111 They come up with the Mosley-Pirow Proposals, which were:
‘a natural development of General Hertzog’s Segregation Policy and was foreshadowed by (his) then cabinet colleagues 15 years earlier’.112
The proposals essentially divide Africa into a large southern ‘white’ state with its labour provided by separate ‘black’ vassal states on temporary work permits. The work foreshadows the Apartheid Bantustan program and influx control policies.113
The Oswalds collaborating – Oswald Pirow and Oswald Mosley right
This mutual political disposition and outlook between ‘the two Oswald’s’ is an interesting twist as it signals what sort of post war sentiment there is in many parts of South Africa, even years after the war is over. Mosley is regarded as ‘the most hated man in Great Britain’ and his writings that of the ‘loony’ right. Pirow on the other hand is taken a little more seriously in South Africa, he’s eventually appointed the State Prosecutor in the Treason Trial and these writings of his foreshadow some the National Party’s policies on Apartheid.
Pirow’s involvement as defence council in all the cases of South African renegades is interesting – be they people caught spying for Nazi Germany in South Africa, or be they members of Radio Zeesen broadcasting Nazi propaganda to South Africa or be it this case, the South Africans joining the Waffen SS. In all instances Pirow – as a previously committed and vocal Nazi and anti-Communist politician – is “protecting his own” and bringing his formidable legal and political skills to bear in doing this. His presence alone would give an atmosphere that Nazism and Fascism were normative and accepted practices in some communities in South Africa before and during the war, so too the deep seated hatred and fear of Communism. His open relationship with Mosely, and support of British fascism also gives a little gravitas to the British Union of Fascists (BUF) and all the BFC members who belonged to it.
Waffen SS Propaganda – Dutch and South African
An interesting facet of the Waffen SS and BFC story is the extreme hatred for Communism and the fear of the on-set of Bolshevism in Europe, the United Kingdom and the Commonwealth. So how successful was Nazi Germany in recruiting Waffen SS members from foreign counties on the same premise of anti-bolshevism? On a cultural, language and historical basis (as its shared) the closest we can compare the recruitment of South Africans into the Waffen SS, especially Afrikaners, is to compare the appeal the German’s made to recruit the Dutch and its successes.
The appeal for Dutch recruits into the Waffen SS has a distinctive South African message. Hitler in 1940, is a firm fan of the Afrikaner Nationalist cause and shares the ‘politics of pain’ caused during the South African War with them. Hitler’s passion for Boer politics starts early and he states in his autobiography Mein Kampf:
‘The Boer War came, like a glow of lightning on the far horizon. Day after day I used to gaze intently at the newspapers … overjoyed to think that I could witness that heroic struggle.”114
On 30th January 1940 at the Sportspalast, during his speech, Hitler drives his pro-Afrikaner Nationalism positioning home when he makes two significant points, he says:
“They (Britain) waged war for gold mines and mastery over diamond mines.”115
Then later in the speech Hitler says:
‘When has England ever stopped at women and children? After all, this entire blockade warfare is nothing other than a war against women and children just as once was the case in the Boer War, a war on women and children. It was there (South Africa) that the concentration camps were invented, in an English brain this idea was born. We only had to look up the term in the dictionary and later copy it .. with only one difference, England locked up women and children in their camps. Over 20,000 Boer women (and children) died wretchedly at the time. So why would England fight differently today?’
Later Hitler would again engage his propaganda ministry to drive his opinion on the Boer War, Joseph Goebbels who on 19 April 1940, on Hitler’s birthday speech, would broadcast over Radio Zeesen (and others), and he said:
‘Get rid of the Führer or so-called Hitlerism … British plutocracy had tried to persuade the Boers during the South African war of the same thing. Britain was only fighting Krugerism. As is well known, that did not stop them from allowing countless thousands of women and children to starve in English concentration camps.’116
Ohm Krüger (Uncle Paul), a movie about the Boer War is released in 1941 – it’s Joseph Goebbels’ masterpiece on South Africa. Winner of the Reich Propaganda Ministry’s “Film of the Nation” rating (one of only 4). The movie is a propaganda masterstroke which would reach millions all across Europe, especially in the Netherlands and related territories. Directed by Hans Steinhoff the story is about Paul Kruger, the Transvaal Republic President, and the Boer War from a ‘Dutch’ (Boer) perspective and it climaxes with the massacre and starvation of Boer women and children in British concentration camps – it’s highly inaccurate and an historic fabrication, however it nevertheless strikes a chord with the Dutch, who supported the Boer cause during The South African War.
Hitler speaking at the Sportspalast, inserts Mein Kampf and Ohm Krüger movie poster.
Dr Erik Holm – the South African Afrikaans broadcaster for Radio Zeesen would recall Hitler’s open admiration for General Christiaan De Wet during the Boer War and his guerrilla tactics in flummoxing the British – from conversations he personally had with the Führer on the Boer War.117
The Nazi propaganda ministry and the Waffen SS used this very powerful affinity and memory to the South African War to appeal to the Dutch, playing on the sense of injustice done to their “Dutch” cousins in Africa by the British, bearing in mind the South African War still in living memory for many elderly Dutch and still a point of deep political outrage. At the same time the Germans cleverly conflate the call to action to fight against onset Bolshevism (Communism) with the political outrage of the South African War to drive Dutch volunteerism – especially to the ranks of the Waffen SS.
One wartime Waffen SS recruitment poster demonstrates this sentiment perfectly, it shows an image of the Transvaal Republic Boer Republic President – Paul Kruger in a mythical sense of memory, it has a famous period quote by the Orange Free State Boer Republic President Johannes Brand ‘Alles sal recht komen als elkeen zijn plicht doet’ or simply ‘Alles sal reg kom’ (all will be well) – and the main call to action in Dutch reads ‘Fights against Bolshevism in the Waffen SS.’
Dutch recruitment line and a South African themed Waffen SS poster to recruit them.
In targeting this Dutch and Flemish community which is historically and culturally very closely associated and linked to the Afrikaans community, we see some of Nazi Germany’s greatest success in recruiting for the Waffen SS. According to the Netherlands State Institute for War Documentation is estimated that between 20,000 to 25,000 Dutch volunteer to join the Waffen SS 118 (almost twice the number that join the Dutch Resistance). These Dutch Waffen SS all go on to demonstrate a high degree of fighting prowess, military discipline, strong battle order and an almost fanatical focus in their defence of Europe against the counter-attacking Soviet Red Army and its Allies.
The vast difference between the Dutch versus the South African recruits to the Waffen SS, on the same call to action and historical affinity, is seen statistically – in the numbers alone – 25,000 Dutchmen and only 3 South Africans, and this alone draws its own conclusion. The recruitment campaign for the BFC is statistically insignificant in comparison with just about every key ethnic formation in the Waffen SS, the BFC are numerically inconsequential.
A key difference to note here is that the threat of Bolshevism is seen in an entirely different way in Europe as opposed to the United Kingdom and its Commonwealth when it comes to propaganda and political rhetoric. In the United Kingdom and South Africa, both Winston Churchill and Jan Smuts position the Soviets as key allies first, as Smuts notes in his speech to both houses of the British Parliament in 1942, he refers to Russia’s ‘indomitable spirit’, having taken the hardest blows and made the ‘most appalling bloodletting necessary for Hitler’s defeat’ and because of this ‘they alone‘ can win the war.119 In general the Allied propaganda and messaging points to a prioritisation to defeating “Hitlerism” first as the greater of the two evils, a more imminent priority is to stand “Together” with the Soviet Union and defeat the common enemy. Examples of this propaganda and messaging are seen in the posters below:
Together with the Soviets propaganda
This propaganda is in sharp contrast to the German messaging when it comes to Europe defeating Communism and the prioritisation of this endeavour as the greater evil. This is especially apparent in Waffen SS posters and propaganda targeted at citizens of ‘Germanic regions and peoples’ – the Netherlands, Belgium, France, Luxembourg, Denmark, Sweden, and Norway where National Socialism prior to World War 2 is far more palatable as a social order for Western Europe than Communism.
Obergruppenführer Felix Steiner the III SS Panzer Corps Commander would note that the highly unstable socio-economic conditions in Europe in the 1930’s caused by the Great Depression impacted the youth of Europe and led to ‘intellectual despair’ which in turn contributed to Waffen SS recruitment. To Steiner, the European youth were so disillusioned by the apparent helplessness and instability of their own governments many began to search for an ideal that would give meaning to their lives and tended to regard developments in the Third Reich with ‘idealistic hopefulness.‘120 For these recruits, Communism and future uncertainty it offered is superseded by their adoration for the discipline and successes of Nazism and as a net result the Waffen SS recruitment for its “Nederland”, “Norland”, “Wiking” divisions and other Legions such as the “Flemish Legion” and “Walloon Legion” is highly successful.
Waffen SS anti-Bolshevism propaganda
This exceedingly low conversion rate of British, Canadian, New Zealand, Australian and South African POW to the Waffen SS is held up by the fact that in these servicemen by and large followed the prevailing call to action in their countries to fight as a collective to beat Hitlerism as a priority. These POW simply do not have the same frame of reference as the European youth, and it can be proposed that their loyalty to their country’s Casus Belli supersedes all else, especially in South Africa where all serving in Africa and Europe were volunteers.
Even militarily speaking, where the Norland and Wiking divisions of the Waffen SS, as well as other ethnic divisions and legions are renowned for almost fanatical battlefield prowess and highly disciplined battle order, the BFC is ineffectual as a fighting unit. Although the BFC is only a platoon size and although they spend a month in the combat theatre in earthen trenches with a sense of determination, they were fractured, ill-disciplined, inclined to desertion and highly compromised, as pointed out by Colonel S.T. Pretorius, a prosecutor during the trial of the South African Waffen SS members, had the Red Army attacked their position they would have run over them with ease. According to Pretorius:
… the BFC was a ‘dismal failure’, ‘never up to strength’, ‘the members could never agree amongst themselves’ and at times ‘the Germans did not know what to do with these men.’121
The fractured nature of the BFC and that it is no match for the Waffen SS Norland division it has been attached to also supports the notion that BFC simply did not share the moral convictions or values of their Waffen SS counter-parts and were simply not fit for purpose.
In Conclusion
In the United Kingdom, the British renegades joining the Waffen SS or involved in propaganda in support of British POW joining the Waffen SS received a broad range of sentencing, however in general those found to be in leadership positions – fully committed to fighting Bolshevism on behalf of Nazi Germany and serving in German uniform with ‘hostile intent’, as well as those at the heart of the propaganda initiatives received severe High Treason guilty sentences, some received the death sentence and others harsh sentences of lengthy imprisonment with hard labour. This has a lot to do with retribution and intolerance of Nazism in the post war environment in the United Kingdom.
The British ‘rank and file’ in the British Free Corps receive varying degrees of sentences, some prison time, time already served to acquittal, this has a lot to do with war weariness and the wish for new horizons, which are the grounding reasons underpinning the change in government in 1945 and would see Winston Churchill lose his premiership and his Conservative Party out of power, of which given his success in World War 2 Churchill was certain would be retained. The Labour Party’s emphasis on social reform clearly resonated with a war weary Britain and gave Labour a landslide victory at the polls and a clear mandate for change.122
In South Africa the matter is treated somewhat differently, the advent of the National Party to power in 1948 would see all South Africans involved in collaborating with Nazi Germany receive full amnesty, however even prior to that the High Treason cases are handled somewhat leniently in comparison to those in Britain, and this also has a lot to do with war weariness, a reconciliatory post war environment and Smuts’ continued appeasement of an irreconcilable Afrikaner Nationalist community in South Africa tolerant of Nazism and Nazi Germany.
The socio-political landscape in South Africa, prior to, during and after the war is substantially different to that of the United Kingdom – or any of the other Commonwealth countries. South Africa is the only country in the Allied mix where a significant majority did not fundamentally support going to war – although South Africa’s black population saw an opportunity to improve political emancipation, the support in joining the war effort was not broad in relation to population. In the white population, suitably enfranchised, a very significant swathe of whites were in antitheses to the call to war with Nazi Germany and in fact many in direct support of Nazi Germany.123
As with Churchill in the United Kingdom, Smuts in South Africa was buoyed by his strong electoral performance in 1943, mid way into the war, where he held a clear constitutional majority. Smuts, like Churchill, did not see his opposition, the Afrikaner Nationalists also take up the mantra of social reform at the end of the war, demanding change with a new reform policy called Apartheid, and it also held a high appeal to a war weary nation still bitterly divided over Smuts’ decision to go to war. In a surprise 1948 General Election result the Reunited National Party and its partners were able to sneak in on a single constitutional seat and oust Smuts. The new Minister of Justice C.R. Swart on 11 June 1948 issued a statement of general amnesty for individuals convicted of war crimes relating to treason, the statement read:
‘(The National Party) government (wanted) to relieve the people of the Union from the strain of the war years and to endeavour to end all the unpleasantness and rancour that flowed from it’124
By October, the majority of South African men who had sympathised with, or supported Nazi Germany directly were released, the South Africans who had served in the Waffen SS found themselves free of prosecution, their decision to support the Nazi state and fight Communism a favorable one in the eyes of the incoming nationalist government. A different matter entirely in Germany, from 20 November 1945 to 1 October 1946, the Nuremberg Trial takes place and exposes the full criminality of the Nazi Party regime and its ideology. The National Socialist dogma with its focus on the bogus “protocols of the elders of Zion”, which blamed all of Germany’s economic, social and political problems on Judaism, Freemasonry and Communism and was used to justify the holocaust and the massacre of soviet citizens and POW en masse along racial and political lines is exposed as willful genocide and deemed a crime against humanity.
Although Nazi ideology and dogma was no longer tolerant in the political sphere in South Africa after 1945, ‘no solid measures were put in place by the Smuts government to prevent it from flourishing. Afrikaner Nationalists entertaining strong National Socialist ideologies and having committed treason and sedition during the war, who in European countries would have been hanged for war crimes, landed up back in mainstream party politics under the banner of the National Party and many even ended their days in Parliament.’125
Written and Researched by Peter Dickens
Footnotes
D Harrison, The White Tribe of Africa: South Africa in Perspective (Berkley and Los Angeles: University of California Press, 1981), 99. ↩︎
‘Elections in South Africa’, African Elections Database, 10 November 2004. Accessed 8 August 2024 ↩︎
DB Katz, ‘General Jan Smuts and his First World War in Africa 1914–1917’ (Johannesburg: Jonathan Ball Publishers 2022), 34-35. ↩︎
Bunting, The Rise of the South African Reich, 57. ↩︎
FA Mouton, ‘Beyond the Pale’ Oswald Pirow, Sir Oswald Mosley, the ‘enemies of the Soviet Union’ and Apartheid 1948 – 1959, Journal for Contemporary History, 43, 2 (2018), 18. ↩︎
FL Monama, Wartime Propaganda in the Union of South Africa, 1939 – 1945 (Dissertation for the degree of history, University of Stellenbosch. Stellenbosch, 2014), 62. ↩︎
M Shain, ‘A Perfect Storm’, Antisemitism in South Africa 1930-1948, (Johannesburg: Jonathan Ball Publishers, 2015) , 55–58. ↩︎
W Bouwer, National Socialism and Nazism in South Africa: The case of L.T. Weichardt and his Greyshirt movements, 1933-1946. (MA Thesis, University of the Free State, Bloemfontein 2021), 18. ↩︎
Harrison, The White Tribe of Africa, 103 – 106. ↩︎
DP Olivier, A special kind of colonist: An analytical and historical study of the Ossewa-Brandwag as an anti-colonial resistance movement (thesis, University of the North West, Potchefstroom 2021) ↩︎
Bunting, The Rise of the South African Reich, 98 ↩︎
Bunting, The Rise of the South African Reich, 92 – 93 ↩︎
Weal, Adrian: ‘Renegades: Hitler’s Englishmen’. Weidenfeld and Nicholson. 1994. On-line summation reference ‘British Free Corps in SS Waffen – Myth and Historic Reality’ ↩︎
Weal, Adrian: ‘Renegades: Hitler’s Englishmen’. Weidenfeld and Nicholson. 1994. Kindle (2014). Random House. Location 1948. ↩︎
Warfare History Network online. Nazi Propagandist William Joyce American-born Nazi radio propagandist William Joyce amused, and also terrorized, British listeners. 2017. By Blaine Taylor ↩︎
Weal, ‘Renegades: Hitler’s Englishmen’. Weidenfeld and Nicholson. 1994. On-line summation reference ‘British Free Corps in SS Waffen – Myth and Historic Reality’ ↩︎
Weal, Adrian: ‘Renegades: Hitler’s Englishmen’. Weidenfeld and Nicholson. 1994. Kindle (2014). Random House. Locations 1998-1999. ↩︎
Weal, Adrian: ‘Renegades: Hitler’s Englishmen’. Weidenfeld and Nicholson. 1994. Kindle (2014). Random House. Location 2342. ↩︎
Weal, Adrian: ‘Renegades: Hitler’s Englishmen’. Weidenfeld and Nicholson. 1994. Kindle (2014). Random House. Locations 1968-1969 ↩︎
Weal, Adrian: ‘Renegades: Hitler’s Englishmen’. Weidenfeld and Nicholson. 1994. Kindle (2014). Random House. Locations 1968-1969. ↩︎
Weal, Adrian: ‘Renegades: Hitler’s Englishmen’. Weidenfeld and Nicholson. 1994. List of members – appendix 5. ↩︎
Weal, Adrian: ‘Renegades: Hitler’s Englishmen’. Weidenfeld and Nicholson. 1994. On-line summation reference ‘British Free Corps in SS Waffen – Myth and Historic Reality’. ↩︎
Weal, Adrian: ‘Renegades: Hitler’s Englishmen’. Weidenfeld and Nicholson. 1994. On-line summation reference ‘British Free Corps in SS Waffen – Myth and Historic Reality’ ↩︎
Weal, Adrian: ‘Renegades: Hitler’s Englishmen’. Weidenfeld and Nicholson. 1994. On-line summation reference ‘British Free Corps in SS Waffen – Myth and Historic Reality’ ↩︎
Weal, Adrian: ‘Renegades: Hitler’s Englishmen’. Weidenfeld and Nicholson. 1994. On-line summation reference ‘British Free Corps in SS Waffen – Myth and Historic Reality’ ↩︎
Weal, Adrian: ‘Renegades: Hitler’s Englishmen’. Weidenfeld and Nicholson. 1994. On-line summation reference ‘British Free Corps in SS Waffen – Myth and Historic Reality’ ↩︎
Weal, Adrian: ‘Renegades: Hitler’s Englishmen’. Weidenfeld and Nicholson. 1994. On-line summation reference ‘British Free Corps in SS Waffen – Myth and Historic Reality’ ↩︎
Weal, Adrian: ‘Renegades: Hitler’s Englishmen’. Weidenfeld and Nicholson. 1994. On-line summation reference ‘British Free Corps in SS Waffen – Myth and Historic Reality’. ↩︎
Weal, Adrian: ‘Renegades: Hitler’s Englishmen’. Weidenfeld and Nicholson. 1994. Kindle (2014). Random House. Locations 3077-3078 ↩︎
Weal, Adrian: ‘Renegades: Hitler’s Englishmen’. Weidenfeld and Nicholson. 1994. Kindle (2014). Random House. Locations 3132 – 3141 ↩︎
British National Archives – Kew reference KV 2/254 Thomas Cooper ↩︎
Smuts, J.C. Jan Christian Smuts by his Son (London Cassell. 1952) 678-679 ↩︎
Kleynhans, Evert – Hitler’s Spies, Secret agents and the intelligence war in South Africa, 1939 to 1945. Jonathan Ball. 2021. Page 172 ↩︎
Kleynhans, Evert – Hitler’s Spies, Secret agents and the intelligence war in South Africa, 1939 to 1945. Jonathan Ball. 2021. Page 173 ↩︎
Visser, George C. OB: Traitors or Patriots. Macmillian. 1976. Pages 176-177 ↩︎
Kleynhans, Hitler’s Spies,179 – referencing Van der Waag, Ian. A military history of modern South Africa. ↩︎
Archive Box 1620 – Justice Department: 1-49-44 ‘War Criminals’ General File – Part 1 ↩︎
Archive Box 1620 – Justice Department: 1-49-44 ‘War Criminals’ General File – Part 1 ↩︎
Archive Box 1621 – Justice Department: 1-49-44 ‘War Criminals’ General File – Part 2 ↩︎
The National Archives, United Kingdom – Kew. Information about UK renegades from the Continent of Europe. Item number: 7212995 Catalogue reference: KV 2/3581 ↩︎
The National Archives, United Kingdom – Kew. Information about UK renegades from the Continent of Europe. Item number: 7212995 Catalogue reference: KV 2/3581 ↩︎
Archive Box 1621 – Justice Department: 1-49-44 ‘War Criminals’ General File – Part 2 ↩︎
Archive Box 1621 – Justice Department: 1-49-44 ‘War Criminals General File – Part 2 ↩︎
Katz, David. General Jan Smuts and his First World War in Africa, 1914–1917: Incorporating His German South West and East Africa Campaigns. Delta. 2022. Pages 83-88 ↩︎
Kleynhans, Evert – Hitler’s Spies, Secret agents and the intelligence war in South Africa, 1939 to 1945. Jonathan Ball. 2021. Page 199 ↩︎
Jan Visser, George C. OB: Traitors or Patriots. Macmillian. 1976, Nongqai magazine reference ↩︎
Special Criminal Courts Archive Reference 44 – High Treason Cases – Justice Department ↩︎
Mouton, F.A. 2018 ‘Beyond the Pale’ Oswald Pirow, Sir Oswald Mosley, the ‘enemies of the Soviet Union’ and Apartheid 1948 – 1959. UNISA, Journal for Contemporary History 2018. Page 23 ↩︎
Mouton, F.A. 2018 ‘Beyond the Pale’ Oswald Pirow, Sir Oswald Mosley, the ‘enemies of the Soviet Union’ and Apartheid 1948 – 1959. UNISA, Journal for Contemporary History 2018. Page 23 – 27 ↩︎
British National Archives – Kew reference 2/908, 12 April 1948 – Oswald Pirow Statement. ↩︎
British National Archives – Kew reference 2/908, 12 April 1948 – Oswald Pirow Statement. ↩︎
Hitler, Adolf. Mein Kampf (Ralph Manheim Translation), Houghton Mifflin Company, New York, 1925 original publication, translation published 1999. Page 158 ↩︎
Hitler, Adolf. Speech by the Fuehrer in the Sportpalast in Berlin, on 30 January 1940. English translation – Sons of Liberty, 1977 ↩︎
Goebbels, Joseph. Our Hitler,1940 Speech on Hitler’s Birthday, 20 April 1940. Reference: Goebbels, J. Die Zeit ohne BeispielDie Zeit ohne Beispiel (Munich: Zentralverlag der NSDAP, 1941) ↩︎
Potgieter, De Wet & Lazarus, Jannie. Sunday Times – Page 2, Nazi Radio man took part in Hess Service: 30 August 1982 ↩︎
Netherlands State Institute for War Documentation, ‘De SS en Nederland Documenten uit SS-Archieven 1935-1945. Part 1 ↩︎
The offensive phase : the historic speech delivered by General Smuts to members of the two Houses of Parliament on Wednesday, October 21st 1942. ↩︎
Stein, George. The Waffen SS : Hitler’s elite guard at war, 1939-1945. Cornell University Press. 1984. Page 141 to 142 ↩︎
Furlong. Pro-Nazi Subversion in South Africa, 1939-1941 ↩︎
Bibliography and References
Books
Bunting, Brian. The Rise of the South African Reich. Penguin Books. 1964
Cawthorne, Nigel. The Waffen-SS: The Third Reich’s Most Infamous Military Organization.
Dorril, Stephen. Blackshirt: Sir Oswald Moseley and British Fascism. Penguin UK. 1999
Freedman, Morris. Fact and Object. Harper & Row. 1963
Giliomee, Hermann. The Afrikaners: Biography of a People. Cape Town: Tafelberg, 2003.
Goebbels, Joseph. Die Zeit ohne BeispielDie Zeit ohne Beispiel. Munich: Zentralverlag der NSDAP, 1941.
Harrison, David. The White Tribe of Africa: South Africa in Perspective. Macmillian Publishers. 1981
Hitler, Adolf. Mein Kampf (Ralph Manheim Translation), Houghton Mifflin Company, New York, 1925 original publication, translation published 1999.
Hitler, Adolf. Speech by the Fuehrer in the Sportpalast in Berlin, on 30 January 1940. English translation – Sons of Liberty, 1977
Katz, David Brock. General Jan Smuts and his First World War in Africa, 1914–1917: Incorporating His German South West and East Africa Campaigns. Delta. 2022.
Kleynhans, Evert – Hitler’s Spies, Secret agents and the intelligence war in South Africa, 1939 to 1945. Jonathan Ball. 2021
Landwehr, Richard. Britisches Freikorps: British Volunteers of the Waffen-SS 1943 to 1945. CreateSpace Independent Publishing Platform. 2012
Milton, Shain. A Perfect Storm – Antisemitism in South Africa 1930-1948. Jonathan Ball. 2015
Mouton, F.A. The Opportunist: The Political Life of Oswald Pirow, 1915-1959. Pretoria: Protea Boekhuis. 2022
Pugh, M. ‘Hurrah for the Blackshirts!’ – Fascists and Fascism in Britain Between the Wars. Pimlico. 2006
Roos, Neil. Ordinary Springboks: White Servicemen and Social Justice in South Africa,1939-1961 Ashgate: Aldershot 2005.
Seth, Ronald. Jackals of the Reich: the story of the British Free Corps. New English Library. 1973
Shirer, William. The Rise and Fall of the Third Reich: A History of Nazi Germany. Simon and Schuster. 1974 edition.
Smuts, J.C. Jan Christian Smuts by his Son. London Cassell. 1952.
Stein, George. The Waffen SS : Hitler’s elite guard at war, 1939-1945. Cornell University Press. 1984.
Strydom, Hans. For Volk and Führer: Robey Leibbrandt & Operation Weissdorn. Jonathan Ball. 1982
Van Rensburg, Hans. Their Paths Crossed Mine: Memoirs of the Commandant-General of the Ossewa-Brandwag. Central News Agency. 1956.
Visser, George C. OB: Traitors or Patriots. Macmillian. 1976
Weal, Adrian. ‘Army of Evil: A History of the SS’. Penguin. 2012
Weal, Adrian. ‘Renegades: Hitler’s Englishmen’. Weidenfeld and Nicholson. 1994
Weal, Adrian. ‘Patriot Traitors: Roger Casement John Amery and the Real Meaning of Treason’. Viking. 2001
Weal, Adrian. Army of Evil: A History of the SS. International Edition. 2013
Weal, Adrian SS: A New History. International Edition. 2012
Wegner, Bernd. The Waffen-SS: Organization, Ideology and Function. First Edition. 1990.
Williamson, Gordon. The SS: Hitler’s Instrument of Terror. 2004
West, Rebecca. The Meaning of Treason. London: Macmillan & Co Ltd. 1949.
Thesis and Dissertations
Bloomberg, Charles. Christian Nationalism and the Rise of the Afrikaner Broederbond in South Africa, 1918 to 1948. Indiana University Press. 1989
Bouwer, Werner. National Socialism and Nazism in South Africa: The case of L.T. Weichardt and his Greyshirt movements, 1933-1946
Delport, Anri. Changing attitudes of South Africans towards Italy and its people during the Second World War, 1939 to 1945. Historia vol.58 n.1 Durban Jan. 2013
Fokkens, A.M. Afrikaner unrest within South Africa during the Second World War and the measures taken to supress it. Journal for Contemporary History 37/2. 2012
Furlong, Patrick J. Allies at War? Britain and the Southern African Front in the Second World War. South African Historical Journal 54/1. 2009
Furlong Patrick Jonathan – National Socialism, the National Party and the radical right in South Africa, 1933-1948 (D.Phil. Thesis, University of California, 1990
Furlong, Patrick J. Pro-Nazi Subversion in South Africa, 1939-1941. 1988. Ufahamu: A Journal of African Studies, 16(1)
Grundlingh, Albert. ‘The King’s Afrikaners? Enlistment and Ethnic Identity in the Union of South Africa’s Defence Force during the Second World War 1939-45’. Journal of African History 40 (1999).
Hattingh, Isak. Nasionaal-Sosialisme en die Gryshemp-beweging in Suid-Afrika (D.Phil. Thesis, University of the Orange Free State, 1989)
Horn, Karen. ‘Researching South African Prisoners-of-War Experience During World War II : Historiography, Archives and Oral Testimony’. Journal for Contemporary History 39, no. 2 (2014).
Horn, Karen. ‘South African Prisoner- Prisoner -of-War Experience during and after World War II : 1939 – c . 1950’. Stellenbosch University, 2012.
Katz, David B. A Case of Arrested Development: The Historiography Relating to South Africa’s Participation in the Second World War. Scientia Militaria 40/3. 2012
Marx, Christoph. Ox wagon Sentinel: Radical Afrikaner Nationalism and the History of the Ossewabrandwag. South African University Press. 2008
Macklin, Graham. ‘Very Deeply Dyed in Black’ Sir Oswald Mosley and the Resurrection of British Fascism After 1945. Bloomsbury Academic. 2007
Monama, Frankie. Wartime Propaganda In the Union of South Africa, 1939 – 1945. Dissertation, University of Stellenbosch. 2014
Mouton, F.A. 2018 ‘Beyond the Pale’ Oswald Pirow, Sir Oswald Mosley, the ‘enemies of the Soviet Union’ and Apartheid 1948 – 1959. UNISA, Journal for Contemporary History 2018
Roos, Neil. ‘The Springbok and the Skunk: War Veterans and the Politics of Whiteness in South Africa during the 1940s and 1950s’. Journal of Southern African Studies 35, no. 3 (2009).
Sacks, Benjamin. Sir Oswald Mosley and British Fascism: 1937. New Mexico Quarterly. Volume 7, issue 4, Article 4.
Scher, David M. Echoes of David Irving – The Greyshirt Trial of 1934.
Thomas, M.J. The Waffen SS 1933-45 ‘Soldiers, just like the others’? Part 1. South African Military History Journal Vol 12 No 5 – June 2003.
Werner, Bouwer. National Socialism and Nazism in South Africa: The case of L.T. Weichardt and his Greyshirt movements, 1933-1946
Archives – United Kingdom
Information about UK renegades from the Continent of Europe. names and details of British and other renegades who worked for the German cause during the war, including membership of the British Free Corps. KV2/3581
National Archives, Kew: Disposal of non-German nationals who served in Wehrmacht or Waffen SS. WO 309/1424
National Archives, Kew: Department Inland II: Geheim: Recruitment of foreign-based Germans to the Waffen SS. GFM 33/2254/5239
National Archives, Kew: Renegades and Persons suspected or convicted of assisting the Enemy: COOPER, Thomas Heller, one-time member of the British Union; served in the Waffen SS. HO 45/25805
Private Paper Archives – UK
University of Birmingham: Oswald Mosley papers: Nicholas Moseley Collection, 19 Boxes. Reference OMN
Archives – South Africa
National Archives and Record Service of South Africa (Pretoria, South Africa). Public Records of Central Government since 1910.
Sir Winston Churchill the drunk? Nazi propaganda did a very good job painting Churchill as a drunk and glutton, in the Nazi Propaganda Ministry’s block buster of about the Boer War “Uncle Kruger” Ohm Krüger (1941), Churchill is depicted as a Concentration Camp Commandant, complete with bulldog, which whilst feasting himself he also feeds prime cuts to his bulldog, all the time whilst his Boer women and children in the camp are being starved to death.1
Churchill as depicted in Ohm Krüger (1941)
In another propaganda poster – this one from Serbia during World War 2, called ‘Churchill behind the mask’. After taking off his mask shown to the public, halo and all, a Jewish star now above his head and showing a drunken, haggard face and whiskey bottle in his pocket.
The poster falls part of an anti-Semitic campaign called ‘The Grand Anti-Masonic Exhibition’, which opened in Belgrade, in occupied Serbia on 22 October 1941. Financed by Nazi Germans and opened with the support of collaborationist leader Milan Nedić. Although being anti-Masonic in its title, the primary purpose was to promote antisemitic ideology and intensify hatred of Jews – ironically Churchill was a Freemason for a short time, but that is coincidental.
A famous quote has also entered the lexicon of Winston Churchill as proof positive he was a ‘drunk’ (bear in mind its the only quote) – Churchill was accompanied Ronald Golding his bodyguard and whilst exiting the Parliament building and he was confronted by Bessie Braddock, a fellow MP, who said:
Bessie Braddock: “Winston, you are drunk, and what’s more you are disgustingly drunk.”
Churchill replied: “Bessie, my dear, you are ugly, and what’s more, you are disgustingly ugly. But tomorrow I shall be sober and you will still be disgustingly ugly.”
A lush surely this Churchill fellow must be, he said so – right? Turns out Ronald Golding later admitted Churchill was not drunk that night, merely exhausted and unsteady. Being tired he gave Braddock both barrels, and what he quoted was from his rather photographic memory, and it was a W.C Fields character in the movie “its a gift” who when told he is drunk, responds, “Yeah, and you’re crazy. But I’ll be sober tomorrow and you’ll be crazy the rest of your life.” So, the Bessie Braddock encounter was really Churchill editing and reciting W. C. Fields.2
Was Churchill known for drinking? In fact no member of his family ever saw Churchill the worse for drink, they saw him drink yes, but never ‘drunk’. Richard M. Langworth spent 40 years researching Churchill and only found one reference of him been drunk … it came from a military staffer who helped Churchill and Eden on a wobbly walk back to the British Embassy in Teheran, this after a late-night of mutual toasts with the Russians.3
Whilst it is true that at the on-set of the South African War (1899-1902) – Churchill, the son of a Baron and part of British well-to-do society, aged 25 and acting as a correspondent on the Morning Post took with him 36 bottles of wine, 18 bottles of ten-year old scotch, and 6 bottles of vintage brandy. Such was the arrogance of aristocracy in addition to this booze cabinet he also took a valet with him to South Africa. However, if you step back from this and see that Churchill took with him a full year’s supply, then that ‘booze’ cabinet hardly makes a mark.4
With this Churchill became synonymous with two things according to modern writers – alcohol and war.
In one famous wartime episode during World War 2, when George VI set a personal example to the troops by giving up alcohol, Churchill declared the whole idea absurd and announced he would not be giving up drink just because the King had.5
He also became synonymous with excess when it came to food, cigars and alcohol, he was known to consume high degrees of relatively low ABV Champagne and watered down brandy. On the food front he detested the idea of the ‘French’ manner of serving seven courses starting with an aperitif and ending with a small dessert. On the ‘formal 7 course’ menu he would start with the meal he enjoyed the most and end on the one he enjoyed least.6
He started the day (every-day) with a small whiskey and water, his daughter would recall it as the “Papa Cocktail” – a smidgen of Johnnie Walker covering the bottom of a tumbler, which was then filled with water and sipped throughout the morning. This practice Winston Churchill learned as a Victorian habit – as a young man in India and South Africa (see My Early Life) he writes that the water was unfit to drink, and one had to add whisky and, “by dint of careful application I learned to like it.”7 Jock Colville, his private secretary would say of the ‘papa cocktail’ that it was so watered down it was akin to mouthwash.8
He however was renowned, not for drinking whiskey, but for drinking brandy and champagne both at lunchtime and dinner, and he was renowned for putting away copious amounts of it. He averaged on 500ml of 12.5% ABV Pol Roger Champagne for lunch and 500ml of Pol Roger Champagne for dinner along with a couple of diluted brandy glasses per day – in all this is estimated about 150ml AA per day. It certainly is ‘heavy drinking’ by any standard but in context of his time Russian delegations meeting him, thought of him as a ‘lightweight’ on this front. Having also said that, large amounts of adult population in South Africa still consume a bottle of wine and a couple of spirit chasers a day – 150ml AA. Only on reaching 76 years of age did Churchill decide to ‘cut down’ a little and said:
“I am trying to cut down on alcohol. I have knocked off brandy and take Cointreau instead. I disliked whiskey at first. It was only when I was a subaltern in India, and there was a choice between dirty water and dirty water with some whiskey in it, that I got to like it. I have always, since that time, made a point of keeping in practice.”9
Churchill would also not “nurse” a bottle of alcohol the way a alcoholic would, and seldom drank ‘neat’ spirits (preferring not to), unlike alcoholics he also did not drink randomly during the day, sticking to mealtimes instead, and even then none of his colleagues ever reported seeing Churchill the worse for drink. Thus Churchill’s famous quip:
“I have taken more out of alcohol than alcohol has taken out of me.”10
Very famously, Churchill was knocked down by a car New York in 1931 during the American Prohibition 1920 – 1933 on alcohol (he was looking the wrong way), Dr. Otto C. Pickhardt attended to him, actually issued a medical note that Churchill’s medical condition “necessitates the use of alcoholic spirits especially at mealtimes,” specifying 250cc per day as the minimum. A little cheeky to overcome the rigours of Prohibition perhaps, but this is not a sign of dependency – 5 years after this incident in 1936 he took a bet with Rothermere that he could abstain from hard spirits for a year – which apparently he did.11
Churchill’s famous ‘Doctor’s note’
After World War 2, he developed a reputation for really enjoying food and drink, One visitor from the period noted: “There is always some alcohol in his blood, and it reaches its peak late in the evening after he has had two or three scotches, several glasses of champagne, at least two brandies, and a highball… but his family never sees him the worst for drink.”
That is the point with Churchill, he drank copious amounts of alcohol – no doubt, but he ‘held his booze’ remarkably well, he was never really totally inebriated or ‘drunk’ in fact he detested drunks and could not stand been out of control of his faculties and senses. He was raised as an aristocrat, he believed drunkenness to be contemptible and disgusting, and a fault in which no gentleman indulged.
He also had a very healthy mental appreciation for alcohol and remarked, “my father taught me to have the utmost contempt for people who get drunk.” adding to this he said that a glass of Champagne lifts the spirits, sharpens the wits, but “a bottle produces the opposite effect.”12 Here we also note that Churchill throughout his life kept his wits about him and kept them as sharp as ever.
Churchill with his favourite tipple – Pol Roger champagne
The image of excess is often even associated with Churchill’s disposition to smoking cigars. However very few people know that he seldom smoked more than a third of a cigar, allowing the cigar to burn itself out instead and if anything he took to chewing the end, using it more as image prop than anything else.13
On the physical health front, Churchill did have a heart attack during World War 2, how much of that was excess and how much of it stress is anyone’s guess, however he did recover remarkably well, Dr. Mather, his Doctor reported that Churchill’s blood pressure was a very healthy and very consistent 140/80 well into his eighties.14 In fact most of Churchill’s accompanying younger male military personnel and politicians complained that they could hardly keep up with him, his energy and pace, the speed at which he did everything was legendary. He lived to 90 years old, and died of a stroke – a very long and fruitful innings and not one marred by any alcohol related sickness like liver failure/disease.16
Was he an alcoholic? The general opinion amongst some medical practitioners and historians is that he was not. He demonstrated no real medical signs of a person associated with alcoholism. Did he ‘abuse’ alcohol in our 21st century understanding of excessive drinking and functional alcoholism – yes, no doubt in this context you would place him as someone who abused alcohol for his own edification and enjoyment (of course he would have no idea what you were talking about, as a Victorian born in 1874 faced with a 2024 definition of alcoholism – the modern-day idea simply would not compute).
As to the propaganda, the relentless drive by Hitler and his Nazi Propaganda Ministry to paint Churchill as a glutton and a drunk – rather surprisingly that is the legacy which carries to this day. As an example I once posted Churchill’s medals on a Boer War social media group, it was met with a particular nasty Anglophobic Afrikaner who warned users that Churchill was a rabid alcoholic and his alcohol addled, warmongering mind was responsible for the deaths of hundreds of thousands of people – the devil reincarnate – and I should be ‘very weary’ of who I regard as ‘my hero’ or he would have a few more things to say about him.
Now, I’m a South African – the simple fact he thinks of Churchill as ‘mine’ denotes a massive bias on his behalf and ironically I fear alcohol in the form of far too much ‘branders’ has fuelled his outlook – however, it is interesting to note that in this grouping Churchill’s legacy is still viewed by some in the light of propaganda and not the actual historiography of the man.
Written and Researched by Peter Dickens
Footnotes
H Steinhoff, Ohm Krüger (1941, Tobis Film, Screenshot from YouTube) ↩︎
R Langworth, Drunk and Ugly: The Rumour Mill, International Churchill Society 10 January 2011 [accessed 12 August 2024] ↩︎
On the 80th anniversary of D-Day and witnessing the French President Macron awarding the Legion d’Honneur (LdH) to attending D-Day/Overlord veterans still with us. I am reminded of this very special South African. Albie Götze took part in D-Day as a Spitfire pilot seconded to the Royal Air Force, he later took part in Operation Market Garden as a Typhoon pilot. After World War 2 (1939-1945), he took part in the Berlin Air Lift as a Navigator (1948 to 1949), he later took part in the Korean War as a Mustang pilot (1950 to 1953) and finished his career as a General in South African Air Force and took part in the Border War (1966-1989). Albie was one of those very rare war veterans having survived all of that.
As South African Legion I was involved in the obtaining of Legion d’Honneur, the supreme award given by the French government to all surviving D-Day veterans and at the time South Africa’s only surviving D-Day veteran. Here I am (left) with Albie (on the right) and the French Ambassador, his excellency Christophe Farnaud (in the middle) on the occasion of his medal parade and receipt of his LdH on the 13th February 2018 in Cape Town. I also took he opportunity to also present Albie with a print of my Dad’s painting of a Typhoon.
Over time I came to know Albie well and heard many of his stories, I kept my promise to myself to buy any WW2 veteran I meet a beer, and Albie shared this story with me on one such occasion when he and I were hitting a pint of beer and oysters at the Quayside cabin in Hermanus (Albie loved oysters). It says a great deal about this wartime generation, the guts and courage of these young men, they truly are a generation apart.
During D-Day, Operation Overlord and Operation Market Garden Albie’s aircraft was hit on many occasions and he made a few crash landings with damaged aircraft. He recalled on such incident as if they were yesterday, this is a very brave account of combat flying, honest, harrowing and even a little funny – in the darkest manner of ‘military humour’.
“I got shot one day, as a matter of fact I was watching this guy shooting at me, with a 88 mm, he shot at me and I looked and I said to myself ‘this bastard is going to kill me’ … he shot me at the back of the fuselage, but, the 88mm did not explode for some unknown reason, God must have said ‘I not gonna put this fuse on’, But it did cut my trim-wire to my rudder and all it does is that your aircraft just rolls over and you go strait in, but fortunately I was able to ‘catch it’ (arrest the aircraft roll with opposite ailerons);
… but I could only fly at an angle a friend radioed and said ‘Albie are you in trouble?’, I said to him ‘yes’, I can’t see out, at this time as I got down into the cockpit and grabbed hold of the rudder bar in order to keep on flying, otherwise I would go down. He said “I will fly on top of you”, been down there you can’t see out of the cockpit, all I could see was up, he brought me home like that, him flying on top (as a visual marker), me underneath. When I did the crash landing, that scoop on ‘the typhoon’ is full of oil and it sparked and catches fire quickly, I was so scared, before the plane came to a stop, I was out of the cockpit and I ran so fast that the ambulance could not catch me”.
Wow, there’s everything in that story, drama, bravery, camaraderie, action and comedy … and this was one of many many similar stories Albie could relate, not just from WW2, but the Berlin Airlift, the Korean War and the Angolan Border War … this was a man who had truly seen life and death, he had endured some of the greatest blows in history and survived.
When Albie died in September 2018, I had the privilege of giving his eulogy and our local veteran associations, The South African Legion, The Memorable Order of Tin Hats and The South African Air Force Association all saw him off. A true warrior of the sky, and one of the very last of his kind. His humility as a combat pilot is best wrapped up in his own words to me:
‘I survived because of sheer luck alone … with God’s grace.”
Written by Peter Dickens, a privilege to share this story again – lest we forget.
To read a little more about Albie – follow this link:
It’s the 80th anniversary of D-Day and I’ve always upheld a small promise to myself, whenever I meet a WW2 veteran still with us, I buy him a beer.
A couple of years ago I was living in Bicester in the United Kingdom, and as South African Legion I was asked by the local Royal British Legion branch to attend a medal parade for this chap, he was been honoured by the French government with the Légion d’honneur for his involvement in D-Day.
From left to right. Peter Dickens, Patrick Churchill and Karin Churchill (nee Busch)
Meeting him was indeed an honour, and I bought him the beer – but equally remarkable was his wife, and it truly is eye-opening when you sit down and literally ‘touch’ history and hear it first hand. It is a tale which will take us from Operation Overlord to Operation Thunderclap and it has a very human ending.
Operation Overlord
Shortly after 6am on 6 June 1944, Patrick Churchill (the chap been honoured sitting next to me), was a young Royal Marine commando. He described how he waded past the floating corpses of his comrades on Sword beach in the grey dawn of D-Day.
Thinking he would be in trouble for discarding his Mae West jacket as a bullet had just gone through it rendering it useless he eventually made it to shore and took cover.
Film still from the D-Day landings showing Royal Marine commandos aboard a landing craft on their approach to Sword, 6 June 1944.
Patrick was a signaller attached to a Free French Marine Commando unit coming ashore in the first wave of the landings – he later earned the Croix de Gurre for bravery from the French, his unit was cut off by intensive enemy fire entering a French village. Patrick ran into German sniper fire to hoist a radio antenna on top of a statue in the open village square and let accompanying forces know his unit’s position.
Operation Thunderclap
A mere eight months later, in another part of Europe, a 14-year-old German girl, Karin Busch (Patrick’s wife sitting next to him), ran into a sea of flames on the streets of Dresden. She led her screaming twin brother, blinded by the British fire bombing of the city during Operation Thunderclap. Their mother had just been swallowed into the burning wreckage of their home and she witnessed her burn alive. Her story was especially touching and no less brave.
The destruction of Dresden after Operation Thunderclap, the British bombing caused an uncontrollable fire vortex (firestorm) which destroyed more than 1,600 acres (6.5 km2) of the city centre on the night of 13/14 February 1945.
And Back
Patrick and Karin met whilst Patrick formed part of the occupation British forces in West Germany a couple of years after the war, they fell in love and married, eventually moving to England. Proof positive that the human condition of love will always prevail over animosity and hatred.
Truly a generation apart, both believed the Dresden bombing was unnecessary and incredibly tragic, but both believed in the necessity for the liberation of Europe and the sacrifice it took.
A privilege to share their story, written by Peter Dickens
This is a famous speech, 30th January 1940 at the Sportspalast by Adolf Hitler and it had a significant impact on South Africa which very few people know about today. It’s Hitler’s take on the South African War (1899-1902) a.k.a. Boer War 2.
The speech is a lash out against Britain for declaring war against Nazi Germany for the invasion of Poland. Hitler in his speech seeks to paint Britain and the warmonger – and not Germany who we paints as Britain’s victim after the Treaty of Versailles – which he equates as Britain’s “Bible” as they have forsaken God and Christianity in favour of greed and materialism (unlike the God fearing Germans who keep a puritan faith).
To view Hitler’s speech on 30th January 1940 at the Sportspalast in full, here’s the YouTube link:
To ground his argument he uses the Boer War, and makes two significant points, he says:
“They (Britain) waged war for gold mines and mastery over diamond mines.”
Then later in the speech Hitler says:
“When has England ever stopped at women and children? After all, this entire blockade warfare is nothing other than a war against women and children just as once was the case in the Boer War, a war on women and children. It was there (South Africa) that the concentration camps were invented, in an English brain this idea was born. We only had to look up the term in the dictionary and later copy it .. with only one difference, England locked up women and children in their camps. Over 20,000 Boer women (and children) died wretchedly at the time. So why would England fight differently today?”
Now, I’ve seen people on social media immediately conclude that this is yet another rant of a mad-man, Hitler was a megalomaniac with more mental issues than you wave a stick at. As for Nazism – that’s pure evil, nothing to do with good Christians, Afrikaners and the Boer War thanks – no words from the madman here, linking Hitler and World War 2 to the Boer War is mischievous and contentious!
But here is a problem, this is 1940, Hitler is at the absolute pinnacle of his power. Nazism is at the absolute zenith of its popularity – millions, literally millions of Europeans are in favour of the “The Third Reich”. People today don’t really understand what the ‘The Third Reich’ was all about … in a modern construct its a early form of the European Union, only the EU head office is not in Brussels its in Berlin – the Third Reich is all about free trade, semi-open borders, freedom of movement and freedom to assimilate and commercially transact in Europe – its a wealth generator. It’s about respect for “cultural boundaries” according to Hitler – but in reality he’s hoodwinking again – behind the scenes it is in fact a “vampire economy” as Germany gears all its production from food to armaments to war and directs all economies to itself and its nefarious ends.
Adolf Hitler giving a speech at the Berlin Sportspalast
You can hear about all of this in the first 10 minutes of Adolf Hitler’s speech – its a utopian concept, and millions across Europe – in Germany, Austria, Fascist Italy, Hungary, Romania, Fascist Spain – even Belgium, Norway and the Netherlands and literally the whole of the south of France (Vichy France) are into this free trade union with Germany (in fact by definitions of the EU they still are – and immediately after the war ended they strove to get back to it only this time with a different leadership construct without the ‘vampire economy’ ideal).
The speech is also music to the ears of South African Neo-Nazi movements on the far right political spectrum in South Africa, the “cultural fronts” of Afrikaner Nationalism – The Ossewabrandwag, the Grey Shirts, the Black Shirts, The Boerenasie Party and the New Order. All have adopted National Socialism in one form or another and all have declared open admiration for Adolf Hitler – and he’s saying the right stuff, Britain is the warmonger, Britain is greedy for Boer gold and diamonds and Britain waged genocide against Boer women and children. A European world leader, an iconoclast in 1940, a national hero to millions said so. This speech streaming into Afrikaner homes across South Africa by Radio Zeesen (the Nazi Germany’s foreign radio service also broadcasting in Afrikaans).
Mein Kampf
And what’s not to like about Hitler in 1940, he’s a firm fan of the Afrikaner Nationalist cause and shares the ‘politics of pain’ of the Boer War with them. Hitler would write of the Boer War in his autobiography Mein Kampf in 1935:
“The Boer War came, like a glow of lightning on the far horizon. Day after day I used to gaze intently at the newspapers … overjoyed to think that I could witness that heroic struggle.”
Hitler would put his money where his mouth is and engage his propaganda ministry to drive his opinion on the Boer War, Joseph Goebbels on 19 April 1940, on Hitler’s birthday speech, would broadcast over Radio Zeesen (and others), and he said:
“Get rid of the Führer or so-called Hitlerism … British plutocracy had tried to persuade the Boers during the South African war of the same thing. Britain was only fighting Krugerism. As is well known, that did not stop them from allowing countless thousands of women and children to starve in English concentration camps”
Dr Erik Holm – the South African Afrikaans broadcaster for Radio Zeesen would recall Hitler’s open admiration for General Christiaan De Wet during the Boer War and his guerrilla tactics in flummoxing the British – from conversations he personally had with the Führer on the Boer War.
Ohm Krüger
Then there is Ohm Krüger (1941), a movie about the Boer War – Joseph Goebbels’ masterpiece. Winner of the Reich Propaganda Ministry’s “Film of the Nation” rating (one of only 4). A propaganda masterpiece which would reach millions all across Europe, complete with a massacre at the end of hundreds of Boer women as they are mowed down execution style by a skirmish line of British tommies (a scene repeated by Nazi Germany against Jews all over Europe).
Directed by Hans Steinhoff and starring Emil Jannings, Lucie Höflich and Werner Hinz. Although the plot has nothing to do with Germany, the story centres around a character which the Germans could admire, “Uncle” Paul Kruger – a man the Propaganda Minister wants to draw parallels to Adolf Hitler, who he deems is also a man with a common touch, from a simple background and one who is thrust into extraordinary circumstances due to international aggression and a conspiracy of greedy ‘foreigners’.
Waffen SS
The Boer War and Paul Kruger are even used by the Nazi propaganda ministry for recruitment into Dutch Corps of the Waffen SS. In fact the Dutch and Belgians in the Waffen SS Regiment Westland and other SS corps and Wehrmacht formations made up over 25,000 members – the backbone of the Waffen SS.
Press Junkets
During a press interview Hermann Göring (the spokesperson on behalf of Adolf Hitler), took a leaf out his Führer’s leader’s book on the Boer War when he deflected a challenge from Sir Nevile Henderson, the British ambassador to Berlin who protested about the German government’s use of concentration camps for the political ‘re-education’ of German’s dissonant non-believers in Nazism and opposition in 1935, and using a ‘press stunt’ Göring dramatically sprung up, walked over to a bookcase and like a thespian actor, grabbed a German encyclopaedia opening it at “Konzentratinslager” (concentration camp) he read out loud:
“First used by the British, in the South African War”.
Although factually incorrect, his action served as a skilful stroke of deflection of which Hermann Göring was a past master.
Nationalism – two separate peas, same pod!
That the Boer War is nuanced was not on Hitler’s agenda, the fact that the British did not “invent” the concentration camp, the fact that diamonds were already on British soil, the fact that the gold mines in the Transvaal were already owned by British and German private consortiums, the fact that the Boers also first brought ‘British’ women and children into the conflict by driving the ‘Uitlander’ population out of Johannesburg, including all the black mine labour, then declaring war and invading British sovereign territories and laying their towns to siege (with British citizens – black and white – in them). All this mattered not a jot to Adolf Hitler.
Hitler in his speech and radio broadcasts is also reinforcing Anglophobia and Republicanism, he is giving re-assurance to the Afrikaner nationalist cause from Berlin. To understand this better, Afrikaner Nationalism starts in earnest with the establishment of the National Party in 1914 – at this stage it has as its central ideology ‘Krugerism’ – Kruger’s political philosophy and the old ZAR’s (Transvaal) Republicanism constitution and race laws (Grondwet) at its centre. An Oligarchy bordering on a Theocracy with no political emancipation for Black Africans whatsoever (the majority), and racially based franchise and citizenship restrictions for white ‘foreigners’ (read “British” and Jews).
By 1940 this party has evolved its ‘Krugerism’ ideology to a ‘Christian Nationalism’ ideology – a political philosophy which B.J. Vorster (a future South African head of state) famously equated with National Socialism (Nazism) in 1942 when he said:
“We stand for Christian Nationalism which is an ally of National Socialism. You can call this anti-democratic principle dictatorship if you wish. In Italy it is called Fascism, in Germany National Socialism and in South Africa, Christian Nationalism”.
Two people in history play a significant role in generating myths around the Boer War, building into it Afrikaner nationalism constructs and identifying trigger areas for the “politics of pain” necessary for a Christian Nationalism or National Socialism ideology to surface and survive. Known as Hegemonic Nationalism this shared type of Nationalism needs an identified “internal” economic enemy and a “external” political enemy – all grounded on a specified nation’s ‘trauma’. In the case of German National Socialism, it’s World War 1, the Treatise of Versailles is the villainous instrument, the economic enemy is “Judaeo-Capital” profiteering off their misery. In the case of Afrikaner Christian Nationalism it’s Boer War 2, the British concentration camps the villainous instrument, the economic enemy is “British-Judaeo Capital” (“Hoggenheimer”) profiteering off their misery.
The first chap to build up all this nationalism is a fellow by the name of Henning Klopper – he is the Chairman of Afrikaner Broederbond in 1940, Klopper survives a Boer War concentration camp at the tender age of 6 and cannot understand why his older brother is isolated with measles, assuming that Britain murdered him and its all a campaign of genocide – Klopper would use this to principally guide Christian Nationalism as the Broederbond’s official ideology.
The other person is Adolf Hitler himself, one cannot under-estimate his influence, it still influences how the Boer War is seen and understood in Europe to this day – an example is the British “invention” of concentration camps – a myth which still holds right across Europe, the British used the concept of concentrating civilians in camps whilst they fought a guerrilla war (like the Spanish and the United States before them) no doubt there, but they certainly did not “invent” the concept (the Spanish did). To dismiss Hitler as irrelevant to the Boer War is to dismiss factual and relevant history and in fact to censor it for no good reason serves only to distort history.
In Conclusion
On linking Nazism, Kruger, Krugerism and Christian Nationalism, I’m afraid the hard truth is that linking Kruger to Hitler was done very effectively by the German propaganda ministry in Europe prior to and during World War 2. The Afrikaner Nationalist ‘right’ in their support of Nazi Germany during WW2 and infusing the ideology of Krugerism with Weimar Eugenics to create Afrikaner Christian Nationalism certainly creates a linear relationship and reinforces the argument on exactly who is culpable for the ideals of Apartheid.
So, here’s an interesting “first” for South Africa, we are the first nation who can hold up the very first aircraft hijacker as our own. Now, it’s not what you think, he’s not your deranged Islamic extremist or strait forward nut-job hijacking some or other commercial airliner … he’s a South African Air Force pilot and the aircraft he hijacked was a military aircraft belonging to the Axis forces during World War 2. His name was Lt. Colonel Edward Theodore Strever, South African Air Force (SAAF) No. 217 Squadron, or just plain “Ted” and both he, and his deeds are the stuff of legend, here’s his hijack story:
The Attack
During the war, Ted Strever, then a SAAF Lieutenant, found himself seconded to the Royal Air Force (RAF) flying a RAF 217 Squadron Bristol Beaufort twin-engined torpedo bomber L9820 and based at Luqa airfield in the isle of Malta. On 28th July 1942, 217 Squadron was engaged in attacking Italian Merchant shipping off Southern Greece. On that day Lt. Edward “Ted” Strever (SAAF) is captaining his Bristol Beaufort with a motley crew, his navigator is Pilot Officer William Dunsmore, Royal Air Force (RAF), from Liverpool. Sergeant John Wilkinson is his wireless operator, Royal New Zealand Air Force (RNZAF) from Auckland and Sergeant Alexander Brown is his Air gunner, also Royal New Zealand Air Force (RNZAF) from Timaru.
RAF 217 Squadron Bristol Beauforts
They spot a 12,000 ton Italian cargo ship escorted by two destroyers, targeting the cargo ship they go into a torpedo run, intense enemy defensive fire sees Ted Strever’s wingman go down, but Strever is able to get his torpedo away. His torpedo slams into the side of the target in a direct hit, eventually sinking the vessel. However in passing over the target Ted’s Bristol Beaufort is shot up, taking damage to both engines. The stricken bomber is forced into a water crash-landing, the crew all survive and in the 90 seconds it takes the Bristol Beaufort takes to sink, they all manage to scramble into an inflatable dingy.
Taken Prisoner
Not long after scrambling into their dingy after the crash Ted and his crew were picked up by an Axis sea plane – an Italian CANT Z506B ‘Airone’ (Heron), a maritime reconnaissance plane and bomber, it has 3 engines, a crew of 4 and floats – it puts down near the dingy and Ted and his crew are hauled aboard. The Italian crew make the Allied crew Prisoners of War – and kindly give them some brandy and cigarettes to smooth their ordeal of the attack and crash. They are then flown to a small harbour on the island of Corfu. Taken to a nearly camp, the Italians continue to treat them well and they are fed a meal of steak, tomatoes and wine – more cigarettes and given comfortable beds.
The next day after having eggs for breakfast the Italian’s informed the captured Allied crewmen they will be taken to Taranto in Italy, here they would spend the rest of the war as prisoners – they immediately begin to conspire as to escaping. A few hours later they are back at the small harbour, and back in the same aircraft that had rescued them the day before – the CANT Z506B ‘Airone’ – with the same 4 Italian aircrew, only this time there is an extra armed guard – a corporal.
CANT Z506B ‘Airone’
The seaplane took off and set a westwards course, after a short time, the Allied crew talking softly amongst themselves, hatched a hasty escape plan. They are about to make history with the very first “skyjacking”.
The Escape
Sergeant Wilkinson (RNZAF) leans forward and punches the Arione’s wireless operator hard in the face, he leaps over the failing body and over-powers the armed guard, taking his pistol and passing it to Lt. Ted Strever (SAAF). Pilot Officer Dunsmore (RAF) and Sergeant Brown (RNAF), tackle the aircraft’s engineer. The commotion alerts the two pilots, one draws his pistol and the other fumbles with a sub machine gun, however in trying to recover control of the aircraft the pistol is knocked from the pilot’s hand by his colleague. Ted Strever advances on the pilots using the corporal as a human shield and then disarms the pilots – the Italians are then tied up using their own belts. The aircraft is now in the hands of Ted and his crew and Ted takes over the controls – it’s all a little too much for the Italian corporal, not used to flying and in all the excitement he becomes violently air-sick.
More problems rear their heads, Ted Strever is unfamiliar with this aircraft type, cannot understand the fuel situation and had no maps. So, they untie the Italian co-pilot, put him in the pilot’s seat and at gun-point instruct him to fly the aircraft to Malta.
Next was the problem of flying an enemy Italian aircraft into Allied controlled airspace around Malta. On approaching Malta they are intercepted by 3 RAF Spitfires from No. 603 Squadron, the Spitfires immediately pounce on the Arione and start shooting it up. P/O Dunsmore frantically tries to wave the deadly attack off by leaning out and waving his white vest out a window – but to no avail. The Arione, now full of holes and badly shot up, makes an immediate sea landing. The Allied crew climb on top of the wings and start frantically waving the Spitfires off – the target neutralised the Spitfires break the attack. The British then dispatch a RAF ‘crash-boat’, a high speed Air Sea Rescue Launch HSL 107, from Kalafrana to pick the aircrew and tow the sea-plane in.
Astonished to see four Allied aircrew in the enemy plane a member of the RAF crash boat team tasked with towing them to St Paul’s Bay is reported to have said
“We thought it was old Mussolini coming to give himself up!”
RAF ‘Crash Boat’
Feeling a little guilty that the Italian’s had treated them so nicely when they were their POW’s, the Allied crew offered their apologies for not having any wine or brandy on them – but they promised them they would re-pay the compliment. One of the Italian crew, in rather good spirits realising that the war was finally over for him then produced a bottle of wine from his suitcase, which was promptly and very happily shared amongst both the air-crews.
Recognition
William Dunsmore was awarded the Distinguished Flying Cross (DFC), John Wilkinson and Alexander Brown as NCO’s eared the Distinguished Flying Medal (DFM). All survived the war.
Ted Strever also received a Distinguished Flying Cross (DFC) for this action. He died in Haenertsburg, South Africa in 1997 at the age of 77. This was only one instant in what was a very highly colourful and brave career in the Air Force. His daughter Gail Strever-Morkel published a book on his life, called ‘On Laughter-Silvered Wings: The Story of Lt. Col. E.T (Ted) Strever D.F.C’ and it well worth a read should anyone get their hands on a copy or order an electronic copy.
A short documentary was recently made by Mark Felton Productions and is on YouTube, here’s the link:
One thing is certain, they sure don’t make airmen like this anymore. A unique, brave and distinctively South African legacy.
Written and Researched by Peter Dickens
References
On Laughter-Silvered Wings: The Story of Lt. Col. E.T (Ted) Strever D.F.C By Gail Strever-Morkel. Published 2013.
PB Lucas (editor): Wings of War – Published 1983
The Reader’s Digest Illustrated Story of World War 2, vol.I.
The London Gazette dated Friday 4th September, 1942, regarding the award of the DFC.
So, here’s an interesting ‘back of the chappie paper’ fun fact to connoisseurs of fizzy cool drink, both Fanta and Coca-Cola became powerhouse brands thanks to World War 2, and they were at odds with one another – Fanta was developed in Germany as a response to Coca-Cola’s embargo of Nazi Germany.
Also, the reason why Coca-Cola and Pepsi are toe-to-toe on the international market share platform is very much due to World War 2, their ‘share’ of global segments mapped out directly as a result of the American war effort … who knew?
Fun fact in addition, the outcome of World War 2 still dictates how Fanta and Coca-Cola market themselves to this very day, yup, the politically correct police recently pulled a Fanta commercial campaign because of its “Nazi link”.
Now, before I discovered the alcohol industry as my preferred vocation to pay my bills (writing historical articles is a passion pastime and rather ‘free’ service), I was a Marketing Department Head for Pepsi’s distribution in the Middle East, and even here real ‘war’ still dictates global share – Pepsi has a 95% market share in the Middle East, yup – read that again – the Arabs almost refuse to drink Coke, and it’s thanks to .. you guessed it … war!
So, here’s some interesting war-time soft drink history. Let’s start at how Fanta and Coca-Cola landed up on opposing sides taking aim at one another – one the iconic soft drink of the German Wehrmacht – Fanta, and the other the iconic soft drink for American GI’s – Coca-Cola.
Fanta – a truly wartime product
Before World War 2, Coca-Cola was made in Germany under license by Coca-Cola Deutschland (Coca-Cola GmbH). When World War 2 broke out, the United States initiated a trade embargo against Nazi Germany. This meant that the export of Coca-Cola syrup (concentrate) to Nazi Germany was banned. So, like many countries experiencing ‘sanctions’ the Germans (like South Africans and more recently Russia) simply ‘made a plan’.
Max Keith, the head of Coca-Cola Deutschland decided to create a new product for the German market, he had all the bottling, distribution and carbonation abilities – just needed some concentrate, he also needed to look into supplement sweetener as in a wartime economy, sugar was available but highly limited.
Images: Wartime Fanta advertising
The ingredients for his supplement cola where what Max Keith would call “the leftovers of leftovers” and consisted of beet, whey protein (by product of making cheese), apple pomace (the leftovers from apple pressing) and some sugar. As with anything, wartime really does spur innovation, not only weaponry, also soft drink. Consider the degree of innovation for this ‘supplement’ cola – it’s a real step away from normal cola key ingredients like coca, citrus oils, vanilla and kola nut found in peacetime.
All he needed now was a new name (Coca-Cola was trademarked), and like many brand names this one came from a Corporate “Brain-Storming” session. Max Keith asked his team to “use their imagination” – imagination in German is “Fantasie” and one of his sales-men, Joe Knipp retorted with “Fanta!” .. and with that Fanta was born. Fanta would become a household name in wartime Germany and in 1943 alone, 3 million cases of Fanta were sold. Funnily many bottles of Fanta were not only consumed as a beverage but also used as a cooking ingredient to add sweetness and flavour to soups and stews, as sugar was so severely rationed.
As with the German Coca-Cola plant, the Dutch Coca-Cola plant in Amsterdam suffered the same embargo issues as Nazi Germany occupied the Netherlands, they could not get Coca-Cola concentrate. So, Max Keith to the rescue as Coca-Cola Deutschland (Coca-Cola GmbH) gave N.V. Nederlandse Coca-Cola Maatschappij their Fanta recipe and brand name usage. The only difference is the inclusion of elderberries in the Dutch version of Fanta.
Fanta production was discontinued when the German and Dutch Coca-Cola branches were reunited with their parent company – Coca Cola after the end of the war in 1945, but realising the brand still had some intrinsic value and had an emotional connection with European consumers – it would have a new lease of life just 10 years later, but with a different formula. The modern flagship Fanta – Fanta Orange, finding its origin with the Coca-Cola distributer in Italy and the use of … yup, Italian Oranges in the formula.
Image: Wartime Fanta advertising with Wehrmacht link
Coca-Cola – a wartime distribution
1943 Pepsi label
So, how did Coca-Cola become such an international powerhouse, the first real “Global Brand” – prior to World War 2, Coca-Cola had some budding distribution in Europe, sure, but its primary focus was the USA and its traditional power states – the Southern American states. In the USA, at the beginning of the war, both Pepsi (whose strength lay in the Northern American states) and Coke decided they would become Patriots and support the war effort. Pepsi in their way decided to change their logo and labels from simply Red script to “Red, White and Blue” the colours of the American National Flag ‘Old Glory’ (a colour sequence they frequently revisit).
Coca-Cola on the other hand was thinking a little bigger than Pepsi in their efforts to patriotically support the American war effort. In 1941, with America entering the war proper, the President of Coca-Cola USA – Robert Woodruff famously announced, “every man in uniform gets a bottle of Coca-Cola for five cents, wherever he is and whatever it costs the company”.
Problem was that the shipping and cargo space for supplies was reserved for essential goods ‘Food, equipment and ammunition’ and Coca-Cola was a ‘non-essential’ product. So, they came up with a plan to ensure Coca-Cola would get to the combat zones and advancing American GI’s. Portable Factories and bottling plants were devised and set up within reach of the advancing American troops. Initially anticipating only 10 portable bottling lines, Coca-Cola eventually landed up with 64 such lines advancing with the troops.
They even went one step further, 148 representatives from the Coca-Cola Company filled the ranks with an official title of “Technical Observers,” or TO’s. The TO’s were given army fatigues and had one responsibility only – to serve Coca-Cola to every thirsty American GI, no matter where they were located. The GI’s welcomed these TO’s with open arms, treating them as commissioned officers and calling them “Coca-Cola Colonels”. In Coca-Cola today they even have an honour roll – two of these TO’s were killed in action.
American GI’s on the front-line enjoying Coca-Cola
At the end of the war, Coca-Cola had literally conquered every market that the USA troops entered during the war, maintaining distribution, and setting up factories around the world. You can see their global share and market dominance in exactly those markets where America went to war – the European theatre and the Asian theatre – these two global chunks and their markets are absolutely commanded by Coke – significantly the United Kingdom, Netherlands, Belgium, Germany, Italy, France, Japan, Greece, Austria, Indonesia, Thailand, Philippines and even Australia.
Pepsi, also began to ‘globalise’ but only really started to do it after World War 2 – and they could only advance into markets and command share where Coca-Cola had not been focussing during the war – which is why we find Pepsi in the pound seats in South American, Indian, Pakistani and Russian markets. But why such a domination of Pepsi in the Middle East markets – American troops advanced in North Africa, and Coca-Cola have commanding market share in Morocco as a result, but not in the rest of the Middle East – so why not there? Well, it’s down to war again.
Images: Coca-Cola advertising during WW2 stressing globalisation and militarisation.
The simple reason is that it’s not that Coca-Cola is American, Pepsi Cola absolutely commands all the Middle East markets – and it’s American. It’s all because Coca-Cola opened a distribution plant in Israel, and after the various Israeli-Arab wars post World War 2, Arab consumers chose to boycott Coke and by default Pepsi took almost complete control. Since Gulf War 1 in 1990, Coca-Cola decided to re-focus efforts in the Middle East and started opening plants in places like Oman, Saudi Arabia and Bahrain with appeal to younger Arabs who really don’t care about past wars.
However, regardless of changing Arabic and Muslim perspectives and attitudes, “Bebsi” as Pepsi it is pronounced (the Arabic language does not have a ‘P’ letter) remains the giant in places like Lebanon, Egypt, Syria, Saudi Arabia, Bahrain, Oman, Kuwait, Iran, Jordan and the UAE – Coke has a mere sliver of market share.
Fanta Classic in Retro WW2 bottle
Thought Police
So back to Fanta and Coca-Cola, why does World War 2 still affect the way Fanta is marketed and communicated to this very day? Well, it’s down to the Nazi police – and it’s not the Gestapo of 1939-1945, this time it’s the WOKE brigade Cira 2010 onwards– modern self-assured neo-Nazism disguised as liberalism. So, here’s how WW2 still haunt the soft drink industry?
In 2015, Coca-Cola Germany decided to celebrate it wartime Fanta ingenuity with the 75th anniversary of the launch of the brand. They would celebrate it with a retro bottle, an original label (described as “classic”) and original recipe (described as “less sweet”). All good, it’s the revitalising of a nationally loved and adored product and celebrating a home-grown German brand which became an international brand icon.
Problem is the accompanying TV advertisement, which been true to just about every soft drink advertisement, talked about having a good time with a great product. Like any retro product celebration is also talked about bringing back “the feeling of the Good Old Times”. That bit sent the easily offended modern day ‘thought’ police into a ballistic twist as they claimed the product promoted Nazism as a “good time”. The pressure became so great Coco-Cola Germany pulled the campaign.
That’s the problem with self-opinionated righteousness with no sense of time and place – no historical context. Just about every single German brand which has wartime innovation and product at its heart simply cannot talk about it – Volkswagen can’t talk about its first beetle, and it does not stop there – BMW, Heinkel, Mercedes Benz, Bosch, Bayer, Allianz, Deutsche Bank, Audi, Dornier, Hugo Boss, Messerschmidt, Porsche, Merck and even Siemens all have wartime track records and remain very quiet about it, lest someone remember some actual history. So, the period 1939-1945 simply doesn’t exist for them – nor their innovations and science in this period (albeit some it is pretty nasty, so some common sense still needs to prevail). We just need to pretend it all never happened and exist in a state of happy oblivion – the ’thought’ police win.
To see Coca-Cola’s ‘Faux pas’ on its ‘happy’ Fanta 75th retro celebration, have a look at the “offensive” commercial and you’ll see what I mean – there is nearly nothing to it, they ‘allude’ to a difficult time without getting specific and it was ‘stamped’ out for the benefit of political correctiveness – literally. Here’s the link (with English subtitles):
Cocktail Time
Now, as a South African I’ve seen companies in our drinks industry ‘make a plan’ to overcome ‘struggles’, ‘wars’ and ‘sanctions’ – Coke is in command in South Africa because ‘Pepsi’ withdrew due to Apartheid sanctions and has struggled to get a foothold back in South Africa since, the simple truth is that consumers when it comes to brand affinity are more concerned with self gratification and their emotional connect to the brand than with its board members political convictions – so for all the ‘good’ Pepsi thought it was doing by supporting the Apartheid boycott – the ‘masses’ certainly have not rewarded Pepsi with any loyalty for their trouble.
I also personally don’t mind which it is – Pepsi or Coke which is going to augment my now 5 year old barrelled ‘Spirit of Hermanus’ Brandy – it’s gonna taste great, I’m happy either way (I do however have a disposition to Pepsi though – having worked for them for nearly a decade and they treated me well). I also don’t mind Fanta, a “Fanta-see” Fanta Orange, Fresh Orange Juice and my Rum make a great combo, I really admire Fanta for been born out of adverse conditions and enabling ordinary German people to enjoy a soft drink – all these brands are great. But I also love history, and when these great brands have such rich history, and find reason to celebrate it – let’s just do it and not get silly about it.
So, if you like me and love your beer, and as a brewery owner I can’t help myself – Munich (or München in German) is THE place to go. Bavaria’s capital and it’s the venue of the Octoberfest and there is much ‘Ein Prosit der Gemütlichkeit’ (cheers to the sociability), Zigge, Zagge, Hoi, Hoi, Hoi and clunking of large vessels of beer called Steinzeugkrug full of cold, hoppy, golden nectar. It’s a fun place, I certainly love it, it’s a beer lover’s Mecca – no doubt.
But as a purveyor of fine history snippets too, my love of history also kicks in, and in Munich, there is a very sinister and dark past, and there’s tonnes of, literally tonnes of inconvenient history. You would not notice it today as an average tourist “in it for the beer,” Munich has been ‘scrubbed clean’. There is almost no evidence of its history as the epicentre and cultural pilgrimage of Nazism. In fact they go a long way in Munich not to celebrate World War 2 historic tourism, but that has not stopped a couple of freelance ‘independent and opportunist’ tour guides pulling an informal crowd for the unofficial Nazi tour of beer-houses and locations attended by the likes of Hitler and his cronies.
The sterility of Munich got me thinking, at what point is the removal of statues and memorials deemed ‘offensive’ perfectly acceptable and what point is it not? At what point do we, like the city of Munich .. ‘scrub’ out our past completely, disregard the idea of preserving it for the purposes of a history teaching (even a lesson on the evilness it incurred) and hide it for fear of offending victims of it.
So what’s the big deal of this totally bland corner of the Feldherrnhalle monument (Field Marshal’s Hall – built in 1841 by King Ludwig I to celebrate the Bavarian Army), located on the Odeonsplatz – Munich’s town square. Here I am with my usual ironic grin celebrating the complete nothingness of what was a ‘holy’ site to Nazism – that exact nondescript corner – the site of huge pilgrimages and parades. The only evidence left, some plug holes in the original monument that held up the gigantic Nazi add-ons. Heck, this corner was so important that as an average Munich citizen you saluted the corner of this building – ‘Nazi style’ – whenever you walked passed it. Now there is nothing, not even an information plaque.
The importance of beer halls in establishing Nazism
Well, apart from being a historic monument to Bavaria, the Feldherrnhalle is also central to all the traditional beer halls and beer gardens located around is, and it’s in two of these nearby beer halls that this story begins. The famous Bürgerbräukeller beer hall – completely demolished now and replaced with a modern culture, music and arts centre, and the Löwenbräukeller beer hall. You can still visit the Löwenbräukeller (I have) and give a complimentary Ein Prosit and Zigge Zagga to the resident Oompa band, and again – nothing, zilch, nada on its Nazi history – not even on their website.
So, in the Bürgerbräukeller beer hall, Nazism as an ideology was effectively born and took hold. Central to the beer hall was a rectangular grand hall which could accommodate up to 3,000 people and a large cellar, ideal for political meetings and rallies. From 1920 to 1923, the Bürgerbräukeller was one of the main gathering places of the Nazi Party, it was effectively established there, and it was from there that Adolf Hitler launched the infamous Beer Hall Putsch (revolt) on the 8th November 1923. Also known as the Munich Putsch, in essence Hitler and his fellow Nazi cronies attempted to pull off a military coup and overthrow the Weimar Republic.
Images: Bürgerbräukeller’s Great Hall left as it was then, Löwenbräu keller, as it is now.
Throughout 1923, the economic and political crisis struck. The Nazi Party and other nationalists believed that an armed takeover of Bavaria was possible and could even overthrow the Republic in Berlin. Hitler and the Nazi Party collaborated with others such as General Erich Ludendorff and Gustav von Kahr (a founding right wing Nationalist leader) to put a plan together to attempt a military coup. By August 1923, the plan was set and weapons and transport were gathered. However by November 1923, some of the Nazi conspirators got cold feet as news came in that the German Army in Berlin would support the government and not the conspirators.
Hitler, realising that von Kahr sought only to control him and did not have it in him to initiate a coup, utterly frustrated by it all Hitler was determined that the plan would go ahead. On the 8 November 1923, he and a contingent of the party’s SA (Storm Detachment/Troopers) marched into the Bürgerbräukeller beer hall whilst von Kahr was giving a speech to 3,000 people there. The SA surrounded the hall and set up a machine gun. Hitler, surrounded by his associates including Hermann Goring, Rudolf Hess, Alfred Rosenberg, Adolf Lenk, Max Erwin von Scheubner-Richter, Wilhelm Adam, Robert Wagner and others (20 in total) then jumped up a chair, fired a gun-shot and shouted “The national revolution has broken out! The hall is surrounded by six hundred men. Nobody is allowed to leave.”
He went on to state that the Bavarian government was deposed and declared the formation of a new government with General Ludendorff as the head. At gun-point Von Kahr gave his support to Hitler. Dispatches were sent to trigger Ernst Röhm and his paramilitary group the Bund Reichskriegsflagge (Imperial War Flag Society) waiting at the Löwenbräukeller Beer Hall and Gerhard Rossbach who had a detachment right wing students at a nearby infantry officers school.
The Putsch was on. After his speeches Hitler received resounding applause from the crowd at the Bürgerbräukeller beer hall and Von Kahr and other members of the Bavarian government were taken into custody, Hitler departed the hall later in the evening to deal with another crisis, and mistakenly Von Kahr and his associates were released (they later took the opportunity to denounce the Nazi Party as illegal and join the government).
The night was marked by confusion and unrest among government officials, armed forces, police units, and individuals deciding where their loyalties lay. Early in the morning on the 9th November 1923 (around 3am), the first shots fired in the Putsch occurred when a local Reichswehr Army detachment loyal to the government spotted Röhm’s men coming out of the Löwenbräukeller Beer Hall. Encountering heavy fire Röhm and his men were forced to fall back. In the meantime, the Reichswehr officers put the garrison on alert and called for reinforcements.
Later that morning on 9 November, Hitler realised the Putsch had stalled, about to give up, and not sure what to do, the Putschists were rallied again by General Ludendorff who shouted “We will March” and with that Röhm’s force together with Hitler’s force (approximately 2000 men) marched out – but with no specific destination in mind. On the spur of the moment, General Ludendorff decided to lead them to the Bavarian Defence Ministry – which would take them past the ….. Feldherrnhalle and the Odeonsplatz … and here is where the corner of the Feldherrnhalle becomes important, because as they rounded this unremarkable corner of the monument they were met with 130 government soldiers and police blocking their way – and they found themselves in what is a fairly narrow road aside the monument in a sort of ‘Mexican Stand-off.’
Image: Nazi Putsch members – 9 November 1923
The two groups exchanged fire with one another, in all 4 were killed in the government’s forces and 16 Nazi Putschists were killed. In the firefight a couple of key things happened – most importantly the equivalent of a rather crooked ‘Sacred Cross’ legend was born .. the ‘Blutfahne’ (‘blood flag’). The Flag Bearer of the Nazi Flag was a SA member, Heinrich Trambauer, and he was badly wounded dropping the flag splattered with his blood, a second SA man, Andreas Bauriedl, was shot dead and fell dead onto the fallen flag, covering it in more blood. Secondly. Hermann Göring was badly wounded – and this wound would haunt him his entire life, leading to his violent morphine drug addiction which resulted in irrational decision making during the Second World War. The game was up, the Nazis scattered or were arrested. Göring escaped and was smuggled to Innsbruck. Finally, Hitler now on the run was arrested two days later on the 11th November 1923.
Hitler was sent to Landsberg Prison and put on trial for treason. Hitler’s trial took place from the 26 February to the 1 April 1924, he was ultimately found guilty of treason, but, with a sympathetic judge, he was sentenced to just five years in prison. Of this five years, Hitler only served nine months. But most importantly for the Nazi movement and to the detriment of the rest of world, Hitler was imprisoned alongside Rudolf Hess, Hess was a Hitler groupie – and held a fanatical admiration of him. He was also very articulate and ‘balanced’ Hitler enough to assist in writing Mein Kampf by Adolf Hitler (My Struggle) which honed Nazi ideology and philosophy.
Back to the beer halls of Munich, not long after been released, Hitler was back in his old haunt – the Bürgerbräukeller Beer Hall, where he promptly officially ‘re-established’ the Nazi party on 27 February 1925. Not to be left out, during the war, Adolf Hitler delivered his infamous 8 Nov 1942, Stalingrad speech from Löwenbräukeller Beer Hall.
Images: Left – the notice to reestablish the Nazi Party at a ceremony at the Bürgerbräukeller and the Bürgerbräukeller Great Hall hosting a Nazi rally.
The Nazification of the Feldherrnhalle
After the Nazis took power in 1933, Hitler turned the Feldherrnhalle into a memorial to the Nazis killed during the failed putsch. A memorial to the fallen SA men was put up on its east side, opposite the location of the shootings – crowning it with a Swastika. A Nazi add-on monument was mounted, the Mahnmal der Bewegung (Memorial to the Movement), basically a rectangular structure listing the names of the Nazi martyrs faced anyone standing at the corner of Feldherrnhalle monument. The back of the memorial read Und ihr habt doch gesiegt! (‘And you triumphed nevertheless!’). Around it flowers and wreaths were laid.
This memorial was under perpetual ceremonial guard by the SS. The Odeonsplatz square in front of the Feldherrnhalle was used for both SS parades and commemorative rallies. During some of these events the 16 Nazi dead were each commemorated by a temporary pillar placed in the Feldherrnhalle topped by a flame. Many new SS recruits took their oath of loyalty to Hitler in front of the memorial.
Passers-by were expected to hail the site with the Nazi salute. Those not wishing to salute, used a detour lane to by-pass the memorial and honour guard, sarcastically earning its nickname “Drückebergergasse” (meaning the ‘shirker’s lane’).
On 9 November 1935, the 16 Beer Hall Putsch Nazi dead were taken from their graves and to the Feldherrnhalle. The SA and SS carried them down to the Königsplatz, where two Ehrentempel (‘honour temples’) had been constructed. In each of the structures eight of the dead Nazis were interred in a sarcophagus bearing their name.
The 16 Beer Hall Putsch Nazi dead were regarded as the first ‘blood martyrs’ of the Nazi Party, and here’s where the Blutfahne – the ‘Blood Flag’ would make its appearance. It was brought out for the swearing-in of new recruits in front of the Feldherrnhalle and the taking of their oath of allegiance to Adolf Hitler specifically. It was also brought out for Der neunte Elfte – 9 November, literally ‘the ninth of the eleventh’ or 9/11 (not to be confused with the current 9/11 Twin Towers commemoration) and it became one of the most important dates on the Nazi calendar.
Notably, the chosen day to celebrate the Putsch is not the 9th November, when the 16 Nazi martyrs were killed, it was the 11th November – the day Hitler was arrested – so to his megalomaniac mind the more important date as his personal arrest signalled the end of the Putsch (never-mind Göring and others who were still at large).
Every year the Putsch would be commemorated nationwide, with the major wreath laying event taking place at the Feldherrnhalle. On the night of 8 November, Hitler would open the ceremonies and address the Alte Kämpfer (‘Old Fighters’ – veterans of the Putsch) in the Bürgerbräukeller Beer Hall.
The Blutfahne – the ‘Blood Flag’ was treated as a sacred object by the Nazi Party and carried by SS-Sturmbannführer Jakob Grimminger at various other Nazi Party ceremonies. One of the most visible uses of the flag was when Hitler, at the Party’s annual Nuremberg rallies, touched other Nazi banners with the Blutfahne, thereby “sanctifying” them. This was done in a special ceremony called the “flag consecration” (Fahnenweihe).
Image: Hitler behind the ‘Blood Flag’ performs a ‘flag consecration’ on a SS Banner.
Rather mysteriously, and its akin to any good ‘who done it’ mystery – the Blutfahne was last seen in public at the Volksstrum induction ceremony on 18 October 1944, thereafter it vanished, which for such a significant artefact and ‘national treasure’ remains a puzzle. Its current whereabouts are still unknown.
Throughout the Second World War, the 9/11 anniversary ceremony continued, propagandists pitched the 16 fallen as the first losses and the ceremony was an occasion to commemorate everyone who had died for Nazi Germany – the ceremony now akin in Nazi Germany to what is 11/11 today and the Whitehall Cenotaph parade. As the war went on, residents of Munich came increasingly to dread the approach of the anniversary, concerned that the presence of the top Nazi leaders in their city would act as a magnet for Allied bombers.
Images: Original colour images of the German 9/11 anniversary parade in front of the Feldherrnhalle monument on the Odeonsplatz town-square.
The End
Understandably the memorial was going to cause considerable controversy at the end of the war, and it did. Local Munich residents angrily and spontaneously smashed the Mahnmal der Bewegung to pieces on the 3rd June 1945. It was also famously defaced when a guilt ridden German painted graffiti on the memorial with the words “Concentration camps Dachau – Velden – Buchenwald, I am ashamed that I am a German.”
However it remains a site for Nazi pilgrimage, and even as late as April 1995, a World War 2 Veteran named Reinhold Elstner, took the opportunity to commit self-immolation suicide in front of Feldhernhalle to protest against “the ongoing official slander and demonization of the German people and German soldiers”. Each year neo-Fascist/neo-Nazi groups from various European countries and Germany itself try to hold a commemorative ceremony for him, which Bavarian authorities constantly try to prevent through state and federal courts.
So, very understandable the need to sanitise this memorial and discourage neo-Nazi and neo-Fascist groupings from using it to honour an ideology that provided such significant misery to millions of people. But I can’t but think there is no point sanitising it completely as has been done, use it to educate rather – at least an information board or story board which explains the tyranny the site once fostered, a lesson to humanity not to do it again, maybe even Holocaust Memorial sanctioned tour guides to balance and educate and do away with the freelance cowboys (maybe they’ve done it, but that was not the case when I was last in Munich) – lest we completely forget, lest the ‘blood flag’ suddenly re-appear from its secret stash and we open up more ‘clean’ space in which Neo-nazism and holocaust denial/conspiracy theory can thrive (there’s no ‘proof’ to see now, moving on – its been removed, so prove it).
The same can be said of South Africa, at what point do we decide to allow WOKE thinking to remove all ‘white’ history and scrub that culture on the basis of the evils of Apartheid and Colonialism – too offensive to the majority. Take down ALL the statues, another … “where have all the statues gone”.. rather initiate the Communist and Revolutionist zeal for the ‘Year One’ calendar, and let’s all start our history from 1994 shall we comrades. No, history is history, warts and all, we need to ‘have the conversation’ at least, it’s the lesson to mankind to know where it comes from and therefore to know where it’s going to, it gives us our moral north .. sanitising it moves the compass south.
A friend asked the Observation Post a question, what were Sailor Malan’s medals? So down the rabbit hole and here we are … Sailor’s medals. I’m no medal specialist but this is what I’ve managed to find so far. If I’m wrong please feel free to correct me and add to this.
Image: Sailor Malan’s medals on display at the Johannesburg War Museum in Saxonwald
Left to Right – from the highest value (the decoration/medal closest to the heart when the medal rack is worn on the left breast), to the lowest value decoration/medal (the one furtherest from the ‘heart’), and in the case of foreign decorations (other countries) in order of importance after the lowest ‘own’ country medal – Sailor has a few of foreign awards these too, and they are all ‘decorations’ so very important.
Distinguished Service Order & Bar (DSO)
OK, let’s start with Sailor’s DSO, the ‘& Bar’ bit means he was awarded this decoration not once, but twice. In Sailor’s case the DSO is awarded for bravery. Here are the citations for his Distinguished Service Orders:
Acting Squadron Leader Adolph Gysbert Malan, DFC (37604), Royal Air Force, No.74 Squadron. December 24th, 1940.
“This officer has commanded his squadron with outstanding success over an intensive period of air operations and, by his brilliant leadership, skill and determination has contributed to the success obtained. Since early in August 1940, the squadron has destroyed at least 84 enemy aircraft and damaged many more. Squadron Leader Malan has himself destroyed at least eighteen hostile aircraft and possibly another six.”
And on 22nd July, 1941:
Bar to the DSO
Acting Wing Commander Adolph Gysbert Malan, DSO, DFC (37604) Royal Air Force.
“This officer has displayed the greatest courage and disdain of the enemy whilst leading his Wing on numerous recent operations over Northern France. His cool judgement, exceptional determination and ability have enabled him to increase his confirmed victories over enemy aircraft from 19 to 28, in addition to a further 20 damaged and probably destroyed. His record and behaviour have earned for him the greatest admiration and devotion of his comrades in the Wing. During the past fortnight the Wing has scored heavily against the enemy with 42 hostile aircraft destroyed, a further 15 probably destroyed and 11 damaged.”
Distinguished Flying Cross & Bar
Again, the ‘& Bar’ bit means he was awarded this decoration twice, this is still a ‘decoration’ and not a ‘medal’ so it’s very high on the senior level, and in Sailor’s case both times it is awarded to exceptional flying and bravery. Here are the citations for his Distinguished Flying Crosses;
Flight Lieutenant Adolph Gysbert Malan. (37604), Royal Air Force. June 11th, 1940.
“During May 1940, this officer has led his flight, and on certain occasions his squadron, on ten offensive patrols in Northern France. He has personally shot down two enemy aircraft and, probably, three others. Flight Lieutenant Malan has displayed great skill, courage and relentless determination in his attacks upon the enemy.”
And on August 13th, 1940:
Bar to the DFC
Flight Lieutenant Adolph Gysbert Malan. (37604), Royal Air Force.
“Since the end of May, 1940, this officer has continued to lead his flight and, on many occasions the squadron, in numerous successful engagements against the enemy. During the Dunkirk operations he shot down three enemy aircraft and assisted in destroying a further three. In June, 1940, during a night attack by enemy aircraft, he shot down two Heinkel 111’s. His magnificent leadership, skill and courage have been largely responsible for the many successes obtained by his squadron.”
British and Commonwealth Medals
What follows after the decorations on Sailor’s medal rack are medals for World War 2 in order of seniority and these are:
1939-45 Star with Battle of Britain clasp
Campaign medal awarded to all British and Commonwealth personnel who fought in any theatre of operations during WW2. The ribbon shows arms of service – Navy (dark blue), Army (red) and Air Force (light blue).
The ‘Battle of Britain Clasp’ on Sailor’s 1939-45 Star was awarded to those who were engaged in action in the Battle̴ of Britain between 10th July 31st July 1940
The Air Crew Europe Star with France and Germany clasp
The ACE medal was awarded for operational flying from the UK over Europe, between the period 3rd September 1939 to 5th June 1944 (outbreak of war until the start of Operation Neptune on the 5th June 1944, followed by the D-Day Normandy landings on the 6th, so the cut off date is actually 4 June, 1944 for ACE medal), the ribbon is light blue with black edges and yellow stripes, representing continuous service in the air (blue) by day (yellow) and night (black).
The France and Germany clasp was awarded to those who qualified for the France and Germany Star by having participated in land, sea or air operations in, or over, France, Holland, Belgium or Germany between 6 June 1944 and 8 May 1945.
The Defence Medal
Campaign medal awarded for both Operational and non-Operational service during WW2 to British and Commonwealth service personnel (and civilians involved in Service to armed forces). The ribbon is symbolic of the fire bombing air attacks (Orange) on ‘this green and pleasant’ land (Green) of the UK during the ‘blackouts’ (the two thin black lines).
The War Medal (1939-1945) – with a mid Oak Leaf.
Campaign medal for British and Commonwealth personnel who had served full-time in the Armed Forces or the Merchant Navy for at least 28 days between 3 September 1939 and 2 September 1945. The medal ribbon is distinguished by the colours of the British Union Flag/Jack.
The Oak Leaf signifies that the individual wearing this medal was MiD (Mentioned in Dispatches). The Oak Leaf on Sailor’s ribbon of this medal indicates the award of the King’s Commendation for Brave Conduct.
Foreign Decorations
There are decorations issued by ‘foreign’ countries to Sailor Malan and they are worn in the more junior position of the medal rack regardless of the seniority of the decoration. Here Sailor Malan received the following:
Legion of Honour (France) Officer Grade
The ‘Ordre national de la Légion d’honneur’ or LdH is France’s highest distinction and is awarded in recognition of both military and civilian merit. There are three ranks; Chevalier (Knight), Officier (Officer) and Commandeur (Commander). Sailor has the Officer rank.
Croix de Guerre (France)
The French ‘War Cross’ is awarded either as an individual award or a unit award to those combatants who distinguish themselves by acts of heroism involving combat with the enemy.
Croix de guerre (Belgium) with bronze palm
This is the World War 2 variant of the Belgium ‘War Cross’, awarded for bravery or other military virtue on the battlefield. It was reestablished on 20 July 1940 by the Belgian government in exile for recognition of bravery and military virtue during World War 2.
The Bronze Palm means Sailor Malan was ‘Mentioned in Dispatches’ by the War Office specifically for a performing heroic or significant deed.
Czecho-Slovakian Military Cross
Ceskoslovenský válecný kríž 1939 is a military decoration of the former state of Czechoslovakia which was issued for those who had provided great service to the Czechoslovak state (in exile) during World War 2.
Awarded to Group Captain Adolph Gysbert Malan on March 5th, 1946 “In recognition of valuable services rendered in connection with the war.”
In Conclusion
Now, that’s a lot of ‘Bravery’ and Sailor Malan counts as one of South Africa’s bravest, he’s got the decorations and medals to show for it. I’m no pro when it comes to medals, its a very complex field, so here’s waiting for the medal pros for more information … and go!
Image is from a Johannesburg War Museum PDF. Researched and written by Peter Dickens