I was having a banter with an old SADF army pal of mine, and we recalled the great divisions between the “English” okes in the platoon and the “Afrikaans” okes in the platoon. There was always banter, and general unity and respect, we all faced the same hardship and threats, and we needed one another to survive so we were closer than blood brothers. That of course did not stop ‘the great divide’ caused by a Afrikaner nationalist identity, the ingrained idea that the “English” were the source of all Afrikaner trauma, the fierce need to be free of Britain’s tyranny and the mass exodus of Afrikaners from the British colonies in protest – the Great Trek, this would be followed by later by the indignation of the British invading their free republics and the fierce fight for independence again, a fight to the bitter end to protect an Afrikaner rebel hegemony and the right to the country.
Time and again, two key themes would re-appear – the idea that they all belonged to a ‘pioneer’ class of hard fighting frontiersmen – Voortrekkers and the idea they also all belonged to an equally hard fighting bunch of ‘bittereinders’ – all the time seeking independence from their traditional foe – the ‘English’ and all the time desirous of an Afrikaner Republic. It’s a repeat theme – you still see it even today then the Springbok XV meet the England XV. In the army, us ‘English’ okes were constantly singled out as the physical manifestation of this ‘foe’ – sometimes in jest but also sometimes taking a lot of abuse and you had to tread very lightly when accusations like “you put my Grandmother in a concentration camp” started kicking about – not that your forebears had anything to do with it whosoever.
Problem is – not all Afrikaners share a “pioneer” and “bittereinder” identity, they were artificially jelled into this identity in the late 1930’s by an all-white, all-Afrikaans and Broederbond driven Centenary celebration of the Great Trek. Pulled under a singular banner of Christian Nationalism. So much so that even if you look up ‘Afrikanerdom’ today you find it defined as:
Noun. (in South Africa) Afrikaner nationalism based on pride in the Afrikaans language and culture, conservative Calvinism, and a sense of heritage as pioneers (Voortrekkers).
But what are the chances? What are the chances that Afrikaners all share this unified ‘Pioneer’ and ‘Bittereinder’ identity – the coming together of which Henning Klopper, the Chairman on the Broederbond famously declared in 1938 as “a sacred happening” – God, according to Klopper, had ordained it. What are the chances indeed?
This is where economic history, hard stats, the maths, starts to punch massive holes into ‘political’ history and ‘identity’ politics. So, let’s begin at the very beginning.
The “Great” Trek
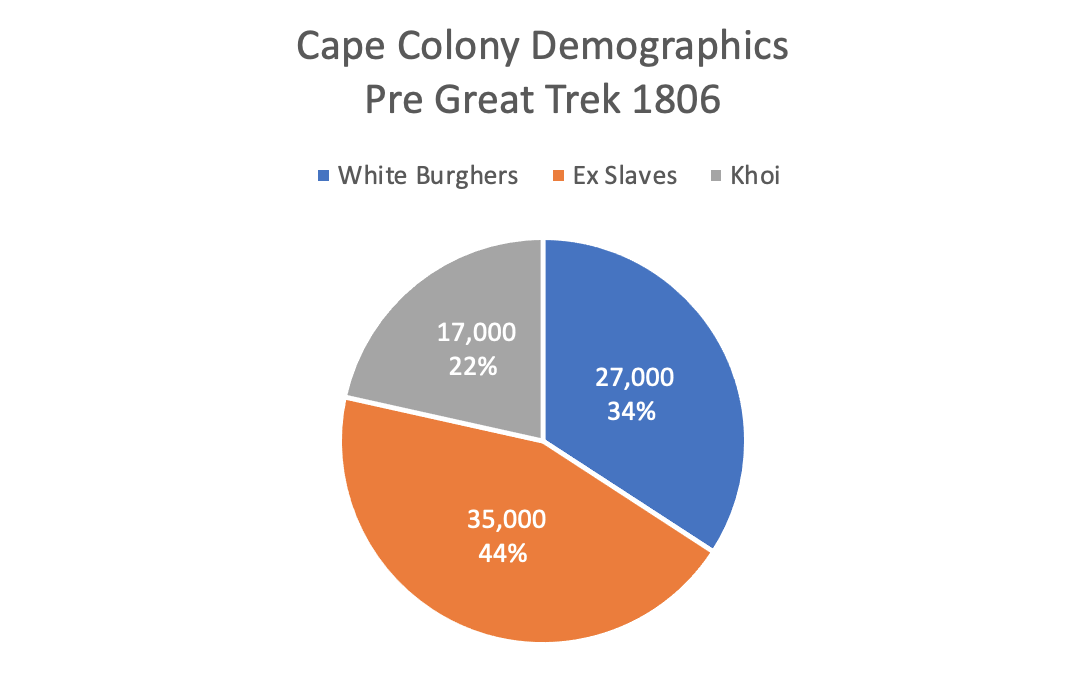
Let’s start with the “Great Trek”. There’s a lot of false and inflated numbers as to The Great Trek, but most accredited historians refer these Cape Colony figures.
From the commencement of British rule in 1806 – the Cape Colony had about 27,000 white burghers, 35,000 registered ‘ex-slaves’ and 17,000 Khoi Khoi descendants – 79,000 total population. Of that total population only approximately 6,000 ‘Boers’ including an equal number of their ‘coloured’ servants and labourers on a 1:1 ratio (so 12,000 in total), left in the waves considered the Great Trek itself – and their jump points – Grahamstown, Uitenhage and Graaff-Reinet were hundreds of kilometres away from metropolitan Cape Town (in fact it was as far to travel to Bloemfontein from these jump points as it was to Cape Town).
We need to think of them as the American white ‘pioneers’ settling the wild west in trailblazing wagon convoys – trying to negotiate land in “Indian” territory. The interior of South Africa above the Cape Colony and Natal Colony was not “empty” or “undiscovered” – like the “Wild West” it was already partly mapped by frontiersmen, nomadic farmers (trek-boers), hunters and missionaries. They would provide the network of ‘supply’ support to our plucky pioneers (Voortrekkers).
The “exploratory” first wave is not very successful. Louis Tregardt’s group is all but wiped out by disease – 52 people make it to Portuguese East Africa and return to Port Natal. Hans van Rensburg’s group (51 people) is wiped out by the Zulu – 2 children survive. Hendrik Potgieter and Sarel Cilliers have a party of 200. Gerrit Maritz has a party of about 700 (including servants). Piet Retief’s party starts with about 100 people, it links up with the other Voortrekkers and over 100 (including black servants/labour) are initially wiped out by the Zulu – the Zulu then wipe out more of Retief’s combined trek 282 Voortrekkers and 250 of their servants (there’s that 1:1 ratio) were killed along the Bloukrans during the Zulu attacks of the 16th and 17th February 1838. Piet Uys has a party of 100, and both he and his son are wiped out by the Zulu.
As we can see, there is already a major issue in trying to account the size of these treks – some account ‘white’ families only (and we have no knowledge of the number of servants – they are referenced but that’s about it), whilst others account both. Much work on the “Black History” of the Great Trek has yet to be done – the guardians of its ‘white’ history resisted it for decades.
Either way, whichever way you cut it, the chances of anyone been related by a direct blood line to the exploratory wave of the great trek are extremely slim if the published numbers are anything to go by – in fact it’s about 1% considering about half didn’t make it. Also, the ‘Zulu’ pose more of a threat to the Voortrekkers as a traditional ‘foe’ than the British ever did – it seems counter-intuitive to believe they would rather face certain death than face a British tax administrator and a colour blind Cape Franchise. There is clearly a lot more motivating this initial expedition and its highly nuanced.
That aside, let’s we stick to all the parties of Voortrekkers, the figure expressed in The Afrikaners : biography of a people by the famous Afrikaner historian, Hermann Giliomee – he notes 6,000 white Afrikaners over the period of the trek 1835 – 1840 (5 years) leaving the colony (so that’s 12,000 including Black Labour/servants on a 1:1 ratio – which tallies up with other references). So, given the size of the Cape Colony population and demographic there is only a 22% chance of any modern day white Afrikaner been related directly by bloodline to a white Voortrekker (Gillomee uses a different base and puts this figure at 10% – but let’s go with the higher figure and the benefit of the doubt). 78% of white Afrikaners are bloodline related to those who stay put in the Cape Colony and have nothing to do with the great trek whatsoever.
But, but .. but, there are loads of us “Boere” – you talking “kak” man comes a great retort from a great many. Well, not really would be my answer, let’s look at the economic history and the numbers.
There is, of course a natural economic migration of people, from the British Colonies and other places into the hinterland and into the small Voortrekker republics as they grow from strength to strength – from about 1840 (when the initial trek ends) all the way to the start of the South African War (1899-1902) a.k.a Boer War 2 – 60 odd years. It’s an incredibly slow migration, but speeds up substantially only from 1886 with the discovery of minerals in the ZAR (the OFS remains very sparsely populated). The economic migrants over this 60 year period consist of many white Afrikaners seeking bigger farms, mineral wealth or they settle as urbanised people seeking a “tabula rasa” opportunity with a trade, skill or service – shop owners, doctors, lawyers, miners, teachers – you name it. It’s not just white Afrikaners, they are joined by thousands of “English” 1820 settlers, other Europeans and even many Jews also seeking bigger farms, mining, commerce, service or trading opportunities.
Here’s the primary difference though, all these people are economic migrants seeking better business, wealth and lifestyle opportunities – they are not migrating because of any deep ‘hatred’ for the British or because the British took away their slaves. On the “numbers”, you would think from all the propaganda spewed out by Afrikaner Nationalists that a mass exodus of “true” Afrikaners had taken place and by the beginning of Boer War 2 most of them are “free-men” living in a Boer Republic, BUT – there’s a problem with this idea, its still NOT the case – not even after 60 years of migration and not even after the discovery of mineral wealth in the ZAR – the majority of Afrikaners, believe it or not, are STILL in the Cape Colony. Here are the numbers at the start of Boer War 2:
Boer War 2
The population of South Africa in 1899 was approximately 4.7 million persons with 3.5 million Africans making up 74% of the total. Whites, numbering 830,000 made up only 18% of the entire population. Asians and Coloureds total 400,000 or 8%. So whichever way you cut it, the ‘whites’ – Boer and British together, are a ‘minority’.
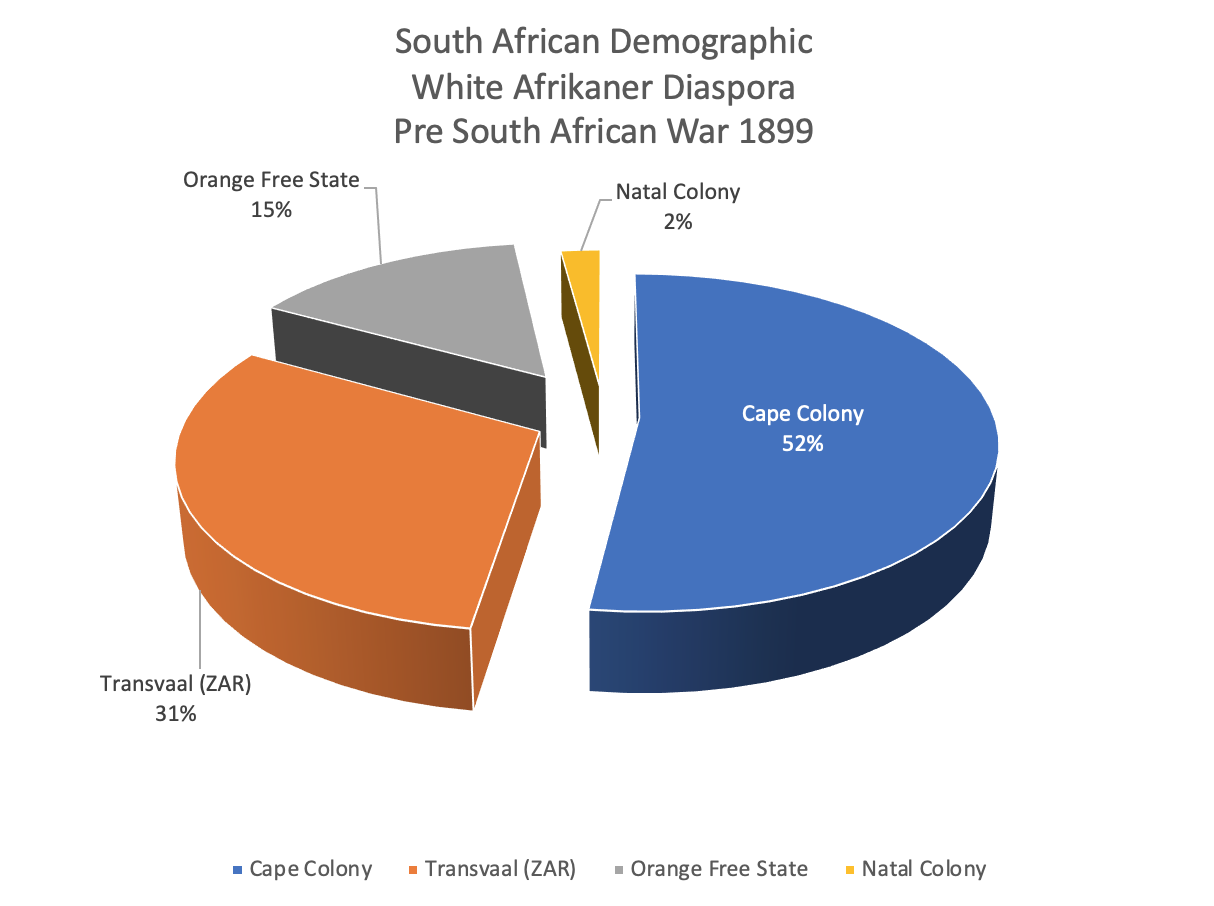
But what of these two ‘white’ tribes? Where are they located after The Great Trek and economic migrations of the last 60 years. The white population are distributed among the two colonies and the two republics, In total 480,000 are Afrikaans-speaking, 58% of the total white population. Less than half of the Afrikaners lived in urban areas, most the ‘English-speaking’ population are urbanised and constitute 42% of the white population.
Also, most importantly, where are all these Afrikaners? Here’s the kicker, the majority of them are STILL in the Cape Colony – Great Trek aside. Afrikaners in the Cape Colony qualified as a bigger population of Afrikaners than the Orange Free State and Transvaal Afrikaners COMBINED. Data sources differ a little in the Transvaal I.e. ZAR, but it is generally understood that Afrikaners only really made up about half (50%) percent of the white population in the ZAR in any event, the other half are classified as ‘Uitlanders’ – mainly ‘British’ (it’s this imbalance that this is the principle Casus Belli advanced by the British as their reason for the 2nd Boer War).
The Transvaal’s Afrikaners made up only 31% of the total number of Afrikaners in South Africa, with the Orange Free State having mere 15%. This total of 46% (approximately 219,000 people) shows that when Boer War 2 broke out, less than half of the total Afrikaners in South Africa were in the two republics that declared war on Britain. The Cape Colony and Natal, containing 54% of the Afrikaners, or 260,000 persons, never rose up and declared war against the British.
Although some 10,000 odd Cape Afrikaners did join the Republics forces as ‘Cape Rebels’ – this force when viewed against that of the general Cape Afrikaner populace is insignificant. Cape Afrikaners, and for that matter Natal Afrikaners too, simply did not rise up in any significant number to join the ZAR and OFS invasions of the two British colonies. Add to this that just about as many Cape and Natal Afrikaners joined the British forces which also counter-balances the argument somewhat.
The bottom line – the majority of Afrikaners simply decided not to rise up against their lawfully elected governments in the Cape and Natal, many decided to remain neutral and as a majority grouping of Afrikaners in general they simply did not participate in the war at all – that’s a fact. View it this way, the Cape franchise is such, that if the Afrikaner – the majority of voters – did not want someone like Cecil Rhodes in government. they could easily have voted him out.
The underpinning reality is that the Boer Generals planning the war and the Boer politicians claiming “Africa for the Afrikaner” failed to appreciate that many of the Cape Afrikaners were pretty happy under British administration for the near 100 years they are subjected to it, contented with the Cape franchise, many of them urbanised middle class and well to do and of the landed class many were very wealthy – as a demographic they are fundamentally different to their isolated frontier farming (Boer) Afrikaner brethren ‘up north’ facing an extremely hostile environment.
Poverty, famine and hardship was not an overarching issues in the British Colonies for many whites’ (Boer and Brit) in 1899 – nor does it seem that there was any fundamental discontent with their governance, representation and political disposition – and many simply did not view the ZAR’s “Krugerism” as a viable ideology or system of governance for Southern Africa – in fact Prime Minister William Schreiner, John X. Merriman and Jacobus Sauer had moved many in the Cape Colony’s branch of the Afrikaner Bond and Afrikaners in the Cape Colony in general closer to the British way of thinking.
In a nutshell, half the available Afrikaners failed to take up arms against the British and the Boers fought the South African War 1899-1902 at half strength. So, in essence – they went off “half-cocked” against a world super-power to quote John L Scott’s conclusion on the numbers and the Boer Republics’ decision to invade British colonies.
So, here’s the statistical truth to a modern white Afrikaner – There is a 22% chance that their direct bloodline forebear was a Voortrekker, and a 54% chance that their direct bloodline forebear never took part in the Boer War, at all – the majority of Afrikaners simply did not take up arms, even when their northern brethren expected them to, even demanding they do it, still nothing happened.
The big question now, is of that minority – the 46% of Afrikaners who can claim a bloodline forebear who took part in the 2nd Boer War, how many of them joined the British and fought for them – the hated “joiners”, how many of them preferred neutrality “hensoppers” and how many qualify as the “true” patriotic Afrikaner irreconcilables – the “bittereinders”?
Bittereinders and Joiners
Let’s go with the most “conservative” Afrikaner chronology experts on this one, Pieter Cloete, and give some benefit of the doubt as numbers on the Boer War to the Boers as they vary considerably depending on whose recording them. Cloete in his chronology maintains there are 5,464 joiners (Republican Boers joining the British army to fight against their own countrymen) versus 20,779 recorded Bittereinders registered as still on Commando at the end of the war. So for every 5 Boers left in the field – 4 were fighting for the Republics and 1 was fighting for the British – a 4:1 ratio. Not a common or acknowledged bit of Boer War history – 26% of the Boers fighting at the end of the war were fighting FOR the British – a quarter of them, it’s a significant statistic.
This Figure becomes a little more skewered and complicated when you add the ‘Hensoppers’ and the ‘Prisoners of War’ – those that took the oath of neutrality and those that did not, those that went back on their oaths as well as the war dead and injured – but suffice to say that the stated majority of white Afrikaners are still not with the Boer Republic’s causes … at all. In fact many are even prepared to go to war with one another over it such is the extent of the disagreement.
This figure of white Afrikaner support for the Boer Republican ideal starts to really pale into insignificance after South Africa is made a Union in 1910. So let’s have a look at the Boer Revolt in 1914 as much Afrikaner legacy and Nationalist ‘volk’ heroes stem from it.
The Boer Revolt 1914
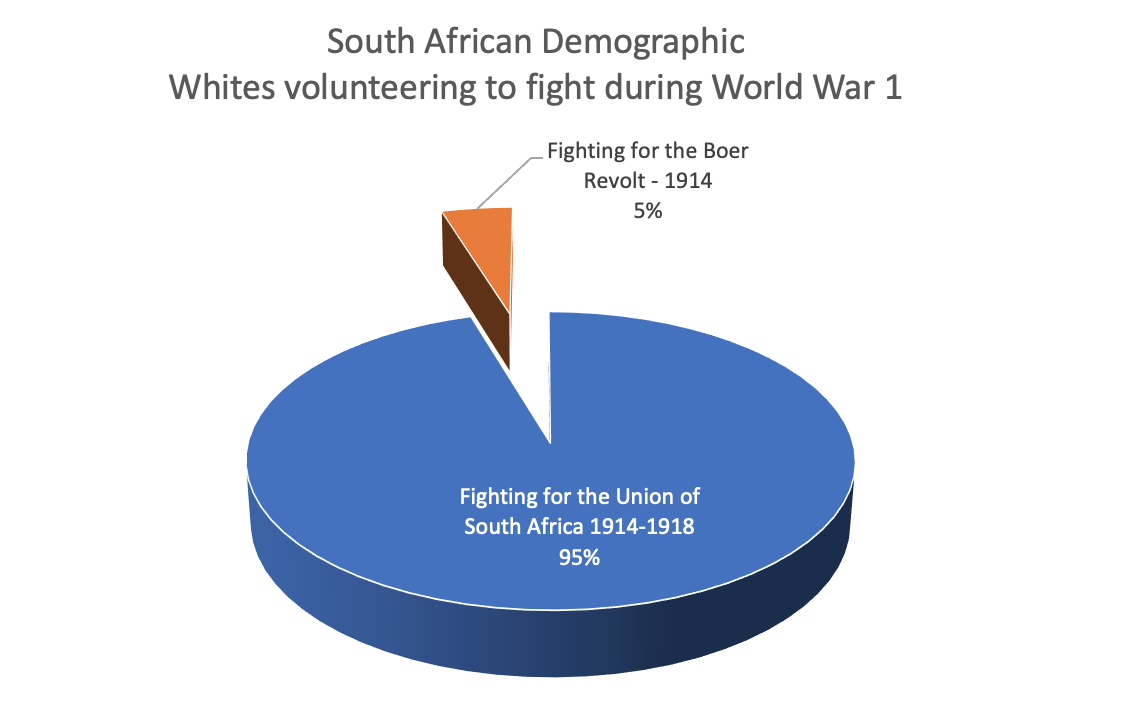
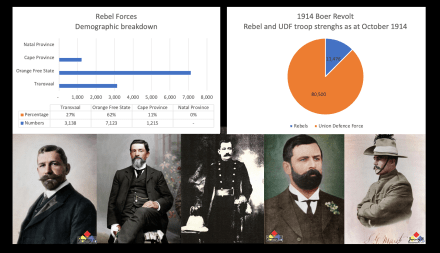
Upfront let’s look at the fighting numbers, in all during World War 1 (1914 to 1918) – no fewer than 146,000 South African whites volunteer to fight alongside Britain and France. A mere 7,100 South Africans volunteer to fight alongside Germany for the reinstatement of the Boer Republican paramountcy in South Africa – that’s only 5% of the entire white population volunteering to fight for one side or the other.
In the case of a proportion of these Boer Revolt fighters in relation to Afrikaners only – during WW1 every white in the census classifies themselves as ‘British’, and there are 1,400,000 of them. It’s hard to say who are English and who are Afrikaans, but if we apply the 40/60 ratio which exits most the way through our history – Afrikaners would account 840,000 – if we double the amount of Boer Rebels to include their wives in support – they would account 2% of the overall Afrikaner diaspora, even if we triple or quadruple the ‘Rebels’ number for sympathetic friends – they still remain a tiny minority – 3% to 4% odd.
And it’s not as if their leaders are in support of the Boer Republican cause and remaining neutral during the World War 1 either, this idea that the decision to go to war against Germany was rejected by the “majority” of Afrikaners is pure Hollywood – 92 members of the South African Parliament voted in favour of the war against Imperial Germany, and only 12 vote against. In the Afrikaner Party – the SAP, the vote is 82% in favour and only 18% against.
There is no doubt that Barry Hertzog’s break away from Botha and Smuts to form the National Party in 1914 re-kindled Afrikaner Nationalism in many white Afrikaners – primarily in the Orange Free State, a region hit by severe drought and an extensive share cropping farmer problem (bywoners) as a result of Boer War 2. Hertzog was a very popular Afrikaner Bittereinder General and held large sway. However, even this romanticising with nationalism the Afrikaner Nationalists are still a minority in the Afrikaner diaspora and even more so in the white diaspora at large. When the National Party first contend the General Elections in 1915 they win 29% of the votes (mainly in the OFS), whilst their brethren Afrikaners in the SAP get 37%. The ‘English’ parties alone match the National Party in size and have around 34% of the vote. This split down the middle in the Afrikaner diaspora is however beginning to rear its head again.
The 1938 Centenary Great Trek
What follows once the National Party get into power as a minority government, in a coalition with the Labour Party on the back of the Rand Rebellion in 1922 – is 15 years of unrelenting glorification of the 1914 Boer Revolt leaders, the execution of Jopie Fourie and the vilifying of General Smuts and General Botha. But even by 1938 the National Party still don’t have the stable majority they need, and there is still a massive split in the diaspora between the ‘Cape Afrikaner’ and the ‘Boere’ Afrikaner. That would all change with the 1938 Centenary of the Great Trek.
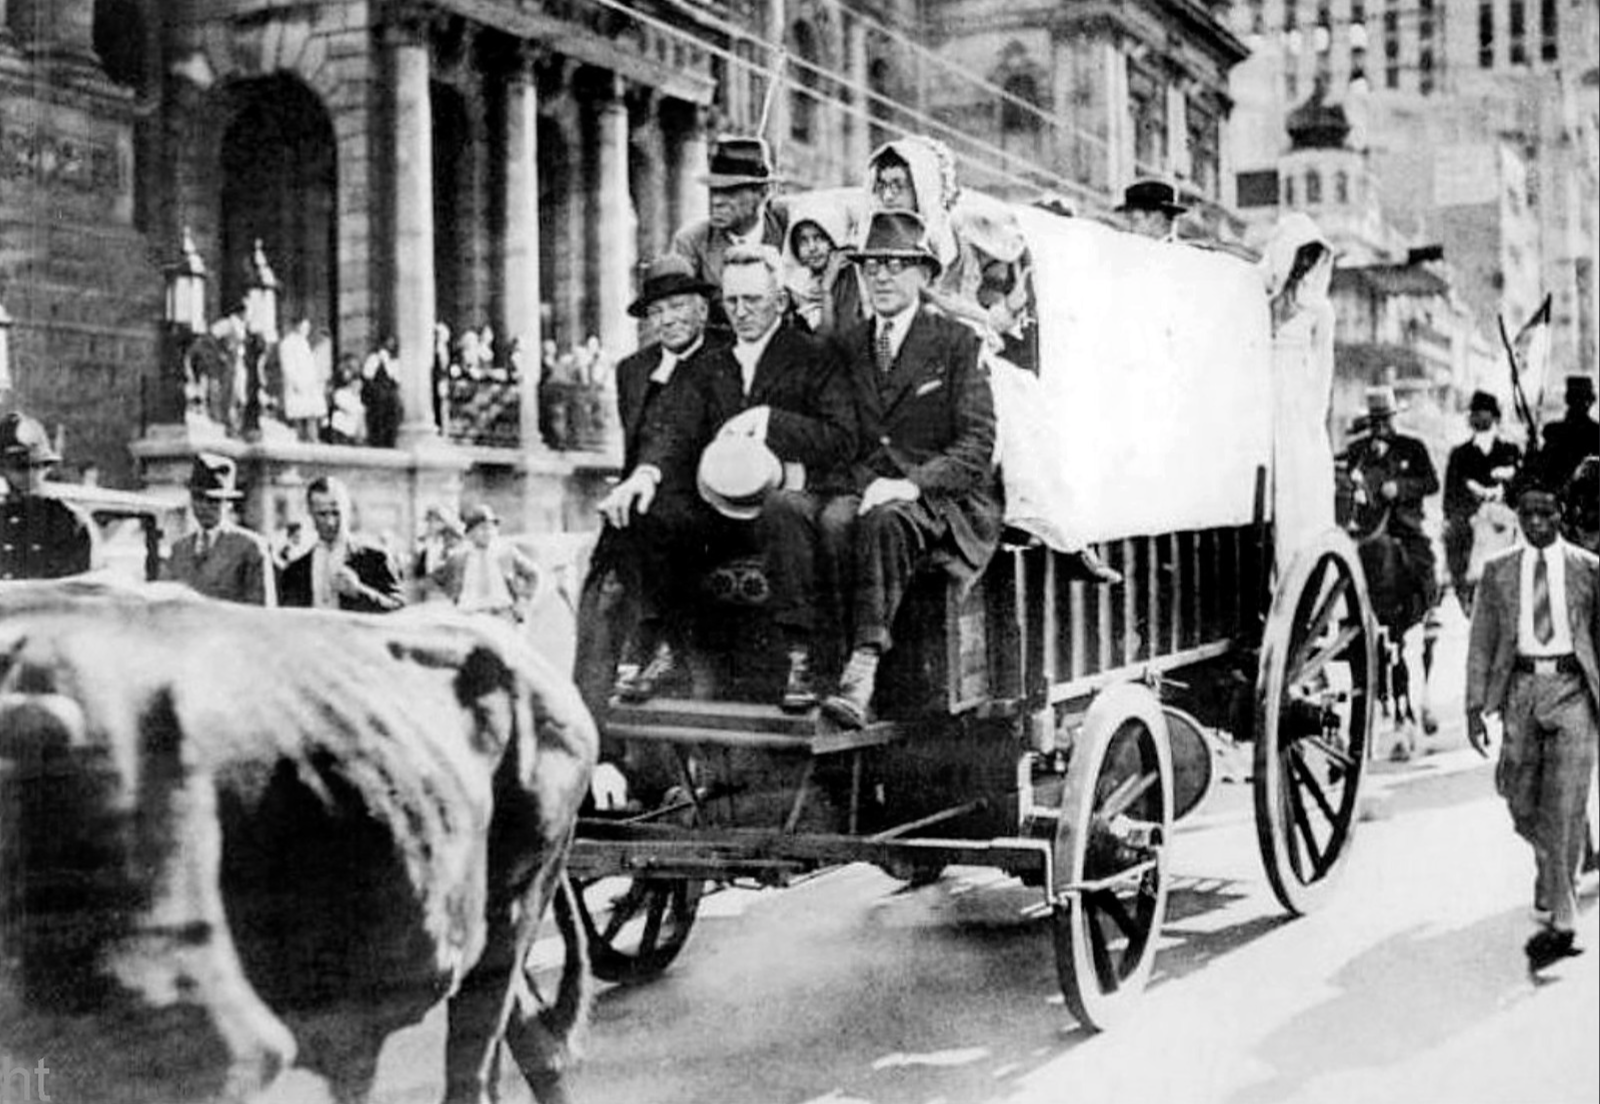
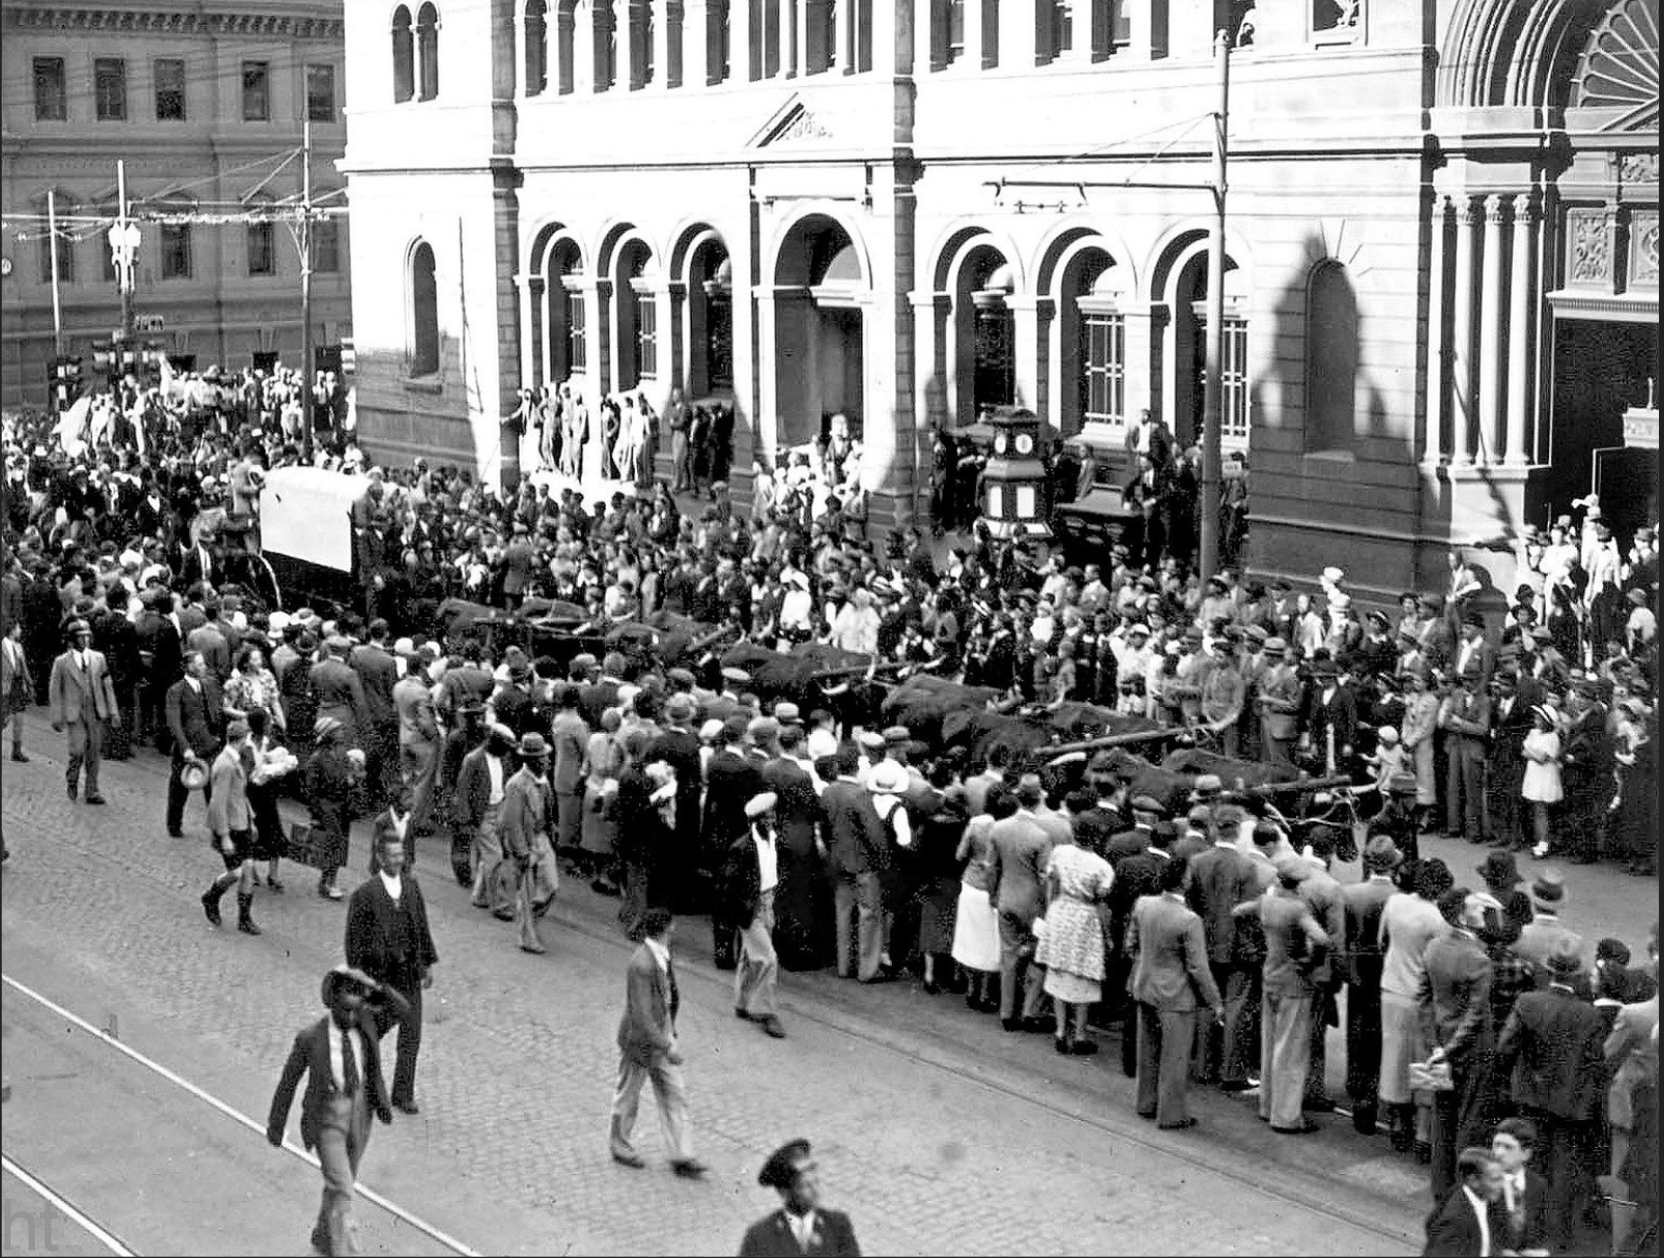
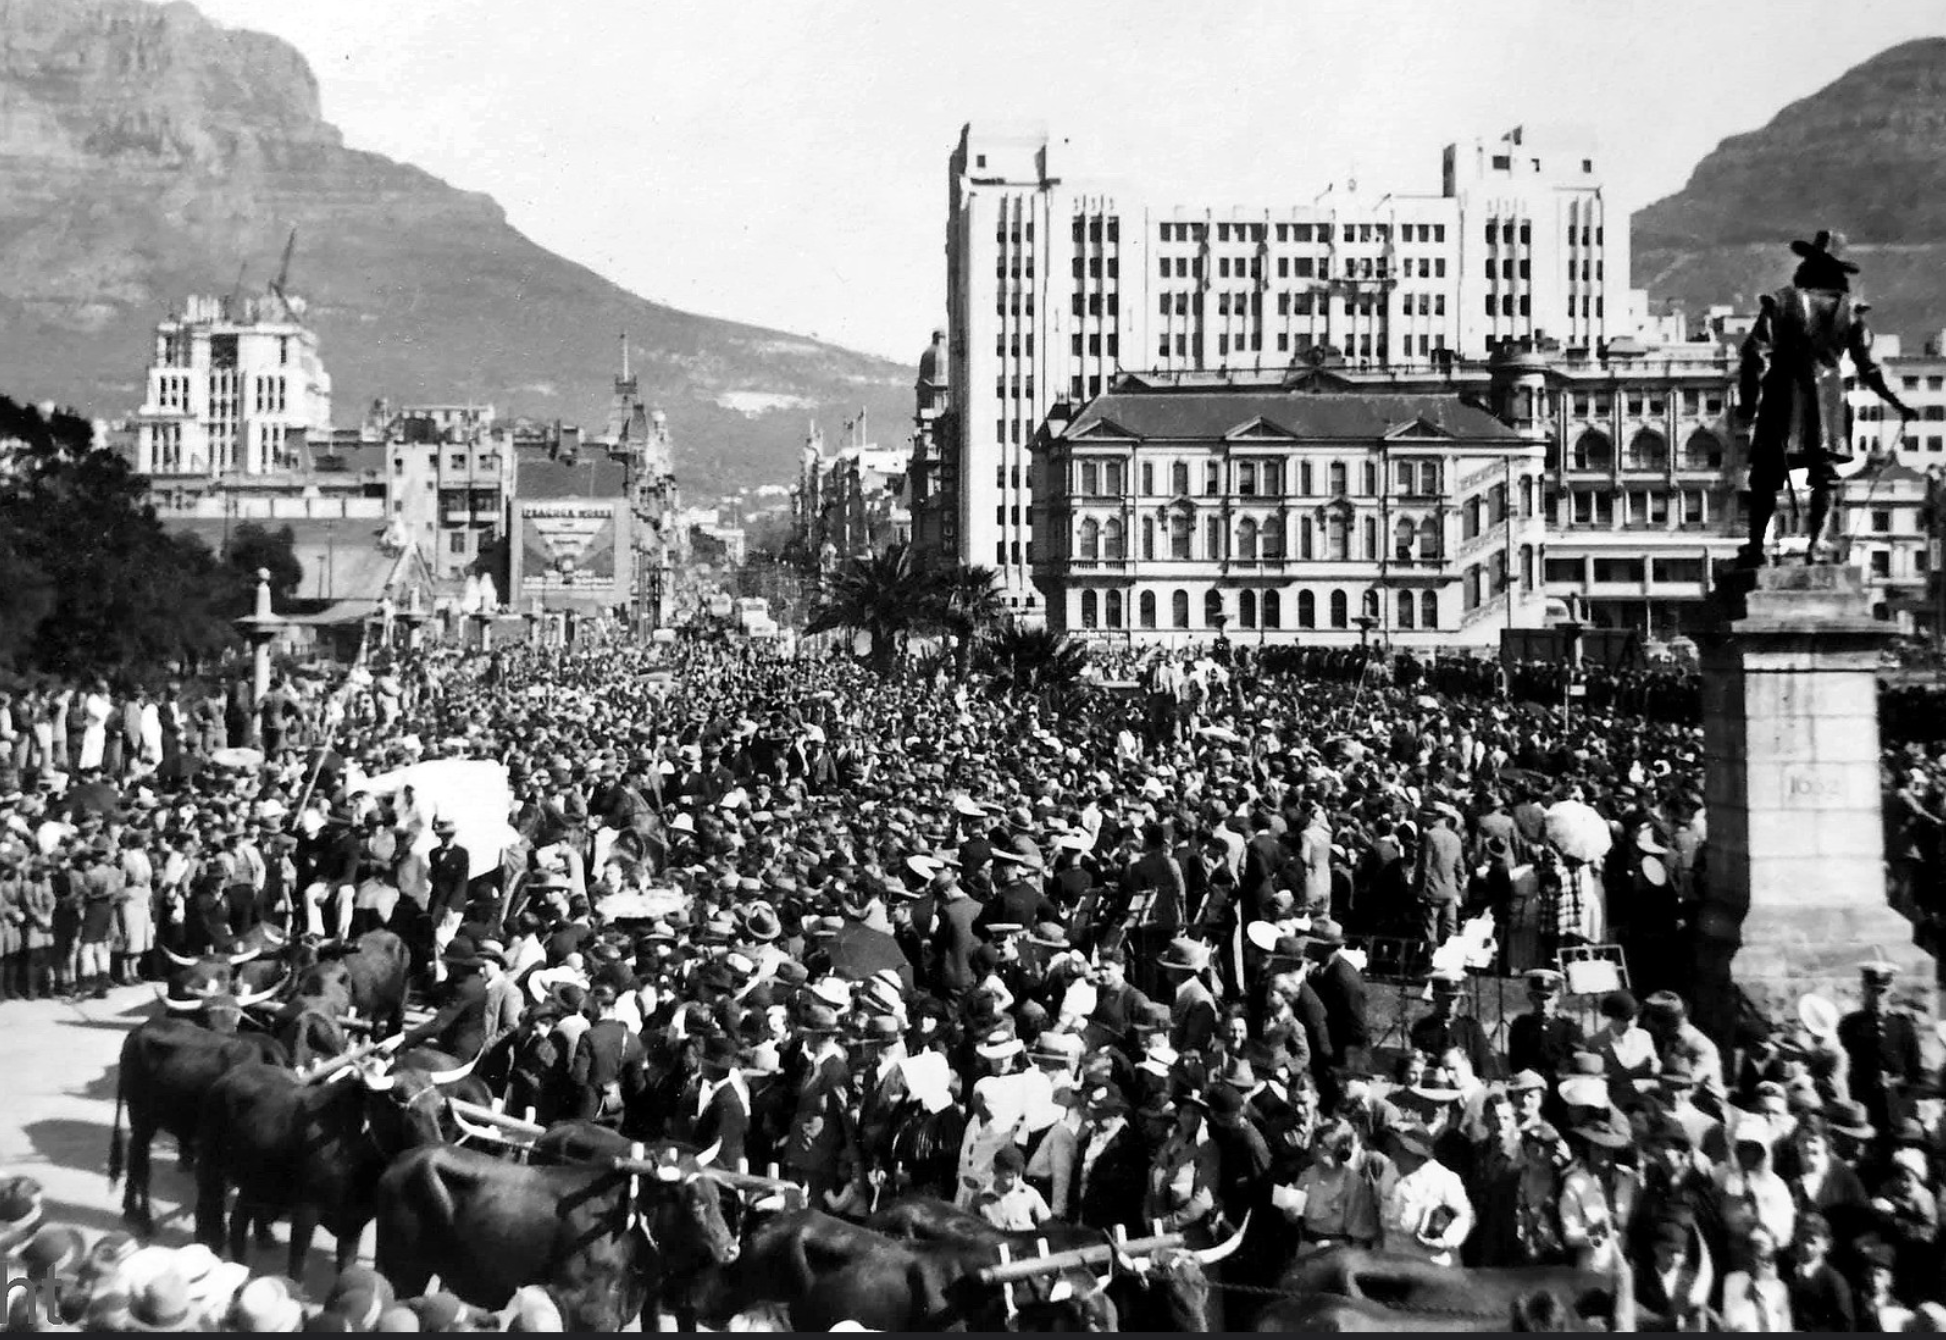
In 1938, the Broederbond under the directive of its Chairman, Henning Klopper sought to use the centenary of Great Trek to unite the ‘Cape Afrikaners’ and the ‘Boere Afrikaners’ under the symbology of the Great trek. In this endeavour artificially creating a shared heritage. He started a Great Trek re-enactment with two Ox-Wagons in Cape Town and addressed the large crowd of 20,000 spectators by saying;
“We ask the entire Afrikanerdom to take part in the festival celebration in this spirit. We long that nothing shall hinder the Afrikaner people as a whole from taking part. This movement is born from the People; may the People carry it in their hearts all the way to Pretoria and Blood River. Let us build up a monument for Afrikaner hearts. May this simple trek bind together in love those Afrikaner hearts which do not yet beat together. We dedicate these wagons to our People and to our God.”
By that he hoped to combine the ‘Cape white Afrikaners’ with the ‘Boer white Afrikaners’ in the symbology of the Great Trek under a fabricated Nationalist ideal of Christian Nationalism – and only meant ‘White’ Afrikaners in the Broederbond’s definition of what constituted ‘Afrikanerdom’ and not really the Afrikaans speaking peoples as a ‘whole’ – certainly not the Coloured and Black Afrikaners. The Trek celebration would be pitched as an assertion of Afrikaner white power in South Africa and the Trek as the true path to a overall South African nationhood and identity and ignore the histories of everyone else – black and white – in creating a future South African identity.
Images: The 1938 Centennial Great Trek
In any event the trek re-enactment was very successful in re-aligning white Afrikaner identity under the Christian Nationalist ideal. In the end eight wagons from all around the country threaded their way to Pretoria to lay the cornerstone of the Voortrekker monument – in front of a crowd of 200,000 people. Whilst at the same time, four ox-wagons went to the site of the battle at Blood River for a commemoration service on the 16th December. The wagons stopping in countless towns and villages all around the country along the way to re-name street after street after one or another Voortrekker hero, and laying imprints of the wagons wheels in freshly laid cement at many halts (there are still ‘imprints’ at my hometown in Hermanus – despite the fact that not one single Voortrekker came from this region).
The Centenary trek gave the Broederbond and the National Party symbology – the ox-wagon, gun-powder horns etc. on which to pin Afrikaner Nationalism that did not exist before. Gideon Roos would say of it:
“We (the Afrikaners) never had a symbol before; the ox-wagon became that symbol.”
The Broederbond had staggered onto the ideal way to ‘unify’ the Afrikaner – a round the country travelling carnival – from the cities to the platteland, on to far flung corners and everything in between. Henning Klopper himself amazed at the reaction and the success of it all – so much so he turned to divine intervention and said:
“Although I organised it and had everything to do with it, I felt it was taken completely out of my hands. The whole feeling of the (centenary) trek was the working not of man, not of any living being. It was the will and the work of the Almighty God. It was a pilgrimage, a sacred happening.
A “sacred happening” – a miracle indeed.
It’s a Miracle!
What is a real miracle however, is that the ‘majority’ of Afrikaners would adopt this Voortrekker hegemony even when it is proven that most of them had nothing to do with the Great Trek, and that the two ‘separate’ hearts from Boer War 2 would only find commonality in the Bittereinders 40 years after the war. It’s a sheer miracle that the Broederbond managed to pull this off – and it’s no wonder that Smuts during World War 2 had to appoint a “Truth Legion” to counteract all the propaganda stemming from the Broederbond, re-setting identity and changing Afrikaner minds. So much so Smuts would call the Broederbond:
“a dangerous, cunning, political fascist organization”
He was not wrong, but the 1948 elections sealed it for the Broederbond, and Smuts was dead by 1950. The next 40 years are dominated by unrelenting Afrikaner Nationalism ideals and the banning, violent repression and gagging of any voices of dissent – including many Afrikaners.
A careful construct was put together which found Afrikaner heroes who were either Bittereinder Generals or 1914 Boer Rebels elevated to national worship. The irony is only those who were enamoured with racial segregation in their central politics were highlighted – and as leaders, either Boer War or 1914 Rebel, they had represented a minority of Afrikaners.
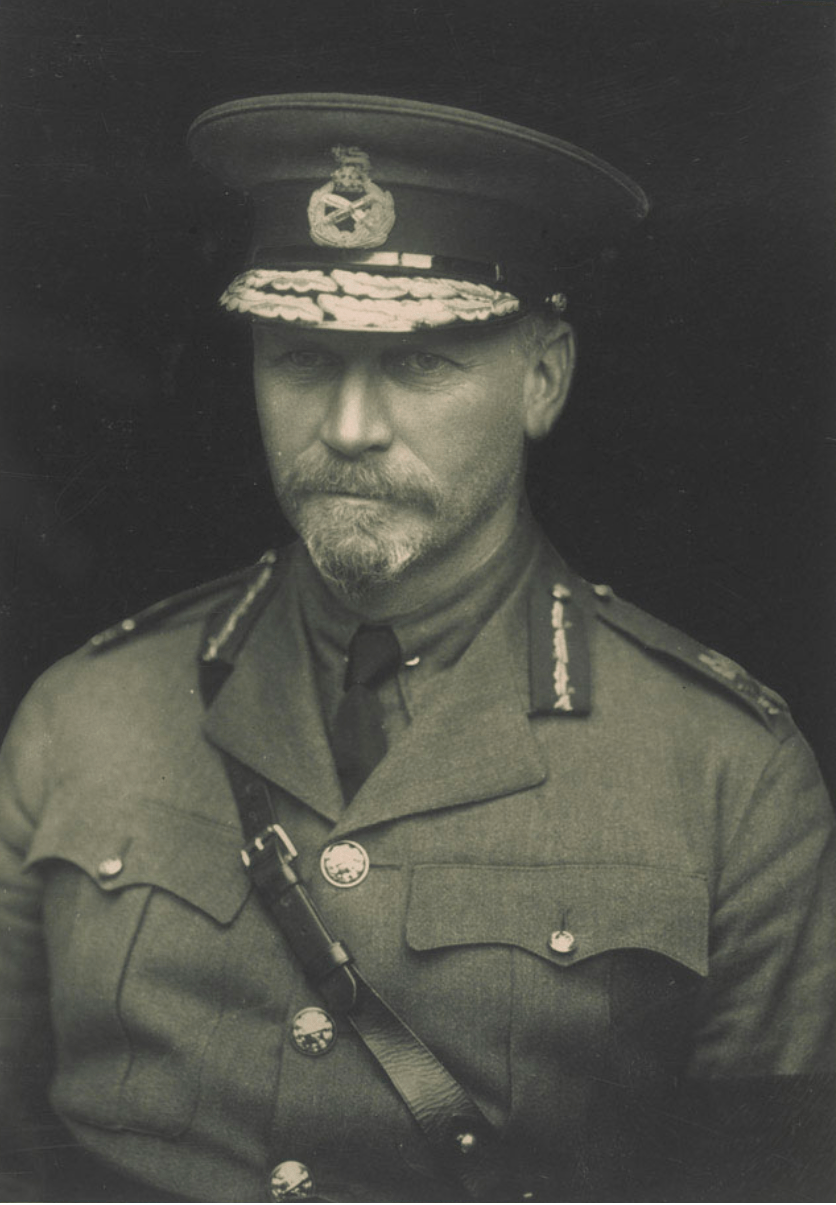
Whereas Afrikaners which sought unification and reconciliation – and were largely the most popular and effective leaders were airbrushed out – Jan Smuts and Louis Botha specifically, and so too all the Afrikaner military heroes who followed them, the military and political likes of Kommandant Dolf de la Rey, Group Captain Adolph “Sailor” Malan, General Daniel Pienaar, Group Captain Petrus “Dutch” Hugo, Mattheus Uys Krige, General Kenneth Reid van der Spuy, General George Brink, Major Jacob Pretorius, Lieutenant (Dr) Jan Steytler, Captain (Sir) De-villiers Graaff, Major Pieter van der Byl, Jan Hendrik Hofmeyr … the list goes on.
By the time I found myself in the Army most my Afrikaner brothers in arms were pretty convinced their heritage and identity lay with Voortrekkers and the Boer War concentration camps – and such is the power of identity many still believe in that – an entire nation baptised into a identity the majority had no connection to in the first place. Dr D.F. Malan would try to cement his sentiment when he said of Afrikanerdom:
“To be a true patriot you have to embrace this Afrikaner Nationalism take on history – to do otherwise is not to be an Afrikaner.”
So – according to the National Party leader, as an Afrikaner, whether you are related to a Voortrekker, Bitteriender Republican or a 1914 Rebel or whether you are not, whether its your history or not (the irony, statistically speaking chances are you’re not). This is your heritage, history and identity, like it or not – or you’re not an Afrikaner – simple.
He went on to define this further, later Dr. Malan would say:
“An Afrikaner is one who, whether speaking the same language or attending the same church as myself or not, cherished the same Nationalist ideas. That is why I willingly fight against General Smuts. I do not consider him an Afrikaner.”
So, if your forebear joined Jan Smuts’ call to arms in World War 1, World War 2 or even voted for his “United Party” – and you’ve not adopted the Afrikaner Nationalist identity politics and their take on Afrikaner history – according to these Nationalists – you’re not considered an Afrikaner – you’ve somehow turned ‘English’. This attitude, believe it or not, still survives today. I took criticism from a local Freedom Front Plus councillor who authors Afrikaner history romanticism that my focus on was not on the true Afrikaners and I only praised selected Afrikaners who had sold out to the “crown” the ones with ‘English’ hearts – in that way he called me “anti-afrikaner” which is pretty odd considering the size of his bias and his total misconception of the Afrikaner diaspora.
Dr. Malan is not alone either, Adolf Hitler managed to do exactly the same to the German nation prior to Word War 2, using the same techniques, a similar ideology and the same brand of Nationalism. A miracle in every sense. It took a genocide and sheer destruction of their entire country and cultural construct to shake the German nation out of this malaise such is the power of it – its testament to what a determined minority government can do with the politics of pain and hatred if they really set their minds to it.
So, what are the chances – well the chances of the vast majority of Afrikaners been related to a Voortrekker is nil – maybe one in five are. The chances their bloodline forebear took part in the Boer War as a hard fighting Bittereinder Republican – maybe a one in three chance. Chances are that their forebear was a Boer Rebel is incredibly slim, there’s a far better probability that he fought against the rebels and joined up with Jan Smuts – chances of that happening are pretty good. Which makes it odd is that the Afrikaner leadership, when in the pound seats from 1948 to 1994, chose to force the traitorous 1914 Boer Rebels onto just about everyone as national heroes (Beyers, Fourie, de Wet, Kemp, Martiz etc.) in just about every medium, when in fact they are an anathema to the general public, black and white – including a great many Afrikaners.
The chances of anyone hitting the trifecta jackpot, a bloodline direct link between a Voortrekker, Bittereinder and a Rebel to make up a “Pure” Afrikaner at heart (as is the basis of the Afrikaner nationalist myth) – this is a very slim chance statistically speaking – its incredibly rare. However the Federasie van Afrikaanse Kidtuurverenigings (FAK) the old Broederbond front organ still co-ordinates events promoting this mythology and identity to the modern Afrikaner generation … and unless they too are exposed to the extent of the National Party’s nefarious ways and flawed ideologies chances of many of them putting any of this identity politics into proper perspective are equally slim.
Written and researched by Peter Dickens
References:
The Afrikaners : biography of a people (Reconsiderations in Southern African History) Published 2010 by Hermann Giliomee
British Concentration Camps of the second South African War (the Transvaal 1900 to 1902), Masters thesis – published 2007 by John L Scott
1899 Population data comes from state almanacs and is found in an essay by Andre Wessels ‘Afrikaners at War’, John Gooch (editor), The Boer War. Published 2000
The White Tribe of Africa – South Africa in Perspective: Published 1981 by David Harrison
The Union of South Africa censuses 1911-1960: an incomplete record: By A.J. Christopher
The Anglo-Boer war: A chronology. By Cloete, Pieter G
The Economic History of the Boer nation from 1880 to 1980. Rhodes University Economic History paper – 1988 by Peter Dickens
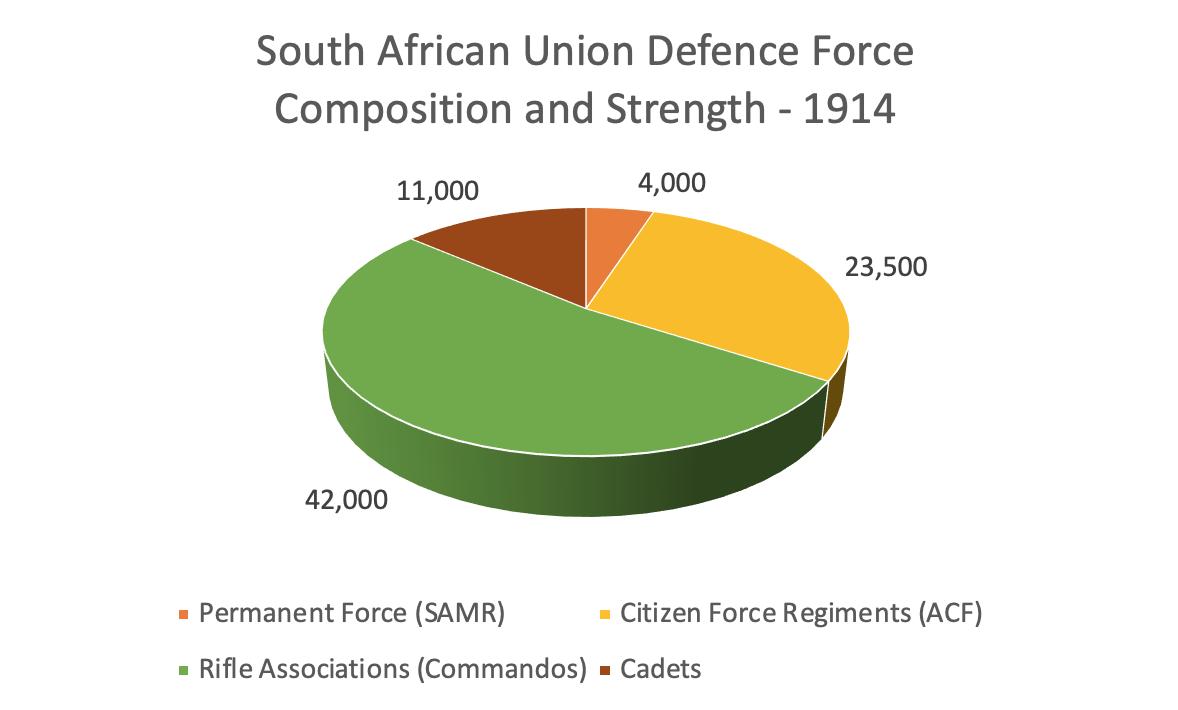
Shakespeare provides us with a wonderful quote from Hamlet, it’s in the opening act, and it’s said by Marcellus on seeing the King’s ghost: “Something is rotten in the state of Denmark” – it’s a forewarning that there is sedition afoot in the state, real trouble is coming. It is appropriate when viewing the newly formed Union of South Africa, as within a year of its formation the old Boer War hero – General Louis Botha can already sense sedition in their camp. As Prime Minister, he tasks General Smuts as his Minister of Defence to set up the South African Union’s Defence Force and amalgamate the old Boer Republic’s Commandos with the old Cape and Natal Colonial Regiments.
Walking a political tight-rope of “reconciliation” post the South African War (1899-1902), Smuts appoints a staunch Boer “Bittereinder” General, Christiaan Beyers, as the head of the South African Union Defence Force’s Active Citizen Force (the largest contingent within the force made up by a majority of Afrikaners). His appointment largely a symbolic gesture to the “irreconcilables” in the Afrikaner diaspora.
On the 4th July 1911, Louis Botha in his capacity as Prime Minister wrote to General Jan Smuts to express his bewilderment that Smuts had appointed General Christiaan Beyers as the head of the Active Citizen Force. He does not hold back and what he says is very telling:
“Dear Jannie, You really are lazy to write so little. How is it possible that you have appointed Beyers? I do hope that you did not agree to it, because you certainly have no greater enemy there. He is not a persona grata (welcome person) with our people and still less so with the English. The Bar, no doubt, also does not approve of it and the Judges will be angry. I can swallow anything but this is impossible.”
Christiaan Beyers, would go on with his appointment, and only just 2 years after his appointment in the Union Defence Force, he would try and scuttle the Union’s decision to go war against German South West Africa. He unsuccessfully campaigns to get resignations from the UDF so as to render it toothless. Thereafter he unsuccessfully campaigns for De La Rey to join his treasonous plot. He joins hands with Manie Maritz, Christiaan de Wet and Jan Kemp in a treasonous soup and initiates the Boer Revolt of 1914 – inadequately planned and inadequately resourced the revolt is an outright failure – strategically, operationally and tactically. Lasting mere months and attaining none of its stated objectives. Beyers would drown in the Vaal river trying to escape his hunt on the 8th December 1914 (later supporters of Beyers would point out that he never fired his handgun when his body was recovered, as if to somehow say he didn’t really intend to kill fellow Afrikaners – but that’s merely an apologist’s stretch, Beyers had every intent given his Commando’s actions and his entire act was that of high treason whichever way you cut it).
The revolt does however pitch Afrikaner against Afrikaner, driving deep scars into the Afrikaner psyche. It would drive a political wedge into the Afrikaner diaspora, and in the strangest turns of fate, many Afrikaners by the 1980’s, after decades of Afrikaner Nationalist propaganda, would oddly juxtaposition the concept of “treason” – and start calling Smuts the “traitor” and Beyers the “hero” (even to this day he is cited in this community as a “volks” hero). Also, rather inexplicably Louis Botha somehow escapes this ‘traitor’ paint-brush as the Afrikaner Nationalist vitriol is almost exclusively targeted at Smuts.
Botha in this letter to Smuts is being nothing more than prophetic – calling out Beyers as an ‘enemy’ and a ‘persona non grata’ (an unacceptable person) to the Afrikaner nation. There is obviously no love lost between these two men and Botha sees Beyers as a treasonous snake not with the program of a peaceful coexistence between English and Afrikaans South Africans and at odds with the vast majority of South Africans in general. Smuts, eternally seeking a careful balance of everyone’s opinions in the Afrikaner diaspora, has his efforts backfire on him considerably.
The path to the South African War (1899-1902) i.e. Boer War 2 is often misunderstood – so let’s look at the actual military numbers and the mission creep. Very often on Boer War social media appreciation sites you hear this old myth “the British intended to invade the Boer Republics and built up their forces on the borders to do so”. This build-up of British invasion forces then prompts the Boers to make “a pre-emptive strike” to “take up forward defensive positions” on British territory. The Boers didn’t start the war see! They merely forestalled the inevitable warmonger, none other than the greedy British – get it?
Problem is “I don’t get it”, my training as an Economic Historian will always lead me to look at the statistics and the ‘cold facts’ to make comparisons and conclusions, my training as a military officer will also always lead me to the science of military doctrine in analysing military history, and not a ‘mainstream’ historian’s interpretation of it. As to above assertions on invasion body troop strengths and pre-emptive strikes, let me be upfront – it’s all bunk, a complete myth and it not supported by the historical facts of the day, nor is it supported by military doctrine (then and now) and the cold hard facts – the statistics, ratios and numbers certainly don’t support it . This is again where ‘economic history’ starts to rip ‘political’ history apart, the numbers – the hard facts (measurable and accurate) start to talk and the political bollocks start to walk, and here’s how.
Looking at the numbers
So, here the numbers to the start of the Boer War on the 11th October 1899 when the Boers invade sovereign British territories:
31st July 1899 – Total British Forces in the Cape Colony, Natal, Rhodesia, and Bechuanaland (Botswana) and Protectorates = Total 8,803 men. 1st August 1899 to 11th October 1899, additional British Forces arrive = Total 6,500 men
Total British Forces in the field as at 11th October 1899 = 15,300 men
27th September 1899 – Transvaal Mobilises Forces = 26,871 men 3rd October 1899 – Free State mobilisers Forces = 21,345 men
Total Boer Forces in the field as at 11th October 1899 = 48,216 men.
The Boer forces at the commencement of hostilities when they declare war against Britain are heavily in their favour = Boer Forces outnumber the British 3 to 1.
“On the high seas” as at the 11th October 1899 are an additional 7,418 British Troops on their way to South Africa – called up to bolster an inadequate British force strength in the event of war.
Even with their arrival at the end of October 1899 (after the war has been declared) bringing the British number up to 22,708 – British Forces are still woefully inadequate, and the invading Boer Forces still outnumber them 2 to 1.
There are numerous quotes and historic references which prove the British had no intention of ‘invading’ the Boer Republics, these always result in a slinging match whilst Boer romantics profess to intelligence reports as proof positive of a plan of attack. Like any military with a military academy and a war office, a scenario plan was devised by the British, its called ‘The War Office Plan’ and it was developed in 1886 – it outlines that should the British invade the ZAR, a full Army Corps (invasion force) would assemble at Colesberg and invade the underbelly of the OFS on their way to the ZAR, avoiding mountainous defences completely and just move up the spine of South Africa over flat and easy terrain (more or less the route of the N1 today).
In reality the British made no actual invasion plans, scenario ‘top draw’ plan yes, actual plans a ‘campaign plan’ with start lines showing troop strengths, regiments and units, timelines and objectives – no, that plan doesn’t exist – an entire Parliamentary commission and Royal inquest was made in 1902 after the war ended, and they established that “no plan for campaign ever existed for operations in South Africa” (that they meant an actual operational plan), but you can put all that aside and let’s just look at the numbers.
There is simply no way, that the British intended to ‘invade’ with a force of only 22,700 troops – going up against a 40,000 strong invading Republican Boer army – just no way. Anyone whose served in the military and understands military doctrines knows, you need twice the numbers of the opponent, at least 2:1 (ideally more) before commencing with an invasion. That means Britain would have needed at least 80,000 troops (in excess of an Army Corps) in theatre before it posed any threat as an ‘invasion’ Force. It had nowhere near those numbers, and nor did it intend to have those numbers. In truth – the Boer Army, who had twice the numbers of the British Army, posed far more of an ‘invasion’ threat – and that’s exactly what they did.
Also, so you can see how the ‘numbers’ and the ‘actual’ history correlate – Lord Milner writes to Her Majesty’s government and states that Kruger is unmovable on issues pertaining the Franchise, he warns them that the ZAR is gearing for an invasion of the British Colonies with the call-up of troops and purchase of munitions, and the purchase of state of the art rifles and artillery pieces – one million Mauser rounds alone arrive in Port Elizabeth as early as the 8th July (ordered around April 1899) destined for the Republics (well before the ‘impasse’ between Milner and Kruger).
He implores the British to send a sizeable force – a full “Army Corps” – of about 35,000 troops to bolster the small garrison forces in South Africa, warning them invasion of British colonies is inevitable.
The British War Office in London respond to Milner, they maintain that the ZAR was simply not bold enough to invade British sovereign territory, and on the remote chance that should an invasion take place, it would be a “farmers army” and could be held back by professional soldiers.
The war office also does not want to provoke a flammable situation by sending a full Army Corps. So, they bolster the garrison forces with only 6,500 men, including colonial ‘citizen force’ units mustered from the local populations – and an additional 7,400 men “on their way” from India – the doctrine again is that even though they are outnumbered they should be able to ‘hold the line’ long enough for an expeditionary ‘Army Corps’ to arrive. The war office estimates a ‘Army Corps’ will take four months to muster and would require a £1 million investment upfront – so not necessary unless there is an absolute and proven military threat.
The eve of war
By the end of September and the beginning of October 1899, Boer forces are amassing primarily at Laing’s neck on the Natal border and the ultimatum agreed by the Boers on the 27th September indicates that war is inevitable, presented by the 7th October 1899 to the British (4 days before they invade sovereign British territories), last minute attempts by Afrikaner Bondsmen in the Cape to get Kruger to “step-down” from his position fail, so too do last minute attempts by members of his own Raad and by his young appointed negotiator Jan Smuts in his final negotiations with Greene, even Steyn in the OFS is urged to get the ZAR to ‘step down’ – whilst all urging the ZAR to “step-down” – Kruger’s unbending demand that the 5 year ‘uitlander’ franchise would only come if the British tore up the 1884 London Convention completely and withdraw all her Suzerainty rights to the region, rights which have been in place since 1877 – this is now deemed a ‘step too far’ as it substantially compromised British paramountcy in the region. Kruger’s position remaining unchanged from the beginning of negotiations in June 1899 in Bloemfontein to the end – only with a cat and mouse game promising limited reforms and then withdrawing them in-between (more on this in an Observation Post called “for suzerainty sakes” as most people don’t understand the real Casus Belli of the war).
Kruger is superstitious, paranoid and impatient and doesn’t even wait for the presentation of the ultimatum to the British or the ultimatum’s deadline – he sees tiny troop movements of small garrison forces as the prelude of an invasion, albeit the British are by no means capitalised for such an invasion – they have not even called up their Army Corps at this point. But Kruger is on the warpath. On the same day the ultimatum is drafted – 27th September 1899 – D Day minus 14 days – Kruger telegraphed to Steyn:
“English troops already at Dundee and Biggarsberg, and will probably take up all the best positions unless we act at once. Executive Council unanimous that commando order should be issued to-day. We beg you will also call out your burghers. As war is unavoidable we must act at once, and strongly. The longer we wait the more innocent blood will be shed through our delay. We don’t intend to have Chamberlain’s note, with your amendments re Convention, telegraphed to you till burghers are at or near borders, and till you have been informed that the English Government has acted contrary to last part thereof. “We are justified in crossing border. Plan of campaign follows.”
27th September 1899 – D Day minus 14 days – Kruger telegraphed to Steyn again (same day again):
“Burghers will be in position in our territory near Laing’s Nek on Friday morning 5 a.m. All other burghers being called up to follow as soon as possible. Kock leaves with two cannons tomorrow evening, also big guns for Laing’s Nek. Will Free State then also be in position? Volksraad meets seven this evening. Can you reply by then? Plan campaign follows.”
On the 29th September 1899 – D Day minus 12 days – Kruger telegraph to Steyn:
“Our burghers going to hold positions on border to prevent enemy getting hold of them. You still seem to think of peace, but I consider it impossible. I am strongly of opinion that your people ought also to go to border to take positions. You think Chamberlain is leading us into a trap, but if we wait longer our cause may be hopelessly lost and that would be our trap.
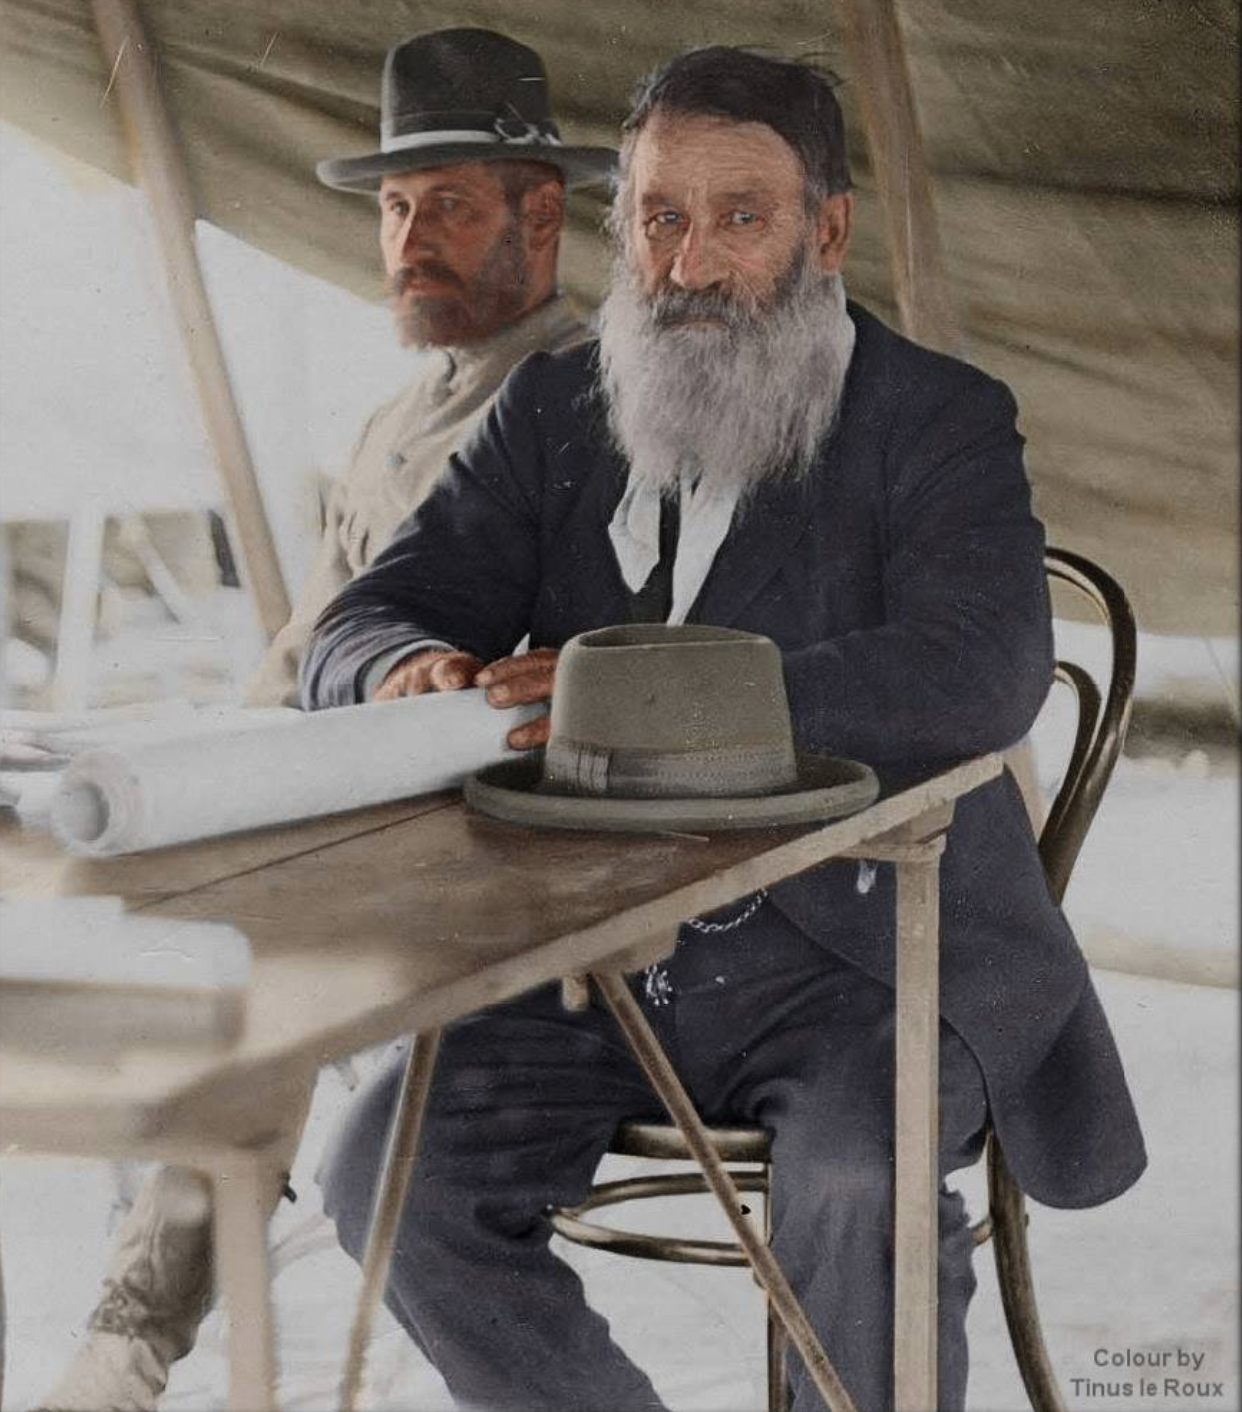
President Steyn (left) and President Kruger (right) colour by Tinus le Roux and Jenny B.
In the final minute, with war inevitable and Boers amassing on the border to invade – the British Parliament approves the request to raise the ‘Army Corps’ as a deterrent against Boer aggression and they only start calling up their reserves from the 7th October 1899 – the Boers are already mobilised and its 4 days before the Boers invade. It’s too late, this force would only be arriving in critical mass in the South African theatre by mid January 1900.
In the end, both ends of the British argument are 100% correct. Milner is 100% correct, the ZAR is a significant destabiliser in the area with territorial ambitions over Swaziland – which they annex, Rhodesia (the Adendorff trek and the Matabeleland concession) and Zululand for access to a Natal based seaport at St Lucia. President Steyn in the OFS also has territorial ambitions over Griqualand and the diamond fields in the Cape Colony.
Afrikaner Bondsmen and their supporters, men like Smuts, Botha, Hofmeyr and Reitz are all promoting the idea of a unitary Afrikaner Republic stretching from the Zambezi to the Cape. Both Boer preachers and politicians are all talking war and the removal of British influence from the entire region altogether (and Milner makes specific note of this). The two Republics are tooling up for war and the ZAR is commissioning and building massive defensive forts and buying advanced state of the art German and French siege guns. Vast stores of smokeless ammunition is been landed, and 40,000 brand new state of the art German Mauser rifles have landed – enough to arm nearly every Boer with not just one but two rifles. President Steyn has signed President Kruger’s long awaited “aggression pact” between the OFS and the ZAR on the 22nd March 1897 which locks the OFS into war even if the ZAR feels “threatened”. Simply put, the ‘winds of war are blowing’.
The purpose for going to war can best be read in the final statements made by the main protagonists.
Francis Reitz, now acting as the ZAR’s state secretary after sending the final Boer ultimatum, concludes his speech on the eve of war with the following:
“…. from Slagter’s Nek to Laing’s Nek, from the Pretoria Convention to the Bloemfontein Conference, they haveever been the treaty-breakers and robbers. The diamond fields of Kimberley and the beautiful land of Natal were robbed from us, and now they want the goldfields of the Witwatersrand … Brother AfrikanersI The day is at hand on which great deeds are expected of us – War has broken out ! What is it to be ?A wasted and enslaved South Africa or – a Free, United South Africa?”
So, for Francis Reitz accuses the British of breaching the spirit of Transvaal’s Suzerainty, accuses them of stealing Natal and Griqualand and a threat to Boer paramountcy in the region – calling for a ‘United South Africa’ (I.e. the Afrikaner Bond’s ‘Zambezi to the Cape under a Boer hegemony’ objective).
The desire of the Boers and the desire of the British that South Africa fall under their respective paramountcy and hegemony is a clash of interests between Boer Imperial and British imperial desires on territorial expansion and control – and this is the conclusion reached by just about every Boer War historian worth his salt as the basic underlying cause of the war, it’s the Casus Belli.
This paramountcy and desire for regional control by Boer and Brit respectively is most adequately wrapped up by Jan Smuts’ final word on the matter, when on the eve of war writes:
The aim of the war is to establish “a United South Africa, of one of the great empires (rijken) of the world… an Afrikaans republic in South Africa stretching from Table Bay to the Zambesi”.
On the British front, Joseph Chamberlain concludes his speech to Parliament on the eve of war with the following:
“… we are at war now because the oligarchy at Pretoria … has persistently pursued, from the very day of the signing of the Convention of 1881 down to now, a policy which tended to the evasion of its obligations; a policy by which it has broken its promises; by which it has placed, gradually, but surely, British subjects in the Transvaal in a position of distinct inferiority; by which it has conspired against and undermined the suzerainty, the paramountcy which belongs to Great Britain.”
So – for Chamberlain, the spirit and agreement of the Transvaal’s Suzerainty (its status as a vassal state as prescribed by the Pretoria and London conventions) has been breached – a breach of treaty – and in so a threat to British paramountcy in the region.
The British War Office is also 100% right, they’ve matched the ‘risk’ perfectly, in terms of military doctrine they augment their forces just enough to prevent total calamity, and its seen upfront in the invasions when these small bordering garrison forces – of professional officers and men, completely outnumbered in Ladysmith, Kimberley, Kuruman and Mafeking make quick work of the invading Boers and stop them in their tracks – on the 14th October 1899 the Boer attack on Mafeking is effectively driven off, and on the 20th October the British forces in Natal are successful at the Battle of Talana Hill and the next day on the 21st October they are successful again at the Battle of Elandslaagte .
On the 25th October the second Boer assault on Mafeking is driven off and on the 9th November, the Boer assault on Ladysmith is effectively driven off (albeit with heavy losses), the Boers then opt to put the town to siege. The siege of Kimberley starts in earnest on the 4th November with the British defenders firmly dug in, the Boers opt to shelling the town from a safe distance in the hope they capitulate. On the 13th November the Boer attack on Kuruman is successfully driven off and the Boers opt to put it that town to siege in addition.
The Pre-emptive strike and forward defences myth
As to a “pre-emptive strike” and “invading for the purposes setting up forward defensives” argument to forestall an inevitable British invasion so often found on Boer war appreciation sites – this is possibly the most stupid assertion and myth generated around Boer War 2 … ever, and for the following reasons:
Upfront, a ‘pre-emptive strike’ is not the plan, never is the plan. These modern-day Boer Romantics ‘couch commanders’ conveniently ignore people like the ZAR commander in chief, Piet Joubert – who states:
“The master plan was to advance rapidly on Cape Town, Port Elizabeth, East London and Durban”
Jan Smuts in his memoirs of the war refers to his direct planning to take the Port of Natal (Durban) in a rapid advance – a “Blitzkreig’ strategy.
In fact, Jan Smuts is the only man with a plan. His plan is outlined, supposedly whilst he was sick in bed. It was presented to the ZAR raad (council) in a secret session and unanimously adopted. It’s a very specific plan, it is summed up by Smuts himself who said the plan was to invade Natal from Laing’s Neck and he does on;
“The republics must get the better of the English troops from the start … by taking the offensive and doing it before the British force in SA is markedly strengthened …. the capture of Natal by a Boer force together with the cutting of the railway between the Cape Colony and Rhodesia … will cause a shaking of the Empire”.
The idea of cutting the railway line between the Cape and Rhodesia is to create an uprising of Afrikaner support in the Cape Colony for the Boer Republic cause, Smuts in his account is very reliant on this happening, he’s an ex-Cape Afrikaner Bondsman, the Afrikaners in the Cape are the majority population – the idea of taking the Cape Colony would fail if they do not rise in support. Smuts’ objective through these actions – in Natal and the Cape Colony – is to “shake up” the paramountcy and in so force better terms with the British with a peace settlement early on … not to get into a protracted and costly war, and to do all this before any sort of “army force” or “expeditionary force” can be raised in the UK – an early concept of “shock and awe” and “blitzkrieg” is Smuts’ basic military plan. Smuts’ plan is also an early form of “manoeuvre” warfare – using the Clausewitzian concept (developed after the Napoleonic wars) – using superior and simultaneous advances along “exterior” lines (a concentration in space) on an enemy using “interior” lines (a concentration of time) of communication and supply. Smuts would also apply this later when he is tasked with forming the Union Defence Force in 1910.
Smuts’ offensive plan also does not propose laying anything to siege, surrounding and laying either Ladysmith, Kimberley or Mafeking is avoided entirely, he is far more concerned with speed and a quick win before Britain can reinforce anything – especially Natal and Durban which Smuts targets his ‘seat of war’. The rapid seizing of Durban whilst its relatively lightly defended is important to Smuts, without seizing it the British will be able to reinforce and counter-attack – so the taking of Durban will either make or break the plan.
Reference: General Jan Smuts and his First World War in Africa – D. Katz
So, here’s the Boer Republics’ offensive plan – in includes Smuts’ initial offensive plan and then a greater offensive offensive advance to Port Elizabeth so as to build on a Cape Afrikaner uprising and rebellion. At the start of hostilities on the 11th October 1899, according to Jan Smuts himself, the ZAR Commandant-General Piet Joubert merely had Smuts’ broad outline of the offensive plan in his hand, he had not given it any further thought – “no comprehensive war planning” had been done on how the strategic plan would be met by any planning on a tactical level or even on the operational level (contingency planning).
On launching the offensive, only then does the Boer leadership give thought to how they inited to meet Smuts’ strategic plan on a tactical level and operational level. They draw on inspiration from the first Anglo-Boer War, the Transvaal War of 1880 to 1881 i.e. Boer War 1, this war called for laying British garrisons around Pretoria to siege and then concentrating on using the natural mountain defences around Laing’s Neck on the ZAR/Natal border which squeezed the British ‘relief column’ making their way to relive the sieges onto a single road through the mountain defences – focusing them onto Majuba where the Boers enjoyed an outstanding victory. This reasoning had worked in 1881, no reason why it would not work in 1899.
So, as a defensive strategy to augment the offensive strategy, General Piet Joubert and the Boer leadership decide on laying siege to Kimberley, Mafeking (in the Northern Cape) and Ladysmith (in Natal) – their thinking is this would split the British forces who would then be focussed on relieving these border towns and their relief columns would have to follow singular roads and railway lines to get there, easy pickings for the Boers as they had done to them at Majuba – thereby weakening the British forces further and giving the Boer’s offensive strategy in Natal all the chance of success.
Important Note, as to military doctrine as follows;
“assuming a defensive posture does not win wars and a offensive strategy is essential for winning a war, defensive stances are a temporary measure allowing for an advantage to develop, which will eventually result in offensive action to secure combat success.”
Dr. D Katz’ ‘Jan Smuts and his First World War
Jan Smuts at this point is disillusioned with the Boer leadership’s planning, he feels this offensive and defensive plan is far too complicated and questions whether the Boers are capable of launching a plan of this magnitude. He even goes as far as calling General Piet Joubert “passé” and “hopelessly incompetent”.
The Boers however, initially follow exactly “the plan” in what they do. They advance from Laing’s Neck down the centre spine of Natal heading to Durban as planned, as they push into Natal the Boer Commanders telegram Kruger to say the “Vierkleur” would be soon flying over Durban. The ZAR Chief Justice Gegorowski boasted;
“the war will be over in a fortnight. We shall take Kimberley and Mafeking, and give the English such a beating in Natal that they will sue for peace”.
The general rally call amount the Boer soldiery is that will be “eating fish” in Durban, General Louis Botha convinced he will also be “eating bananas” in Durban. They also initially follow Smuts’ offensive plan in the Orange Free State, cutting the Cape Colony and Rhodesia railway line in the first action of the war at Kraaipan on the 12th October 1899.
Their mistake, they are too cautious and instead of using their much-promoted advantage – mobility, they err on a cautious and slow advance. The plan, as Smuts predicted is overcomplicated, and in so far as intending to split the British forces between the Northern Cape and Natal, the decision to put Kimberley and Mafeking to siege in addition to the offensive plan as a defensive plan also splits the Boer forces and weakens their offensive capability, from a ‘Blitzkreig’ (lightning mobility war) perspective they are unable to put their maximum effort behind their ‘schwerpunkt’ (heavy, focus – or centre point) which is the rapid invasion of Natal and the taking of Durban. The Boers also compromise their mobility and resources in Natal when they start to lay Ladysmith to siege instead of rapidly advancing to Durban.
In following “the plan” – the ‘high water marks’ of the invasions i.e., where they ultimately land up. In the Natal invasion it’s just 60 kilometres north of Pietermaritzburg – Botha stops at Mooi River, this invasion has no reference to the “defence plan” whatsoever (in fact it’s the opposite), and the Boers do not take up very effective “defensive positions” to stop any sort of mythical British invasion – the positions they take up are far worse than the positions they were in before they invaded. Any military person will tell you that Rivers and Mountain Ranges make for the most formidable defences – and in the case of the Boer Republics – the Orange River, Vaal River and Drakensberg are perfect defences – no need to invade anyone, investing in these border defences would have been the logical military doctrine, and far more effective as to a “defensive strategy” without initiating a war and the risk that involves.
Look at it from the perspective of military doctrine, the Boer “start line” is Volksrust on the border near Laing’s Neck – a most formidable defence position on the border of Natal and the “gateway” to both the ZAR and Natal, home to Majuba mountain and Laing’s neck, where the British were so soundly beaten by the Boers in 1881 – it’s a proven natural defence and one which the British could not breach just 18 years earlier.
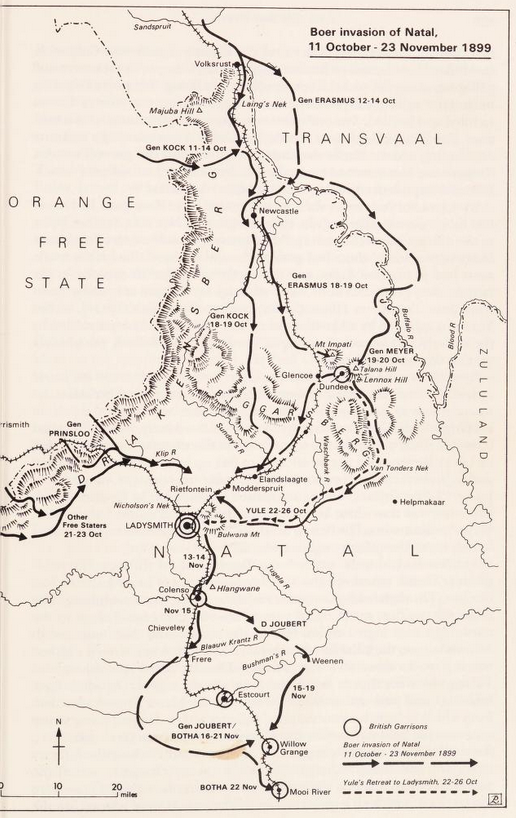
As to continuing a deep advance (remember the offensive plan is to invade), after they are confronted by the British in the field at Talana outside Dundee on the 20th October 1899 (D Day plus 8) – the Boers are initially defeated in two pitched battles, the Boers are held up losing advantage daily. After winning the battle at Nicolson’s Neck the Boers manage to advance another 70 kilometres to Ladysmith reaching it on the 2nd November (D Day plus 24 days) – now they are now 190 kilometres into their advance from their start line on the border and nearly a month into their invasion campaign.
So, if your strategy is only one of defence – why leave such a formidable defence and find something else? Then as to the so called amassed “British threat on the border” – the invasion force overall Commander, General Piet Joubert is joined by General de Kock from the OFS and General Erasmus and they advance from their start line for nearly 120 kilometres deep into Natal territory before they meet any significant British forces or resistance whatsoever – the British are nowhere near the “border” and “poised” to invade anything. The British have rather inadvisably split their forces between Dundee and Ladysmith. Extending military supply lines and logistics support for 120 kilometres in 1899 using wagons and horses to initiate a “pre-emptive” strike aimed at the British in Dundee is pure Hollywood, wishful thinking, it has nothing to do with military doctrine or sound military planning – or even the Boer’s plan for what it is.
The Boer invasion of Natal as mapped.
General Louis Botha then extends the advance from Ladysmith all the way to Mooi River on the 22nd November 1899 – 100 Km away from Ladysmith and 60 km from Pietermaritzburg and now a staggering 290 km from their start line. That’s the length of the “supply” line for the Boers – their “high water” mark. No military commander in his right mind sets up a “defensive position” with a near 300 km long supply line running through enemy territory intended to support ‘defences’ – no military commander in 1899 advances near 300 km on horseback for a pre-emptive strike either – air warfare has not been invented yet and even by today’s standards a ground force invasion 300 km into enemy territory is never considered by any commander as a mere “strike” – pre-emptive or otherwise.
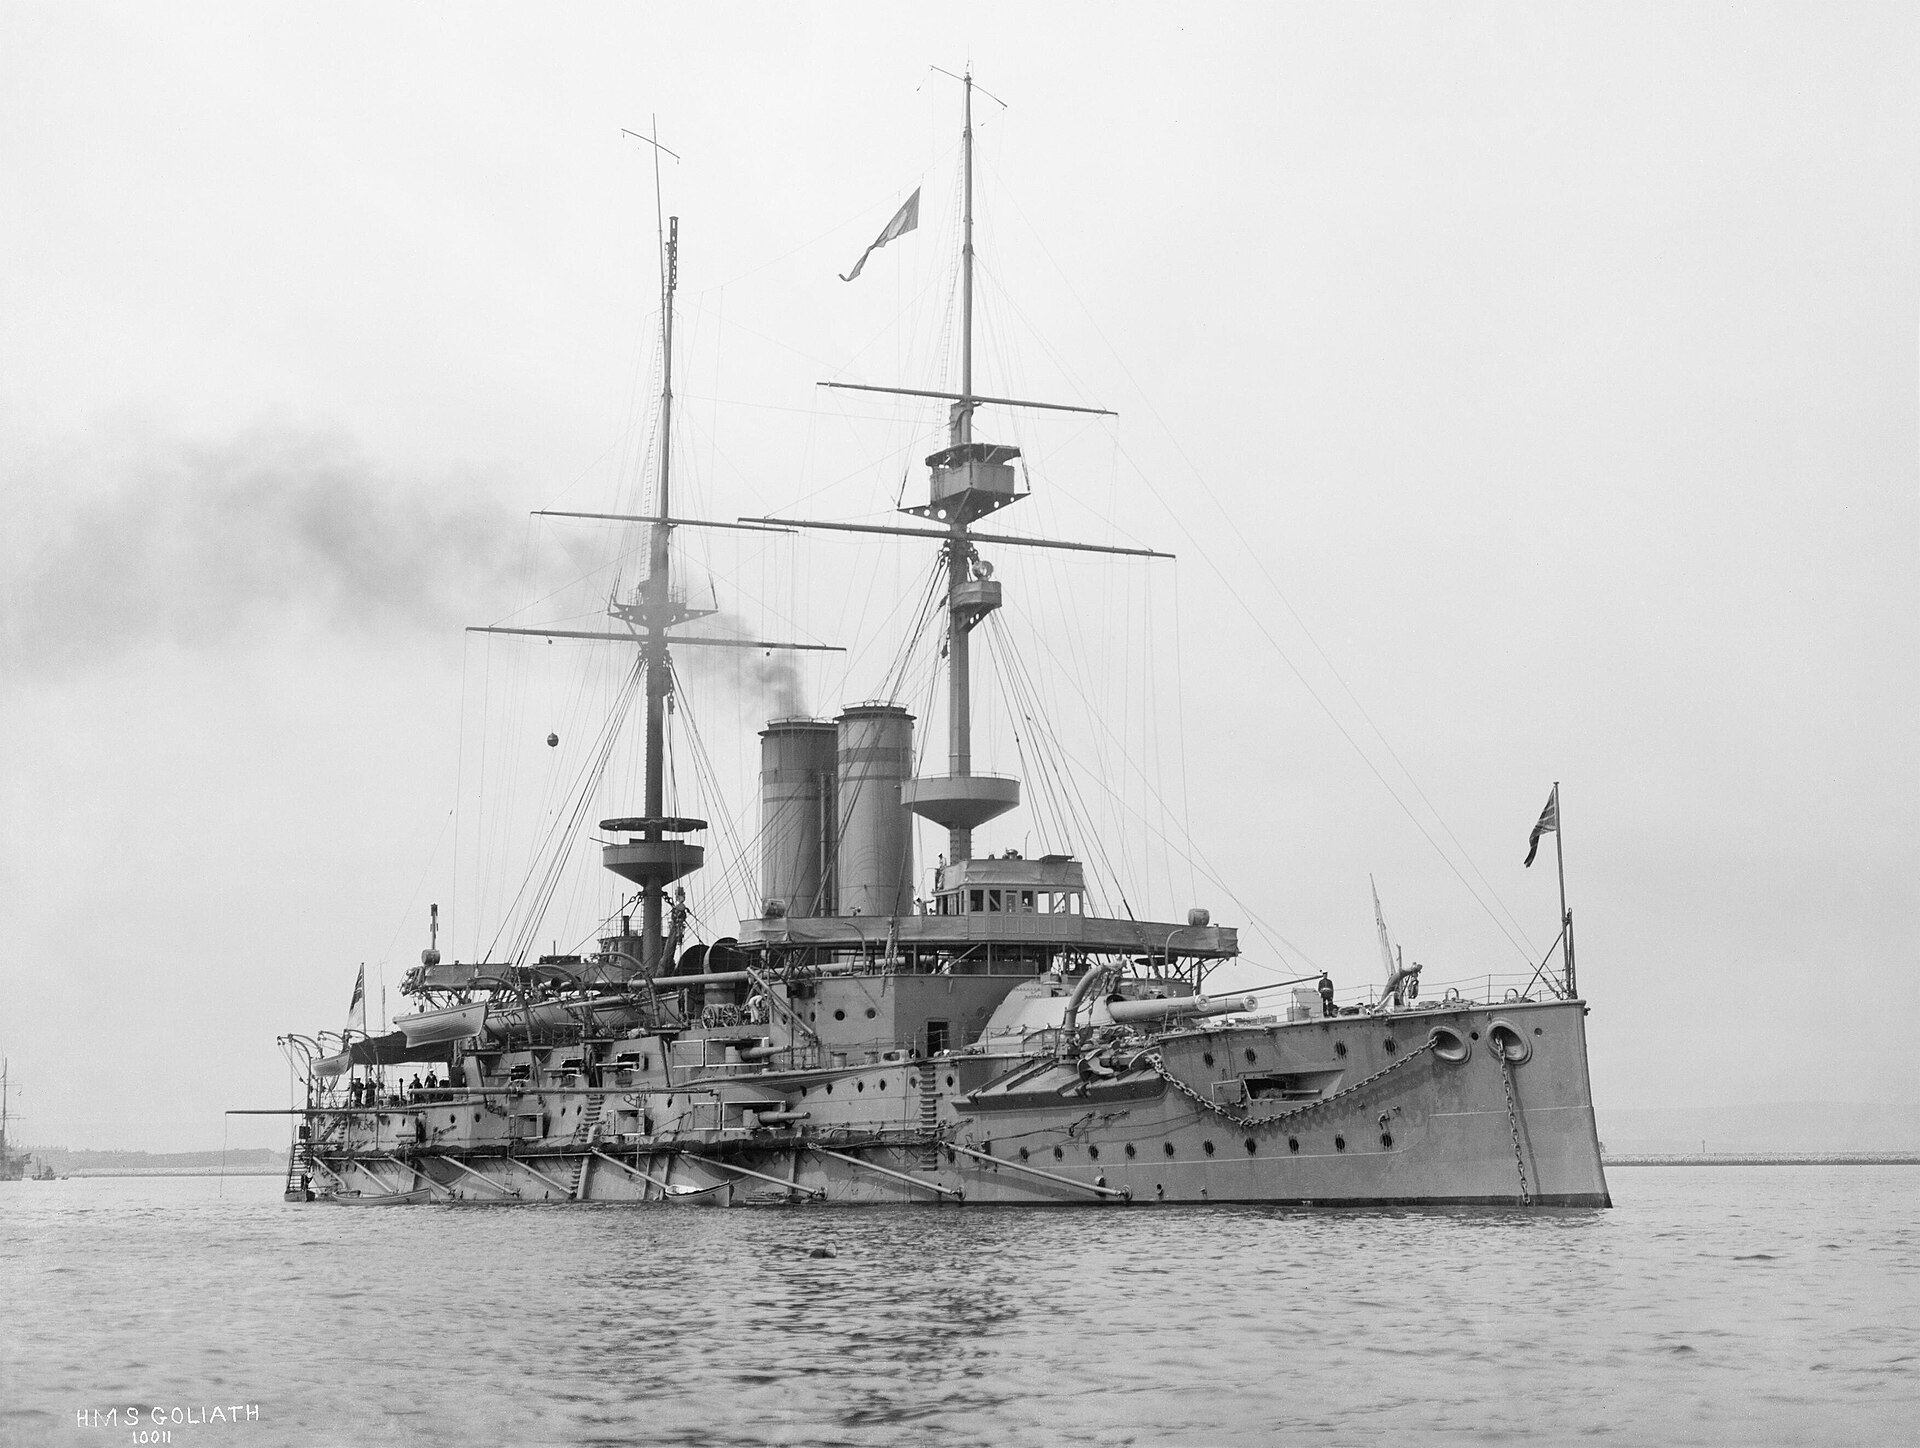
The Boer high-water mark is only obtained by the 22nd November – D Day plus 43 days – now having been significantly compromised on mobility and speed. Both HMS Terrible and HMS Powerful had arrived in Durban port by the 6th November 1899, either one of these two Battle Cruisers had more fire power on board than the entire Boer invading armies combined – a Battle Cruiser defending a port from mounted infantryman on horseback is no match. The Royal Navy is Britain’s senior service and it has at its disposal the very best of all their resources and commanders, defending their ports is what the Royal Navy does best, they are very good at it.
HMS Terrible (Left) and HMS Powerful (Right)
The Boer invasion falters, it fails because they had lost their only significant advantage – mobility, aggression and speed gives way to cautiousness, they chose resource draining static warfare instead – sieges and invest into them instead, losing valuable days and sacrificing their “Blitzkreig” offensive plan altogether.
With Botha’s objective of “eating bananas in Durban” now completely dashed, General Botha has no choice but to do what countless military commanders before and after him have done when an invasion fails – and beat a retreat, creating what are known in the military as “defensive “boxes” as you go along, the idea is to slow the enemy’s counter attack down until you can “join” with more friendly forces and consolidate – which he initially successfully does just north of the high water mark at Willow Grange on 23rd November 1899 and then further north at his next “box” at Colenso on 15th December 1899. He finally settles further north on the Tugela heights as his next defensive box, having now retreated for 80 Km, however he loses this pivotal battle and his final defensive box to the British on the 27th February 1900 (to see a defensive box retreat in action in a more recent war involving South African Commanders – see “Gazala Gallop” in WW2).
On the western front, the Boers are able to invade the arid and sparsely populated northern Cape meeting no real resistance from any British forces – as none are stationed there in any numbers – the Boers end their high water mark at the border with German South West Africa – this has more to do with the strategic imperative of opening up a sea route and port access via Walvis Bay and linking up with a “friendly state” for the purposes of supply than it does with any offensive or defensive plan offered by the Boer command. It certainly has nothing to do with a ‘pre-emptive’ strike.
On other lesser known fronts
If there is any semblance of logic in invading the Cape and Natal colonies for the purposes of establishing forward defences only, there is absolutely no logic in the Boer invasions of Rhodesia (Zimbabwe) and Bechuanaland (Botswana) to suggest invading for purposes of defending – or even a ‘pre-emptive’ strike – the tiny nominal British Police forces in both these countries are no invasion threat whatsoever, and all the invasion of the Bechuanaland Kingdom does is bring the Tswana into the war as a belligerent all on their own, and the Tswana in their own right decimate the invading Boer Kommando and its laager at Derdepoort on the 25th November 1899. The small BSAP (British South African Police) base consisting of 450 British soldiers at Tuli in Rhodesia is however sufficiently professional to stop the 2,000 strong Boer Commando (now with a 1 to 4 advantage over the British) which had forged itself over the Limpopo River into Rhodesia at Rhodes Drift and other points. On the 2nd November 1899 the BSAP successfully halt them at Bryce’s Store and then repulse the invasion, although border incidents and Boer incursions into Rhodesia continue for some time – well into the Guerrilla phase.
Bryce’s Store in Rhodesia showing combat damage
What Defences?
Also, nobody has been able to point where these so called ‘invasion for the purpose of defensive positions’ are, there is no investment in resources or materials for effective defences, the Boer trenching system at the Modder River at the beginning of the war in November 1899 are proven ineffective.
The defensive earthworks that make up the trench line at defence cluster centre at Magtersfontein is merely a shallow trench converted from a natural ‘donga’ at the base of the koppie range (refer Dr. Garth Bennyworth’s groundbreaking work on this trench-line) – the British frontal attack on this trench-line is successfully repelled by the Boers on 11th December 1899 (Cronje’s only real tactical ‘victory’), but after regrouping and reinforcing the British are able to by-pass these defences completely in a highly mobile flanking manoeuvre.
No large defence fortifications are really invested in by the Boers in either Natal or the Cape Colony, and any idea of fortifying the Republics borders are in fact neglected in the drive to invade the British colonies instead.
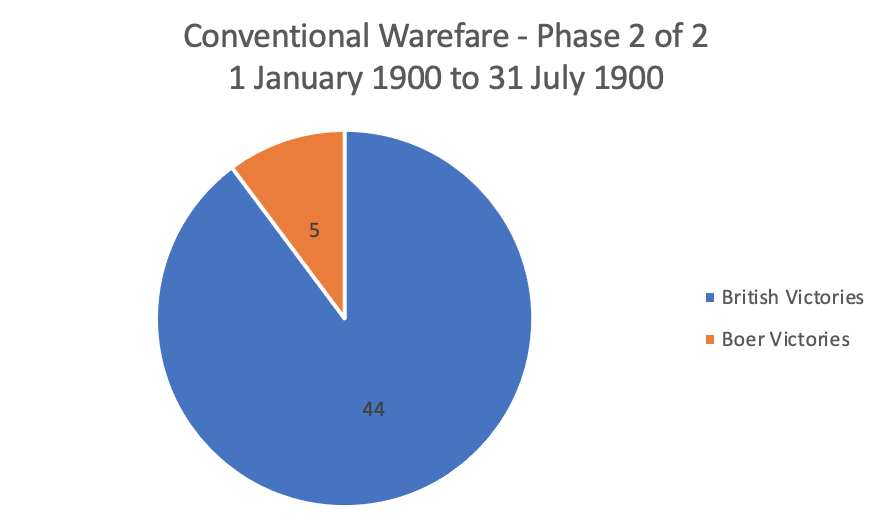
It is only from the beginning of the new year in 1900, that the British have been able to muster anywhere near enough troops to land in Cape Town, that they are now matched 1:1 to the Boer army, and it is on these equal footings that the British counterattack, breakout and relieve of all the major sieges. From January 1900 to July 1900 they rout the Republican armies from their colonies, relieve their sieges and in two significant manoeuvres – the Battle of Paardeberg on the 27th February 1900 and Brandwater Basin (Surrender Hill) on 30th July 1900 they break the Republican forces critical mass to fight a conventional war – Brandwater and Paardeberg alone result in the capturing 8,300 men and the Boer Army is now simply just no longer matched to the British on a 1:1 ratio, it’s now in an inadequate position – with more British troops streaming in.
The 500,000 myth
Often on Boer war sites, and even on simple things like wiki we see this statement “it took 500,000 British to defeat 20,000 Boers” – the much-touted ratio in this type of media is that the Boers were outnumbered 25 to 1, at a staggering disadvantage, but these plucky Boers held the mighty British empire at bay. Now that’s a figure designed to paint the Boer fighter as some sort of super-man and the British military as bumbling, monolithic and ineffective. But the truth is far from this and this figure is completely erroneous designed to drive Afrikaner nationalist political rhetoric – it has nothing to do with actual numbers on the ground.
Now, here’s the truth – at no point in Boer war 2 were there ever 500,000 British troops in South Africa as boots on the ground at any one point in time – in total, over the course of the war the British called up 550,000 men – that bit is true, yes. HOWEVER the British rotated their Regiments in and out of South Africa on ‘tours of duty’ – never really sending a full regiment into the operational theatre at once, retaining many at home and in their other colonies around the world. The “high water mark” i.e., the maximum number of British Troops in South Africa at any one point in time is 230,000 men. Even pro-Boer chronologies like that of Pieter Cloete’s Boer War facts and figures reluctantly has to admit this fact.
This high-water mark of 230,000 (including African Auxiliaries) is only peaked briefly during the Guerrilla Phase of the war – and at least 50,000 of these troops are being used to man the rather extensive blockhouse defence system stretching from the top to bottom and side to side across the whole of South Africa (as referenced by Simon C. Green in his Blockhouses of the Boer War) – over thousands of kilometers. On average during the Guerrilla Phase of the war – September 1900 to April 1902, the British enjoy 190,000 troops on the ground.
But let’s stick to the high-water marks for a proper account – the high water for the Boer forces, total Boer War – including 6,000 burghers who add onto the original ZAR and OFS Commando call-up, the statutory Boer forces, foreign volunteers and Cape Rebels is 87,365 men (possibly higher if we add African auxiliaries and rear echelon support). That means a realistic ratio between Brit and Boer at the high-water mark is a 3:1 ratio – total Imperial forces versus total republican forces. It’s a far cry from the emotionally and erroneously touted figure of 25:1.
If we want to account Boer War 2 properly and view it with balance, it would be correct and very true to say at the beginning of the war the Boers outnumber the Brits 3:1 – as the war progresses there is a juxtaposing of numbers… and by the end of war the Brits account 190,000 troops in country, Boers account 24,300 left in the field and 47,300 POW in the bag (factoring out the ‘Hensoppers’ and ‘joiners’) = 71,600 or a 3:1 ratio – Brits outnumber Boers, a reversal of the ratio the Boers enjoyed at the start of the war.
In terms of military doctrine, the above estimation is about right – to invade the British territory the Boers need a 3 to 1 advantage to be successful and to counter attack and hold the Boer territory the British need to be at a 3 to 1 advantage – and even by Guerrilla Warfare standards and the doctrine used to fight one, this number is very low. Consider the following:
American Brigadier-General Nelson Miles was put in charge of hunting down Geronimo and his followers in April 1886. Miles commanded 5,600 troops deemed necessary to find and destroy Geronimo and his 24 warriors. In Malaya in 1950 it took 200,000 British, Australian and allied troops to defeat 5,000 Communist guerrillas. In Ireland over the 30-year course of ‘the troubles’ a total of 300,000 British troops were used to contain 10,000 IRA guerrillas. Closer to home, so the arm chair Boer war generals get this – over the course of the Angolan Border War (1966-1988) and the ‘Struggle’ (1960-1994) the SADF would call up 650,000 conscripts and then hold them in reserve – MK and other non-statutory force ‘guerrillas’ at their high water mark in 1990 only have 40,000.
The modern-day theoretical ratio of counter-insurgency forces to guerrillas needed to defeat an insurgent/guerrilla campaign is 10:1. In 2007, the US Department of Defence produced a document entitled Handbook on Counter Insurgency which quotes this as the rule-of-thumb ratio for all such operations – and that is even with the advent of modern technology in warfare fighting mere insurgents or guerrillas. Little wonder that General David Petraeus needed 180,000 coalition force troops (the same size as the full invasion force) on the ground in 2007 just to deal with the Iraqi guerrilla “surge” spearheaded by an insignificant but determined bunch of suicide bombers.
Boer bashing and other myths
Military doctrine and planning – to anyone whose served as officer in a military, is made up of three levels – the Strategic level, the Tactical level and the Operational level (when the metal starts flying around and the rubber hits the road). Military Generals and Commanders are judged by how they relate these three components – Strategic, Tactical and Operational. German Forces during WW2 are outstanding at the Operational level, completely dazzling the enemy concentrating overwhelming firepower at the “schwerpunkt” – the ‘heavy or focal’ point. They are equally outstanding at the tactical level, consider the masterful work of Field Marshal Rommel in North Africa. But they fail at the Strategic level by overextending their resources and pandering to wayward political ideologies and ambitions – and that loses them the war.
In reality, and it’s not trying to be nasty or ‘Boer bashing’ in any way shape or form. The Boers at the ground level are a committed, determined, resourceful and extremely brave bunch. They are scarifying much and like the Japanese in WW2 have a deeply ingrained cultural sense of honour.
But their commanders fail these brave men on all three key aspects of warfare. At an Operational level they are been asked to use a Commando system of mounted infantrymen – good for quelling poorly armed native rebellions – but absolutely hopeless when confronting a modern professional military force with modern weaponry using both combined arms and joint arms in which they are very well versed – and it quickly shows when the British are able to repel the invasions and stall them long enough to get reinforcements in whilst completely outnumbered. The British ORBATS (Order of Battle) are also far superior in just about every key engagement fought – that’s a fact.
It is often noted in all the Battle ORBATS – even the ones that mark the beginning of the war in the conventional phase, that the Boers are always “on the back-foot” always “outnumbered” almost always fighting against the odds – even for battles they win. However, this is again a function of poor leadership – at the beginning of the war the Boers outnumber the British significantly, but they don’t make use of the advantage – instead of driving their forces to their “schwerpunkt” and the “crucible” (Natal) – focusing on their plan and leveraging their only real advantage – mobility, they choose instead to divide their forces and sacrifice their mobility completely. Inexplicably they commit unusually large numbers of these highly mobile combatants and all their resources to siege warfare (static warfare) and not to defeating the enemy in the field (also a key military blunder) – high numbers of Boers sitting around and simply shelling three British towns from afar – safely out of range, and other than Ladysmith, making no real attempt to ‘take’ the town – and in doing this they allow the British to pour in all the reinforcements they need to counter-attack.
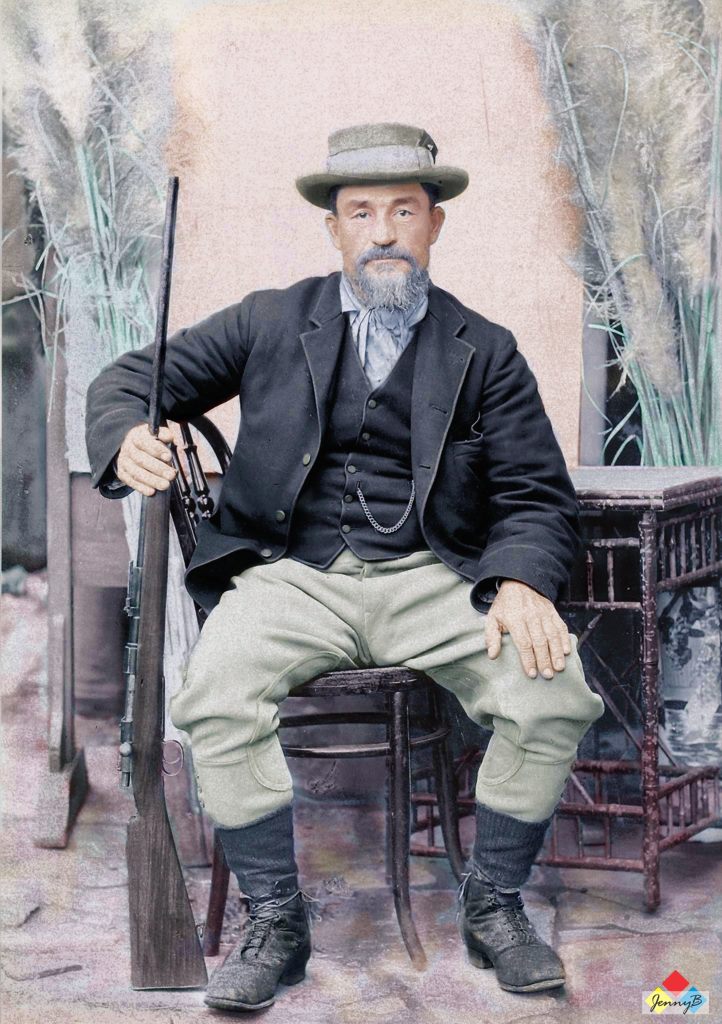
General Joubert – colour by Tinus le Roux
On a tactical level, General Joubert – tasked with the invasion of Natal fails on nearly every level, he fails to take tactical advantage of his “mobility” and fails to “take the fight to the enemy”, he fails to prevent the British forces at Dundee from “linking up” with their forces in Ladysmith (a key military blunder), and he fails to take Ladysmith when the opportunity is presented to him on a plate choosing a divine sense of providence instead (another key military blunder). By the time General Botha takes over the advantage is lost, and Buller is able to ultimately dislodge Botha at Tugela Heights with the innovative use of pontoons and manoeuvre and relive Ladysmith.
General Cronje, on a tactical level on the other front in the Cape also fails on every level, he fails in his initial defences, fails to move from his static defences in time, sacrificing mobility again and is outflanked and outmanoeuvred by a more “mobile” General French, Cronje then, for reasons known only to himself fails to link up with General de Wet and presents himself as a sitting duck to the British – the result is the 1st significant capitulation of Boer forces at Paardeberg on the 27th Feb 1900.
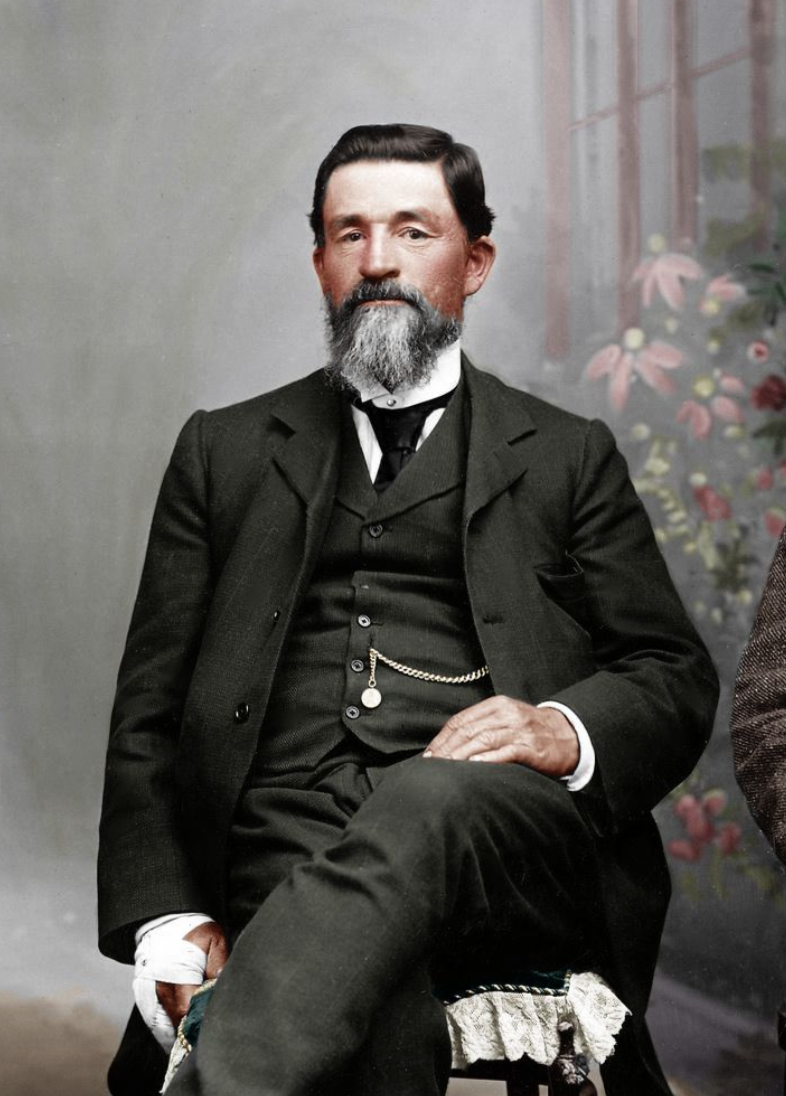
General Cronje – colour by Jenny B
General Christiaan de Wet also fares no better. De Wet’s attack on Wepener is strategically un-sound, committing resources to worthless target and he’s repeatedly beaten back by a gutsy small garrison force. His plan to defend the indefensible at the ‘Brandwater Basin’ is flawed and he too presents his forces as sitting ducks in a ‘pocket’ surrounded on all sides – and then he leaves his command post on the “first train out of Dodge” as the British close in on him and leaves his squabbling subordinates and troops to fight it out instead, the result is a complete breakdown of his command and the 2nd. significant capitulation of Boer forces at Surrender Hill on the 30th July 1900.
This surrender marks the start of the Boer’s loss of the war (it’s the beginning of the end), they are unable to recover it and the surrender marks the end of the Conventional War and chalks it up as a British Victory. Often put up on a pedestal as a “volksheld” (people’s hero) unfortunately General Christiaan de Wet has the stigma of losing the Boer war for the Boer nation – it happened under his watch and his Command – literally. Militarily speaking he’s directly to blame – and he fares no better leading a doomed, inadequately armed, inadequately supported, strategically flawed, and failed Boer Revolt in 1914.
De Wet’s invasion of the Cape Colony in the guerrilla phase is also a disaster as he signals his intentions up-front to the British and over commits a slow and large wagon train which the British chew up and then they expel de Wet from the Cape with a semblance of his invasion force left over and the loss of most of his transports. Tactically de Wet is brilliant, evading his ‘hunt’ and labelled ‘The Boer Pimpernel’ - romanticised somewhat, especially his tactical victory using barefoot burghers to sneak up on the British at Groenkop. However truth be told, on both an operational and strategic level, as a commander he fails, even his victory at Sanna’s Post is somewhat flawed as an ‘own goal’.
General de Wet – Colour by Jenny B
On a strategic level, as we have seen Smuts’ strategic plan adopted by the Boer Forces is thrown out the window almost from the get-go. They start with it, but simply do not follow through with it at all, invading three British colonies and two British protectorates, splitting focus and forces – completely misreading and unable to raise the critical “Cape Rebellion” and completely sacrificing the Blitskreig concept by working to all their weaknesses and not any of their strengths. Smuts’ “Clausewitzian concept” goes out the window too – in the Conventional War phase, the Boers sacrifice their superior and simultaneous advances along “exterior” lines (a concentration in space) and revert to only using “interior” lines (a concentration of time) for communication and supply.
In terms of strategy, on a political front, Kruger’s decision to strike out, by any type of military action you care to mention, against the world’s single biggest superpower, one whose Navy is bigger than the French, German and American Navy’s combined, at the very height of its Imperial power, is fundamentally flawed – plucky and very brave, yes – but strategically myopic and very unsound.
The best the Boers can do from here out is a ‘hit and run’ guerrilla campaign in the hopes of wearing the British resolve down to avoid “unconditional surrender” and get better peace terms (which eventually happens). The ‘Bittereinder’ guerrilla campaign is not fought with any romantic idea of actually “winning’ the war”, the Bittereinder Generals – Smuts, Botha and de la Rey are under no illusions, they also see the resolve of their women to endure the farm clearances and concentration camps as their duty in winning a better peace – they never, during or after the war, turn to victimhood, its denies them their pride and their sacrifices. The victimhood argument is a latter day ‘politics of pain’ concept taken up by latter day “pure” Afrikaner nationalists, nearly all of whom sat out the war or were too young at the time.
Even the decision to strategically engage Guerrilla War is unsound given the extreme sacrifice of lives and livelihoods required to run this type of campaign, literally breaking the back of the Boer nation – the folly of this thinking is something even General Botha realises, and he sues for peace before his entire nation is crushed – as in his own words there will be literally nothing left to fight for.
This is not the failure of the Boer soldier – this is the complete failure of the Boer Command. As military historians we have to look at the ‘score card’ in an objective and disparaging way – pointing out “critical failures” in doctrine it is – “boer bashing” it is not.
The Score Card
To look at the Boer war by way of its score card we need to divide it into three broad sections – the Conventional War – Phase 1, when the Boers have the advantage, the Conventional War – Phase 2 when the British have the advantage and then The Guerrilla War (Insurgency) phase – which needs to be separate as the edicts of war change completely.
In all, for the duration of the war there are 170 significant actions fought between the Boers and the British (including their allied Black armies like the Tswana and the Swazi), these include significant pitched conventional battles, relief or success of all sieges, successful or repelled attacks and counter-attacks during all phases on strong-points (blockhouses, bases, forts) and trains, and the taking of key cities by way of military objective – Bloemfontein, Kroonstad, Johannesburg and Pretoria.
Not factored is the general carnage of destroying property – by either British or Boer actions – the Boer actions of burning down ‘British’, ‘hensopper’ and ‘joiner’ farms, ransacking and looting towns (Dundee etc.), destroying mission stations and blowing up railway track are excluded – so too is the carnage caused by the British burning down ‘bittereinder’ farms, destroying livestock and blowing up buildings. Trying to even factor this would be impossible.
From the 11th October to 1st January 1900, the Boer forces have a numeric advantage, however the British battle order stemming and repulsing attacks on besieged towns is very good considering their disadvantage, so too the initial advance to relieve Kimberley – during this period 21 actions are fought – the Brits win 14 and the Boers win 7.
From 1st January to July 1900, the numeric components start to balance, however on a Operational and Tactical level conducting conventional combined arms – the advantage swings significantly to the British. All the major sieges are relieved, the Boers invasions are turned and they are ejected from the British colonies. The hunt into the Orange Free State decimates the fighting capability of the Boers and forces the surrender of their conventional fighting capability. During this phase 49 actions are fought – the Brits win 44 and the Boers win just 5.
Overall, for the ‘Conventional’ war phase, the balance is overwhelming in favour of the British – British win 58 and the Boers win 12. In terms of timing, the British victory in the Conventional Phase is swift – from October to July – a mere 10 months, they have reversed an invasion, captured two separate countries, taken both Boer Republic’s capital cities, taken the Boer’s economic hub, isolated both countries and starved them of external aid. Broken the critical mass of the enemy to fight conventionally, taken nearly every major gun and artillery piece, and occupied all the enemy’s fortifications and defences. By any military standards that is good Command – Strategic, Tactical and Operational.
The Guerrilla phase is completely different, there are no significant pitched battles, battles resemble skirmishes, sieges are small towns remotely accessed and the focus switches to destroying supply lines (Boer and Brit) and ‘Commando’ hunts. It’s a “slow burner” in other words not much happens for months on end for the hundreds of thousands of troops in the theatre of operations, truly a case of “war is 99% boredom and 1% terror”. From August 1900 to May 1902 – the duration of this phase – 22 months, 100 significant actions are fought that would classify a ‘clash of arms’. It works out to only about 4.5 direct classes between Boer forces and British forces per month.
The scorecard is also in favour of the British – the Brits win 72 and the Boers win 28. To read this correctly we also need to understand that the Boer strategy in this phase is not to beat or capture British troops (they can’t keep them), generally the strategy is to harass the British, inflict some damage, retreat and fight another day. On a ratio of Brit to Boer “wins” the ratio is 2:1 – the Boers are remarkably successful at insurgency warfare, and they generally evade the ‘hunts’. The Boers do well at the tactical and operational levels and attain their objectives of wearing down British resolve and elevate their monetary and human costs of waging war – but it comes as a massive cost to the Boer lives and livelihood at the strategic level.
For the British, they win at the strategic level, the objective of starving the Guerrillas of their supply – food, ammunition, transport, weaponry, shelter and human resources, not to get into the moral or ethics of this, this is strategy used to win just about every Guerrilla war ever fought, by Britain or anyone else – it was the focus of the Vietnam War, the South African “Border War” and even most recently the Afghanistan War. On a tactical level their ‘Counter Insurgency” measures – now known as COIN – are very successful, so much so the Boer War’s Guerrilla Warfare phase is the shortest fought Guerrilla War in modern military history.
That said, as Professor Abel Esterhuyse rightly pointed out to the Observation Post – by 1902, the Boers emerge as the masters of ‘Insurgency Warfare’ and the British emerge as the masters of ‘Counter Insurgency Warfare’ (COIN) – lessons that are still referenced at Westpoint Military Academy to this day. This mastery would also define the ‘South African’ way of fighting war, when Jan Smuts is tasked with amalgamating the Boer Commandos and the old British colonial regiments to form the South African Union Defence Force (UDF) in 1910.
Thus, the UDF was built along the lines of using effective combined arms with high degrees of mobility to deal with both conventional warfare (as is the requirement of any statutory force) in the event a Colonial Power in Africa (e.g. Portugal or Germany) invades the Union and any domestic insurgencies (initially ‘internal’ threats are defined as potential Black African uprisings) and the UDF COIN doctrine is been developed to counter-act it along with a ‘Seek and Destroy’ ethos.
Smuts is happy to cherry pick, basically he’s happy to bring all that’s great and good about the British culture of warfare – their discipline and drill (sorely lacking in the Boer army), their uniforms and rank structures (sorely lacking in the Boer army) and their very effective use of combined arms warfare and joint arms warfare (also sorely lacking in the Boer army) and combine it with the Boer culture of warfare – the use of mobility, and applying high rates of survivability thinking to tactics of assault and defence (both of which are sorely lacking in the British army).
Smuts will build into the UDF the doctrine of highly mobile ‘combined arms’ – mainly the effective use of mounted infantry, armour and artillery (and other ‘arms’) all acting in unison and speed. Finally, he’s able to implement the doctrine of “manoeuvre” using the Clausewitzian concept. Under General Jan Smuts the UDF was shaped into a very effective fighting force, one that is far ahead of the old Boer Republics strategic and tactical constructs and doctrine. This will have far reaching consequences as this South African ‘philosophy’ of warfare would be effectively applied from the 1st World War (1914-1918), to the 2nd World War (1939-1945) to the ‘Border War (1966-1989) and its still used by the SANDF to this very day.
Casualties
The number of casualties in the Boer War needs a whole new Observation Post, as here we look at the very sensitive subject of civilian casualties – Boer, but also British and Black – the number is extreme – about 50,000 and still rising given new research – nearly all of it the result of disease – Measles and Typhoid mainly. The Measles epidemic, which swept the ‘Black’ and ‘White’ Concentration Camps and the besieged British citizens – killed nearly 40% of all the civilians succumbing to disease – measles as a ‘children’s disease’ especially taking its toll on Boer children. Not just civilians, the biggest killer of British soldiery was Typhoid and not the Boer’s bullets, nearly two thirds of all British casualties are the result of disease – young fit men who are dropping like flies from the same diseases sweeping the concentration camps and British towns under siege. Typhoid alone affects 57,684 British soldiers – killing 8,225 of them.
This is a highly sensitive and misunderstood aspect of the war – it requires a full analysis on the disease bell-curves and medical science to fully properly understand the causes and effects, and actions taken or neglected – look out for a future Observation Post in draft called “The Boer War’s biggest killer” where we will deep dive this subject and these statistics – because if there is one “winner” of this war’s butchers bill it’s not the British or the Boers – it’s an indiscriminate cocktail of micro-organisms.
We also need to look at the Killed in Action (KIA) and Died of Wounds (DOW) and survivability ratios between Republican and Imperial forces, as the KIA/DOW figure for the Brits is around 8,000 and the KIA/DOW figure for the Boers is around 4,000 – this implies the Boers were better soldiers – for every 1 Boer killed in combat 2 Brits are killed in combat (2:1 ratio) – this leads to the myths of the Boers been “better marksman” than the British or the Boers had better command and operational prowess – the British according to these myths were then “Lions led by Donkeys”.
However truth be told is on the survivability given the respective troop size and different doctrine, if you were a British soldier in South Africa in a combat role, your chance of surviving combat without been KIA or DOW was 98% – there was a 2% chance a Boer bullet would kill you – which is pretty good survivability by British doctrine which was “Hidebound by Tradition” with costly frontal attacks and bayonet charges and antiquated cavalry and lancer charges.
If you were a Boer combatant, given your overall troop size and strength, you had a 93% chance of combat survival and a 7% chance of been KIA or DOW from a British bullet. Which is not very good given Boer doctrine actually focussed on high degrees of survivability, choosing to break engagements, reconcile and fight another day (mobility and manoeuvre) – rather than stand and be bayonetted, cleaved and then impaled from a costly British frontal assault of infantry, cavalry and lancers – none of which appealed to the Boer way of fighting and doctrine for mounted infantrymen.
Bottom line – on casualties – statistically speaking the British command in the Boer War actually was pretty good given the improvements over time in doctrine from Waterloo to the Crimean War (see chart above), the Boer command on controlling casualties and survivability on the other hand was much poorer. One thing the British are NOT are “bad shots” and their Commanders are certainly NOT “Donkeys”. Simply put, if you were British you had a better chance of surviving combat, the point where the metal is flying around, than if you were a Boer.
In Conclusion
Numbers speak more to truths than anything else, and the truth is the numbers support the idea that the Boers invaded the British colonies whilst they were numerically inferior and the Boers numerically superior, for the purposes of changing the regional balance between Boer and Brit and establishing a unitary state under “Afrikaner” influence – and not only does the republican planning and objectives point to this, their military strategy, doctrine and statements of intent supports it – and it is statistically proven.
The idea that the British were building up an invasion force on the borders is complete Hollywood and panders to the ‘politically inspired’ sabre waving in the “ultimatum” delivered by the Boers and not to the reality on the ground at all. The idea that the Boers invaded British colonies for the purposes of forward defences or as some sort of pre-emptive strike is also completely unsupported by what actually happens, the actual plans and this assertion is woefully unsupported by military doctrine – entirely debunked by the science of military history.
Also, the idea that the Boer command and doctrine is somehow better than that of the British is completely statistically unproven, in fact the opposite is true, the ‘numbers’ point in favour of the British – so too does an analysis of the three aspects of effective command – on the Strategic level, the Tactical level and the Operational level.
Written, researched by Peter Dickens
With thanks to Tinus Le Roux and Jenny Bosch for the use of colourised images.
“Rights and wrongs of the Transvaal war” by Edward t. Cook. Publication date 1901
Leopold Charles Maurice Stennett Amery “The Second Boer War – The Times History of the War in South Africa 1899-1902” – Volumes 1 to 7.
Military History Journal, Vol 6 No 3 – June 1984. The Medical Aspect of the Anglo-Boer War, 1899-1902 Part II by Professor J.C. de Villiers, MD FRCS.
The Anglo-Boer war: A chronology. By Cloete, Pieter G
The Battle of Magersfontein – Victory and Defeat on the South African Veld, 10-12 December 1899. Published 2023. By Dr. Garth Bennyworth.
Dr David Brock Katz; ‘General Jan Smuts and his First World War in Africa 1914 -1917’
Dr Evert Kleynhans and Dr David Brock Katz; ’20 Battles – searching for a South African Way of War 1913 – 2013’.
Anglo-Boer War Blockhouses – a Field Guide by Simon C. Green, fact checking and correspondence – 2023.
The Boer War: By Thomas Pakenham – re-published version, 1st October 1991.
Correspondence and interviews with Dr. Garth Bennyworth, Boer War historian – Sol Plaatjies University, Kimberley – 2023.
Interviews with Dr. David Broc Katz, University of Stellenbosch, South African Military Academy – Military historian – focus on Jan Smuts and fact checking Boer and British military doctrine – 2023.
Correspondence on fact checking British doctrine with Chris Ash, BSc FRGS FRHistS, Boer War historian, Fellow of the Royal Historical Society and Fellow of the Royal Geographical Society for The Boer War Atlas – 2023.
History of the war in South Africa 1899-1902. By Maj. General Sir Frederick Maurice and staff. Volumes 1 to 4, published 1906
Very often when I read website or social media military history commentary on the 1914 Boer Revolt – I often come across the phasing that Louis Botha (usually incorrectly referenced as Jan Smuts) went against the will of the ‘majority’ of Afrikaners and therefore the general will of the white voting population in South Africa, when he declared war against Imperial Germany in 1914 and invaded German South West Africa (GSWA) – now on the side of Britain and its main ally – France. The result is a general upsurgence of Republicanism and a desire to re-engage the Boer War (a sort of Boer War 3) in an outpouring of widespread support by the Boer nation for Germany and against Britain (a legacy hangover from the Boer War). South Africa was forced into an unwanted war to do the British Empire’s bidding and the Boere would have none of it!
The problem with the above assertion is that it is pure bunk, its unfounded, as once again Military History (doctrine, strategy and tactics) and Economic History (stats and demographics) tell a different tale entirely and once again the ‘cold facts’ rip the ‘Political’ interpretation of the history apart (this is why I just love both economic and military history). So, let’s examine these ‘cold facts’ – the hard statistics – the numbers and see how they hold up, let’s also examine military doctrine and see how that holds against the numbers. Let’s challenge the history and establish why this above assertion is purely politically inspired fantasy.
The Vote
Upfront is the vote to go to war. The arrival of World War 1 in 1914 is both a blessing and a curse for the Boer led government of the newly formed Union of South Africa. Both Botha as Prime Minister and Smuts as his ‘right hand man’ were walking a tight rope – as Boer commanders they represented a faction of the new “Union”, balancing the two small old Boer Republic’s politics and laws with those of all the British colonies and protectorates surrounding them (six large British territories and their interests in them in effect) – so they are obliged to support Britain as the major player in the region, and honour their word to them, the oath that brought about peace – that’s the ‘curse’.
The ‘blessing’ to the Union government is that the war presents them with an ideal opportunity to realise the expansive border of ‘Greater South Africa’ as envisioned and concluded in the Union conference in 1909 – as this border also specifies the eventual inclusion of German South West Africa into South Africa in the first phase of the ‘Greater’ South Arica Union and eventually even bits of German East Africa would be included in the second phase of South Africa’s territorial advancement.
So it’s really no surprise, that when the decision to go to war is put to the vote in the Boer led and very independent Union of South Africa Parliament (at Union, Britain takes a figurehead role, the South African Union’s Parliament and legal construct is not governed by Westminster, its fee to make its own laws) – and the result is not what your Apartheid era school history teacher plugged – it’s a staggering vote of confidence by nearly all the Boer MP’s favouring going to war alongside Britain (and France) against Germany, by a landslide – literally. Consider the result.
92 = For invasion of German South West Africa (GSWA) by the Union of South Africa
12 = Against
So, as to the ‘majority’ of Afrikaners NOT wanting war with Germany, that is simply untrue, the Afrikaner community’s representatives in Parliament were overwhelmingly in favour of war against Germany. This is also where some ‘Boer Romantic’ commentators on the 1914 Revolt make a fundamental mistake, the Union of South Africa’s decision to conquer German South West Africa (Namibia) was NOT just a service to the ‘British Empire’ – it was largely in service to the objects of The Union of South Africa and its own territorial expansion ambitions and the prescribed ‘sphere of influence’ over the Southern African region as a whole (as agreed by all Boer and British leaders involved in the Union conference in 1909).
Put another way, that’s 88% in favour of going to war alongside Britain and 12% against. In so far as the politics goes, the South African Party (SAP) headed up by Louis Botha, and comprising all the old Boer War Generals and the old Afrikaner Bond is by far the majority party, it’s the Afrikaner’s representative party in government (the National Party came later) … statistically speaking the breakdown of Parliament is as follows:
South African Party, Louis Botha leader – 66 seats
Unionist Party, Starr Jameson leader – 36 seats
Labour Party, Frederic Creswell leader – 3 seats
Simply put, to see who the “Afrikaner” representatives are and who are the “English” i.e. British affiliated parties, the SAP is the ‘Afrikaner’ party – the ‘British’ party is most certainly Starr Jameson’s Imperial Party (you may remember Starr Jameson as the leader of the infamous Jameson Raid). The Labour Party is a British (English) unionist construct, its voters are the miners on the Johannesburg gold reef mainly.
From that it can be deduced that he majority of the ‘Afrikaner’ SAP have voted FOR going to war alongside Britain against Germany – of the SAP – 54 votes, or 82% of the SAP’s ministers are pro-war alongside Britain and her allies. It is only on the very rump of this party that we find the AGAINST voters, and of these 12 individuals (or 18% of the SAP), only 3 of them are notable and become highly vocal anti-war campaigners – Barry Hertzog, Koos de la Rey and Christiaan de Wet.
In this respect, between the three of them, although vocal they are really a small voice at odds with the legitimate elected government construct, the vast majority of South Africa’s representatives, and even most of their own peers. In truth, they are also not just “pro-German’ – at this stage they are intrinsically at odds with the idea of ‘Union’ and it’s agreed objects – seeking minority rule under a ‘Boer Republican’ hegemony instead.
Political cartoon of the day captures the Union’s territorial ambitions
The UDF Construct and its ’Afrikaner’ nature
Jan Smuts, as the Minister of Defence at this time had also been busy amalgamating the armed forces of the republics with those of the colonial citizen force regiments to form the Union Defence Force i.e. the UDF (in much the same way as the SADF was amalgamated with other forces in 1994 to form the SANDF – with the same challenges).
The UDF had taken shape to consist of a small contingent of Permanent Force, the Permanent Force basically comprises some 4,000 odd members and consists of a HQ, some admin and training staff and a mounted military constabulary of 5 regiments called the South African Mounted Rifles (SAMR) – these are a combination of members of the old British colonial mounted regiments like the Cape Mounted Rifles and old Boer Kommando members making the military their profession. They make up only 5% of the total UDF strength.
But the backbone would remain essentially voluntarily forces in a two-stream approach, the old ‘English’ colonial citizen force regiments – Transvaal Scottish, Royal Natal Carbineers, Royal Durban Light Infantry etc comprise what is collectively known as ‘Active Citizen Force’ (ACF) and to begin with they tend be ‘English’ speaking and led. There are 23,000 ACF members (29% of the total UDF mustering).
The greater part of the UDF backbone however is the ‘Afrikaans’ citizen force “skiet” Commandos known as the ‘Rifle Association Mounted Infantry’ working in parallel to the ACF. This is the old Transvaal and Orange Free State Boer Republic’s Boer Kommando system in effect. They are collectively called the “Rifle Associations” or RA and comprise 42,000 members (or 52% of the complete UDF strength) and they are the majority in the new UDF construct.
It was a careful construct to keep everyone happy, but the point is this, it was NOT “British” – Imperial British troops present in South Africa after the Boer War had all returned to the United Kingdom, any engagement the Union of South Africa was going to fight in World War 1 in Africa, whether foreign or domestic, was going to be made up of ‘South Africans’ and led by ‘South Africans’ – and in truth it was commanded by the old Republic’s ‘Bittereinder’ Boer Generals – primarily Botha (as Prime Minister was Commander in Chief) and Smuts (as Botha’s Minister of Defence) – and by way of construction the vast majority of the force is of ‘Afrikaans’ origin (not English) and part of a mounted infantry construct (RA and SAMR).
General Jan Smuts during WW1
Smuts is beginning to outline military doctrine for the UDF and he has a greater disposition to the Boer ‘way of fighting’ i.e. mobility which is heavily reliant on mounted infantry. The UDF is fortunate, at the end of the Boer War in 1902, the British (and Colonial forces) emerge as the singular worldwide authority on Counter Insurgency warfare (we know this today as COIN) and the old Boer Republican forces emerge as the worldwide authority on Insurgency warfare. Thus the UDF is now being built along the lines of using effective combined arms with high degrees of mobility to deal with both conventional warfare (as is the requirement of any statutory force) in the event a Colonial Power in Africa (e.g. Portugal or Germany) invades the Union and any domestic insurgencies (initially ‘internal’ threats are defined as potential Black African uprisings and the UDF doctrine is been developed to counter-act it).
Intrinsic in the UDF’s DNA at this point is the use of COIN in the rural warfare context (they have not been tested in the urban context, that would only really happen with the Miners’ strike in 1922). Also, a key learning for the UDF is that towards the end of Boer War 2, the British turn to highly mobile ‘Seek and Destroy’ columns known as “Commando Hunts” to put an end to the final ‘Bittereinder Kommandos’ – essentially matching mobility with mobility but with greater firepower and ‘combined arms’. This institutional knowledge will play a major role in the upcoming 1914 Boer Revolt.
Smuts is happy to cherry pick, basically he’s happy to bring all that’s great and good about the British culture of warfare – their discipline and drill (sorely lacking in the Boer army), their uniforms and rank structures (sorely lacking in the Boer army) and their very effective use of combined arms warfare and joint arms warfare (also sorely lacking in the Boer army) and combine it with the Boer culture of warfare – the use of mobility, and applying high rates of survivability thinking to tactics of assault and defence (both of which are sorely lacking in the British army).
WW1 UDF Recruitment poster targeted at Afrikaners
Smuts will build into the UDF the doctrine of highly mobile ‘combined arms’ – mainly the effective use of mounted infantry, armour and artillery (and other ‘arms’) all acting in unison and speed. It’s a doctrine of “manoeuvre” using the Clausewitzian concept – using superior and simultaneous advances along “exterior” lines (a concentration in space) on an enemy using “interior” lines (known as a concentration of time) of communication and supply. Under General Jan Smuts the UDF is shaping into a very effective fighting force, one that is far ahead of the old Boer Republics strategic and tactical constructs and doctrine which focused mainly on “interior lines”. This will have far reaching consequences for the Boer Revolt and the rebels.
The Afrikaner disposition to Germany
Smuts was also sensitive to the fact that many Afrikaners shared German heritage and they (falsely) believed that Germany extensively supported the Boer cause during Boer War 2 – ‘falsely’ because in fact, Germany was happy to ‘sell’ them arms (as did the British arms manufacturers) at a premium and send some medical assistance later on, however Germany withdrew their support officially – they provided no troops and no substantial funding to the Republican Boer War effort whatsoever.
Kaiser Wilhelm II
Kaiser Wilhelm II, although sending a letter to Kruger congratulating him on the Jameson Raid victory (given the Boer nation their false sense of ‘support’), in fact refused point blank to receive any Boer representations and after the ‘Black Week’ Boer victories during Boer War 2 in late 1899, he and his Generals compiled a military strategy, not to help the Boers, but to help the British win the war (he was after all related to the British monarchy – part of the family so to speak) and shared it with them instead – Kaiser Wilhelm II even proudly proclaiming at the end of the Boer War that the British had followed his plan precisely as he had outlined it to them and it was the German plan that won the war for the British – not Field Marshal Frederick Robert’s plan and as inconvenient truths go the Kaiser’s plan involved scorched earth policies and concentration camps. (see: John C.G. Röhl: The Kaiser and England during the Boer War).
Ethnic Germans (local and foreign) volunteering to join Boer Commandos also qualified very few (550 odd) – far more Anglo-Irish, Dutch and Flemish joined the Boers (5,500 odd). A Boer leader delegation, including Botha and de Wet visited Germany after the war in 1902, and although they received a grand welcome and ovations, they were never officially received, Kaiser Wilhelm II flatly refused to entertain any Boer delegation sent to Germany.
Boer delegations did raise a little money from private donators and a Boer help fund, but that’s it – there was never any official public contribution by the German government to the Boer cause – ever. Germany wanted to avoid conflict with Britain – who by convention and legal treatise at the time held suzerainty limitations over the two Boer Republics preventing them from engaging in foreign policies and entering into treaties. However, all this still did not resonate with many in the Boer community who almost illogically saw Germany as an Ally. Now, I bet none of this was in your Nationalistic inspired history teachings.
Left: Boer delegation to Europe and the USA in 1900 to try and solicit help for the Republics – with very limited success. Right: Kaiser Wilhelm II in a British Field Marshal uniform – he was made a Field Marshal in the British Army in 1909 by his relative – King Edward VII just after Queen Victoria’s death.
Smuts would argue the case for war, not on the basis of warring against Germany on the side of ‘Britain’, but for supporting the other old Boer Republic’s supporters – France, Belgium and the Netherlands in their war against a hostile and aggressive Germany busy de-stabilising western and eastern Europe, and Smuts was very aware of the vast majority of Boers had Dutch, Belgian and French roots, as opposed to the ones with German roots. He would use the same argument again for his declaration of war against Germany in World War 2.
Smuts however anticipated that the decision to go to war, although largely supported by the Afrikaner political elite and leadership, would have with it a handful of resignations from the Union’s Defence Force from those strongly in favour of Germany and whose sheer hatred of the British superseded everything, and the Union government received exactly that – a “handful” – nothing that would fundamentally compromise the UDF’s fighting ability or construct, the UDF remained at its 80,000 men strong capability and it remained with its primarily strong ‘Afrikaans’ demographic skew, contrary to the thinking of wishful Boer Romantic modern-day arm-chair Generals, there was no large gravitation of Afrikaners from the ‘Rifle Associations’ (Kommandos) and other arms of the UDF over to the German cause, nor was there a large wave of resignations from the UDF, in fact there was very little, verging on none – less than 1%.
General Christiaan Frederik Beyers
Of the handful of resignations which were received, a rather long-winded one came from General Christiaan Beyers, the UDF’s Commandant General in charge of the Active Citizen Force (ACF) and his was the most important resignation. As previously noted, prior to the decision to go to war against Germany, Smuts and Botha’s old friend and highly respected comrade, General Koos de la Rey had been one of the handful of Parliamentary Ministers vocally against the decision to invade GSWA and advocated neutrality, and because of his popularity his opinion held massive sway over the old Boer Republic’s Afrikaner electorate – nevertheless he was persuaded by Louis Botha and Jan Smuts not to take actions which may arouse the Boers, he then held a political rally for only 800 Boers who felt strongly over the matter and took a reconciliatory approach – contrary to what the attendees expected of him.
Major Jan Kemp in UDF uniform
General De la Rey seemed torn over his decision, and he was then targeted by General Beyers to join him for meeting with Major Jan Kemp, a mid-line UDF officer who had also resigned – the purpose of the meeting; Beyers and Kemp wanted to persuade de la Rey to take a stronger stand and initiate more Union Defence Force resignations to try and compromise its fighting capability. Joining the conspiracy was another heavyweight – the significant Boer General and Parliamentary Minister, Christiaan de Wet.
What follows next is well documented, however the generally accepted and investigated history concludes; General De la Rey and General Beyers were travelling in a soft top sedan car to their meeting with Major Kemp and did not stop at a Police blockade set up to capture a notorious gang of robbers and murderers called The Foster Gang. One of the Policeman fired a warning shot into the road to get them to stop, the bullet ricocheted and hit De la Rey, killing him.
It was tragedy – plain and simple, and both Botha and Smuts were devasted at the loss of their friend, as a signal to the inevitable accusations of ‘political assassination’ both Botha and Smuts attended De la Rey’s funeral in front of thousands of mourning Boers, they appeared without any bodyguard at the mercy of the assembly – a token of no malice intended, and there were no protests or accusations from the mourners.
Jacobus Hercules de la Rey
Regardless, despite sound and tested enquiries and court cases, and the Nationalists having full scope and the resources at hand for 40 years to uncover a ‘plot’ – no concrete proof has emerged of a plot by Smuts to kill De la Rey whatsoever – ‘conspiracy theory’ nevertheless grew out of the incident which would plague Smuts in future years, and it still does.
It is also generally understood that with the death of De La Rey, that would probably have been the extent of Boer resistance to the war, and it would have devolved into simple political protest and peaceful demonstrations, had it not been for one single man … Lt. Colonel Manie Maritz, who had an especially strong disposition towards Germany having served in German South West Africa and he commanded a small UDF force at Upington, on the border with German South West Africa (GSWA).
A treacherous soup
The day after de la Rey’s funeral, Kemp, Beyers and de Wet addressed a large crowd at Lichtenberg, calling on protest meetings against the decision to invade GSWA. Manie Maritz however took a far more robust position than Kemp, Beyers and de Wet, he instead went into open sedition and started ignoring Smuts’ and his other Commander’s orders been sent to him. Intel told Smuts that Maritz had joined the Germans, however contradictory to Smuts’ usual manner of decisiveness, he vacillated instead hoping to persuade Maritz not to revolt and get him to see reason.
Lt Col Manie Maritz, front and centre in his South African Union uniform and his staff behind him – his ‘Agter-ryer’ (man-servant) is at his heels (It’s the man-servant’s expression and position that is most interesting as in many ways it gives away Maritz who is a very outspoken racist and has no regard for people of colour).
Not dissuaded by Smuts and bent on a sedition, Maritz resigned his commission from the Union Defence Force and openly rebelled on 9 October, taking just 300 odd of his UDF soldiers with him when he went over to the Germans. Maritz arrested all the UDF officers and men under his command who were unwilling to join the Germans, and then sent them forward as prisoners into German South West Africa (GSWA).
Smuts sent Major Barend ‘Ben’ Bouwer over to deal with Maritz’ sedition and insubordination (both Bouwer and Maritz had served under Smuts in his Commando during Boer War 2 and he hoped Bouwer could reason with Maritz). Maritz however also promptly took Bouwer prisoner along with his fellow officers, he was subsequently released and sent back with the ultimatum from Maritz to the Union Government:
The ultimatum read that unless the Union Government guaranteed safe passage of his fellow plotting Generals (De Wet, Beyers, Kemp et al), to his position on the GSWA border by the 11th October he would immediately attack General Brits’ UDF forces preparing to invade GSWA and then he would invade the Union of South Africa.
Major Ben Bouwer reported that Maritz was in possession of some guns belonging to the Germans, and that he held the rank of General commanding the German troops. He also had a force of Germans under him in addition to his own rebel commando.
To drive Maritz’ point home, Major Bouwer was shown an agreement between Maritz and the Governor of German South West Africa guaranteeing the independence of the Union as a Republic, ceding Walfish Bay and certain other portions of the Union to the Germans, and undertaking that the Germans would only invade the Union on the invitation of Maritz.
Major Bouwer was shown numerous telegrams and helio messages dating back to the beginning of September. Maritz boasted that he had ample guns, rifles, ammunition, and money from the Germans, and that he would overrun the whole of South Africa.
In response to Maritz’ action and ultimatum, on 12 October, the Union government imposed martial law across the whole of South Africa. On proclaiming martial law, Smuts, the eternal reconciler, immediately called again for “reason” and urged the rebels not to be swayed by “foreign agents influencing them”.
The ‘Boer Revolt’ or ‘Maritz Revolt’ or ‘Five Shilling Rebellion’ as it would also become known was underway, and with their sedition hand now played by Maritz in the Cape Colony, his fellow conspirators – Beyers, Kemp and de Wet had no choice, now ‘in for a penny and in for a pound’ they all broke their ties with the Union and went into open armed rebellion against their lawfully elected government – raising Commando’s primarily from the Transvaal and Orange Free State to come to Maritz’ aid.
The ‘Five Shillings Rebellion’ reference came about when de Wet, entered the town of Reitz on a recruitment drive, called together the inhabitants and said:
“I was charged before for beating a native boy. I only did it with a small shepherd’s whip, and for that I was fined 5/–”.
Hearing about the speech later, Jan Smuts referred to the rising as “the Five Shilling Rebellion” as a means of belittling the rebels, the baseless promises of wealth to the desperate and the aims of the revolt.
The stated objective: Maritz issued a proclamation by way of an objective:
“The former South African Republic and Orange Free State as well as the Cape Province and Natal are proclaimed free from British control and independent, and every White inhabitant of the mentioned areas, of whatever nationality, are hereby called upon to take their weapons in their hands and realize the long-cherished ideal of a Free and Independent South Africa.”
In other words, to take by force, the former British Colonies and re-start the Boer War, resistance to the declaration by any “white” in the entire Union of South Africa would be treated by Maritz’ Provisional Government as treasonous.
Sabre Waving
Generally in social media and web based articles on the Boer Revolt you get the impression that this was a significant military threat and social movement, but that’s not the case – in fact all these threats by Maritz as to invading South Africa, crushing the UDF’s intensions on invading GSWA, declaring a Afrikaner Republic under a white Boer hegemony with the aid of Germany are nothing more than ‘sabre waving’ – from a military doctrine perspective they are nothing more than unsubstantiated and baseless threats.
So, let’s look at the military doctrine and establish what sort of threat from the rebels and Germany the South African Union defence force is facing, what’s the magnitude of the problem with regard the Boer Revolt that they have to deal with, what is the rebel forces calibre, construct and fighting capability? – Let’s look at the numbers.
To attain their objective, the Rebels raised 11,476 Boers. The South African Union Defence Force strength to ready itself for World War 1, all in, including all its reserves is 80,500 troops (without even considering the Rhodesian troops mustered for the GSWA campaign under South African command). That means the Boer Rebels are outnumbered on a ratio of 8 to 1.
Military doctrine will always dictate that a force needs to be twice the size of the opposing force (2:1) if an effective ‘invasion’ is feasible and victory within grasp, more so (and more troops than a 2:1 advantage) if the intention is the occupation and annexation of a country. For the Boer Rebels to be successful in their object to defeat an 80,000 strong UDF they require a force of 160,000 men (that’s 3x more than the entire Boer Republican forces had in Boer War 2 which at their zenith numbered 40,000).
Obviously, their hope and intention, albeit somewhat fanciful and arrogant, was that the UDF would capitulate with a mass walk out of all its Afrikaner demographic – estimated at some 50,000 odd people – but that simply did not happen. On an 8:1 ratio disadvantage the Boer Revolt stood absolutely no chance of success, even if this UDF number reduced sizeably there would still be at a disadvantage with almost no chance of success.
But the intention was that Germany would combine with the Boere, the Germans in GSWA would join forces with the Boers right? We need to augment the numbers with German troops. Total German strength in GSWA is 3,000 odd well trained German Schutztruppe and 2,000 odd trained German militaria – about 5,000 in total. At best another 2,000 can be mustered from local Boere and German settlers in GSWA. If we add 7,000 German troops to the Boer Rebels’ 11,500 troops we get 18,500 troops MAX. Against the UDF’s 80,500 that still is nowhere near enough to affect a victorious outcome, they are still heavily outnumbered by 4 to 1.
German ‘Camel Corps’ in German South West Africa
There is also no German expeditionary force from elsewhere making its way to GSWA, they are heavily committed to the European theatres of operations. Also, unlike in their East Africa colony, the German military in GSWA is unable to raise many local Askari black troops to augment their numbers, a hang-over from the Herero and Namaqua genocide which gives them no real traction with the black inhabitants of GSWA.
The idea that the Germans in GSWA could link up with a Boer Revolt (unless substantially supported) and invade South Africa is fanciful at best.
Now, let’s look at the Rebel Forces capability and make-up. It is important to note, the Rebel force was not made up entirely of first rate ex-UDF soldiers going against their counterparts, the rebel force was primarily made up of destitute Orange Free State Boers having come through a drought and agricultural reforms on the back of the devastation of their farms during Boer War 2.
Many of these Free State Boers as has been pointed out by historians like Sandra Swart (Desperate Men: The 1914 Rebellion and the Polities of Poverty’ in South African Historical Journal, Vol 42) and John Bottomly (The Orange Free State and the Rebellion of 1914: the influence of industrialisation, poverty and poor whitism: pages 29-73), were simply desperate ‘Bywoners’ (landless farmers or share-croppers) promised a better life if the rebellion was successful.
Consider the statistics of the Boer rebels and from where they came, and you’ll see how the above statement holds true. 7,123 (62%) of the Boer Rebels came from the Orange Free State – the least populace, most rural and economically worse off province in the Union. As an aside, to gauge the extent of success of Maritz’ proclamation and its resonance across the broader Afrikaner community across the whole of South Africa, the rebel leaders were only able to motivate 1,215 (12%) of the Boer Rebels from the Cape province – the biggest province in the Union with the largest Afrikaans population. The balance coming from the Transvaal – which considering its very urbanised and significant population is negligible in the bigger scheme of the Transvaal’s demographic make-up, and no real support from Natal whatsoever.
The Potchefstroom Herald at the time best tried to explain why there was no traction behind the revolt from Cape Afrikaners and the black/brown African communities in this quote – and not surprisingly it boils down to the lack of suffrage and plain racism in the old Republics;
“When these high officers of the Defence Force in Transvaal and Orange “Free” State rebelled and joined the Germans with their commandos, the Dutchmen of the Cape (presumably because “they vote side by side with the Kafirs”) denounced the treachery in unmistakable terms. The South African party at the Cape beat up its followers to the support of the Government, and the voice of the Cape section of the Dutch Reformed Church rang from pulpit and platform in denunciation of disloyalty and treason. But in the Northern Provinces, where white men are pampered and guarded by the Government against the so-called humiliation of allowing native taxpayers to vote, there the rebellion, having been regarded with seeming approval, gained a marvellous impetus.”
Plaatjie: The Boer Rebellion – snippet from the Potchefstroom Herald
As a unified, coherent, trained and fully armed force, the Rebel Boers were not.
They were desperate and landless farmers in the main up against fully trained, motivated, even mechanised in some instances, and properly armed UDF soldiers who had an 8:1 numerical advantage. As noted earlier, in terms of doctrine the UDF under Jan Smuts’ design, command and control was focussed on effective deployment of combined arms in an enveloping role – all based on high manoeuvrability – up against this very modern military construct was a rebel force which only really consisted of ‘old school’ mounted infantry Commandos with ‘old school’ Boer command and control doctrine leading it – they had no light artillery support, no supply logistics to speak of, no armoured cars, no heavy guns, no machine guns and no motorised support – whereas the UDF had all of these.
UDF armoured cars during GSWA campaign – 1914
In essence the Boer Rebels were using an outdated military doctrine originally intended to quell poorly armed Black African uprisings – a Commando, and it was simply complete folly to pitch such doctrine against a modern military using a doctrine of both combined arms and joint arms. The Rebels were simply no match and it quickly showed.
Whilst still focussing much of the UDF’s resources on the invasion plans and logistics for the GSWA campaign, General Louis Botha would primarily use just the Rifle Associations to counteract the rebellion, insistent that the British ‘stay out of it’, this was going to be the Boer leaders sorting their differences out between themselves – so ‘Brother against Brother’ and in effect the UDF’s Afrikaners outnumbered the rebel Afrikaners 4 to 1. As also noted earlier, intrinsic in the UDF’s institutional memory and doctrine was the British idea of “hunting” Commandos using what was termed as a “flying column” of combined arms – a spill over of the British tactic from Boer War 2.
The long and short the rebellion was almost immediately repelled and then very quickly crushed as Botha’s UDF Rifle Associations with some Active Citizen Force elements in support used these ‘Flying Columns’ and effectively hunted the Rebel Commandos down as they tried to make their way to assist Maritz on the GSWA border. The revolt would last a couple of months only.
Image: The last pursuit of Major Kemp. A South African Union ‘Flying column’ crossing the Orange River after him.
Reconciliation
As Dr David Katz in his work ‘General Jan Smuts and his First World War in Africa 1914 -1917) points out. Jan Smuts, eternally the one Boer General keeping a level head and seeking reconciliation and understanding, and when it was clear the rebellion had failed, Smuts called for a ‘Blanket Amnesty’ across the board for the Boer Rebel leaders and their troops if they laid down their arms. General Louis Botha, the Commander in Chief, on the other hand took a much harder and less reconciliatory line than his colleague – he was livid at the sheer betrayal, the sheer waste of lives, resources and time it took and the complete stupidity of it all – an unsupported revolt against a lawfully elected government with absolutely no chance of success. It was reported that he once joking said to Jan Smuts “Let’s face it Jannie, you’re no General!” By that he meant Smuts was far too reconciliatory and soft-hearted – as far as Louis Botha was concerned, under the edicts of martial law, all rebels, officers and men alike should be tried, the most treasonous of which, the leaders, put up against a wall and shot – even if they were all his old friends.
Smuts however persevered – Botha eventually agreed to an Amnesty, but for the rank and file only, the Boer Rebel leaders would have to be prosecuted. The amnesty, excluding the Rebel leadership, was in put place from 12th to 21st November 1914, and with it the 1914 Boer Rebellion was effectively over, by the end of November General de Wet’s force alone was down to only 40 men. Rear actions and isolated and desperate battles continued to be fought for a couple of months by woefully under-strength hard liners refusing surrender and amnesty, but by the end of January 1915 the rebellion was over.
Of the Rebel leadership now having surrendered, Botha and Smuts would again be especially magnanimous, considering the Union was in a state of war externally and in a state of martial law internally – and this was 1914 ‘World War 1’ – people were put in front of firing squads for ‘cowardice’ and being AWOL (absent without leave) – let alone ‘sedition’ and ‘treason’. Smuts would treat the Rebels in general very kindly, literally with kid gloves, all the time urging reason, understanding and reconciliation.
General Christiaan Rudolf de Wet
Of the main rebel leaders, General Christiaan Beyers tragically drowned in the Vaal River whilst attempting to desperately evade capture on 8th December 1914. General Christiaan de Wet was captured during the amnesty and sentenced to six years imprisonment, with a fine of £2000, he was released by Botha and Smuts after one year’s imprisonment, after giving a written promise to take no further part in politics.
Major Jan Kemp was captured on the 2nd of February 1915 and sentenced to 7 years imprisonment, with a fine of £1000. However, a mere 10 months into his sentence Botha and Smuts agreed to release him – also on the condition that he may not participate in any politics – a promise Kemp almost immediately broke entering politics as a National Party MP under Hertzog in 1920. Ironically he accompanied Hertzog and joined with Jan Smuts in the Fusion government, however by 1940, in opposition to South Africa entering WW2 against Nazi Germany, he joined the Reunited National Party until his death in 1946.
Lt. Colonel Manie Maritz would evade capture and escape into German South West Africa, at the conclusion of the GSWA campaign and the Union Defence Force’s victory and annexation of the territory (the first real victory for the Allies against Imperial Germany in WW1), Maritz would again evade capture, going into self-imposed exile in Angola, Spain, Portugal and then Mozambique. He would re-enter South Africa in 1923 and spend a couple of months in jail for treason, thereafter he would enter into politics as the leader of an antisemitic, one-party state, National Socialist (Nazi) inspired ‘Boerenasie’ party prior to World War 2.
Jopie Fourie
Of all the other leaders – junior and mid-level rebel officers who were also captured. All were sentenced to short imprisonments and fines, almost all of them walking free within a year … except for just one man … Captain Jopie Fourie was executed for ‘High Treason’ having not resigned his UDF officers commission, captured still wearing his UDF officer’s uniform and opening fire on his fellow UDF troops whilst under a ‘white flag’ of truce – in one skirmish Jopie Fourie’s men shot dead Captain William Allan-King, the much loved and popular Native Affairs administrator, whilst he was attending to a wounded man.
Retribution for William Allan-King was coming, many in the English, Native and Coloured communities wanted Jopie Fourie dead, the South African Union Defence Force wanted him dead, many Afrikaners related to or who had affiliation to the Afrikaner UDF men he killed wanted him dead … and this was WW1 and Martial Law after all – there was no way anyone could get him out of this one with a no-nonsense leader like General Louis Botha as Prime Minister and in charge of stays of execution – not just one but on three distinctive charges of high treason, not in a month of Sundays was this possible – a story on Jopie needs a little more space – so follow this Observation Post link to Jopie’s story: What about Jopie?
To pay for all their fines the Bloemfontein newspaper ‘Het Volksblad’ established the ‘Halfkroonfonds’ (Half-a-Crown Fund). Shop owners and other people whose property had been damaged during the rebellion were able to claim compensation, leading to the establishment of the Helpmekaar Beweging (the Help-One-Another Movement). By the end of 1917, all the debts were paid.
Of the handling of the 1914 Boer Revolt, Louis Botha would summarise Smuts role and leadership, when he said of him;
“Nobody can appreciate sufficiently the great work General Smuts has done – greater than any man throughout this unhappy period. At his post day and night, his brilliant intellect, his calm judgement, his amazing energy and his undaunted courage have been assets of inestimable value to the Union in her hour of trial.”
As a rebellion with any chance of success consider just what a small minority they represented – no Cape Province or Natal Afrikaner would really come near it (and the majority of Afrikaners lived in the Cape), of the Afrikaners in the Transvaal and OFS they were unable to raise an effective fighting force, the vast majority of Afrikaners in the armed forces remained in the UDF, the vast majority of Afrikaner political leaders remained behind Botha and Smuts and they gained no traction whatsoever to raise anything from the Black and Coloured communities (the real ‘vast’ majority) – no “Askari” troops whatsoever, and they got no support whatsoever from the white South Africans of British decent – who by way of ‘white’ population were not insignificant in size (about 40% of the white population total), the ‘English’ whites commanding massive swathes of white population groups in the Transvaal (most of Johannesburg and the reef), Natal (most of Durban) and the Cape Colony (especially in Cape Town and the Eastern Cape).
What if?
Now we can ask the question “what if the Rebellion took traction?” What next? Assuming the UDF internally imploded and a 10,000 strong Boer army with a 7,000 strong German army in support could annex the whole of South Africa, however implausible – consider the scale of white, coloured and black population groups that would resist it.
Also consider the British reaction to it, the probability that a couple of thousand mounted infantrymen, lightly armed, could take British held ports like Cape Town, Port Elizabeth and Durban or their Naval Base in Simonstown. As a modern military construct, the UDF at this stage ops out of developing a Navy of its own because the Royal Navy provides this service to the UDF on the back of operating their Simonstown Base as sovereign British territory. As a ‘joint arm’ to the UDF construct the Royal Navy is an incredibly powerful instrument.
HMS Goliath – pre-dreadnaught class, extensive use during the East Africa Campaign.
The Royal Navy is Britain’s true military might, and it’s the world’s undisputed naval power – a very big hitter, in 1914 it’s bigger than the French and American navies combined. For the British in 1914 the ‘Army’ is very secondary to the control of its trading empire worldwide – the primary tool is the Navy. Defending (and even assaulting) ports is what the Royal Navy does, it’s their speciality and just one British battleship has more firepower on it than the entire Boer Rebel army combined – think about that.
Also, to consider with the hindsight of history, what would Britain do to re-establish its influence in Southern Africa with a rebel Boer Republic (with German backing) now declared – incorporating hundreds of thousands of people who consider themselves British subjects or under British protectorate, citizens and subjects who want nothing to do with the racist constructs of Boer Republicanism. Indeed, what would Britain do … it would, when the opportunity arose, return its Expeditionary Force to South Africa and simply take the country back – only this time it would have the benefit of all the technological advances of World War 1 – tanks, chemical warfare, fighter aircraft, bomber aircraft etc.
Also, as Germany was defeated in WW1, an unsupported Boer Republican government would not hold out and Britain would have to intervene by 1918. The question then is how would the Boer nation hold out? As a population the Boer nation was devastated by the South African War (1899-1902) and they had no armaments industry, with a renewed British military intervention and all the new technology of warfare available to them, the Boer nation would simply not survive the onslaught.
But – you may ask, the Boere did manage to get a ‘white’ Republic for themselves in 1948 without the support of Germany, and Britain didn’t invade – so it’s possible right? Again, this is after WW1 – not WW2, Britain is still an Imperial Empire and a colonial power, at the heart of which are its ‘Dominions’ – of which South Africa is one, and a key one at that (the other ‘Dominions’ are Ireland, Canada, Australia, and New Zealand). In any event, look at how Dr. H.F. Verwoerd’s ‘Keep South Africa White’ Republic worked out in the end.
To Jan Smuts (and Louis Botha), the idea that a Boer Republic could be resurrected ended with the Boer War, South Africa was now intertwined as a British and Boer construct – Union had seen to that, and all the Boer war leaders had sworn an oath to uphold it, they had given their word (Smuts would remark that a nation who goes back on its word is not a nation at all).
Smuts would also take an almost paternal approach to his much loved nation and try and gently try to steer the Boer nation away from inflicting more harm on itself, he would however consistently be thwarted by a minority of Afrikaners on the rump of Afrikanerdom, who against all odds are blindly bent on re-instating a Boer Republic with its intensive racially driven constructs (based on Krugerism) over the whole of South Africa and they are also wholeheartedly bent on supporting Germany – through both its Imperial and subsequent Nazi manifestations.
Conclusion
In the end the Boer Revolt did little in terms of its military objectives, it managed to delay the invasion plans of GSWA for a couple of months only whilst the UDF dealt with it, however in the end the GSWA campaign was a decisive victory for the Union and the territory successfully annexed under ‘Greater South Africa’ in a trusteeship – as was the Union’s expressed casus belli for entering the war.
As has been statistically proven – the Boer Revolt did NOT evoke a widespread desire from the Afrikaner community in the greater South Africa for a Boer Republic with Germany as its supporter. The Boer Revolt did NOT reflect the sentiment of the majority of the Afrikaans community nor that of the majority of its leaders. The Boer Revolt did NOT inspire the old Boer War Commando system and the majority of Afrikaner fighting men to join with it, in fact they did the opposite. The Boer Revolt also did NOT compromise the Union Defence Force in any way, shape or form whatsoever.
From a military doctrine perspective, The Boer Revolt was poorly planned and poorly executed. The rebels were always going to be woefully outnumbered with completely insufficient firepower to do the task expected of them – in truth they had no chance of success – zero. The use of outdated mounted infantry doctrine against a modern military construct using combined and joint arms with a mobility ethos was also only ever going to end in a disaster for the rebels. In truth, not one single critical military objective of the Boer Revolt was met.
What the 1914 Boer Revolt did however do was plant the seeds for political division and is one of the key propaganda tools used by the Nationalists to create the deep split in Afrikaner outlooks. Louis Botha would look at the Rebellion as complete folly, a waste of time and an utter waste of life – a sort of Boer equivalent of the Charge of the Light Brigade, with the same disastrous consequence. Botha’s political opponents would look at it rather romantically instead – a sort of ‘Boer Last Stand’. It stands today in some Afrikaner communities, precisely because of its ‘Romanticism’ and ‘political currency’ and not because of its military prowess or even its unattainable objectives.
Written and Researched by Peter Dickens
References:
Statistics, data and references sourced from the following:
Eben Nel; ‘Kaapse rebelle van die Hantam-karoo’
Dr David Brock Katz; ‘General Jan Smuts and his First World War in Africa 1914 -1917’
Dr Evert Kleynhans and Dr David Brock Katz; ’20 Battles – searching for a South African Way of War 1913 – 2013’
Sandra Swart; ‘Desperate Men: The 1914 Rebellion and the Polities of Poverty’
John Bottomly; ‘The Orange Free State and the Rebellion of 1914: the influence of industrialisation, poverty and poor whitism’
André Wessels; Afrikaner (Boer) Rebellion (Union of South Africa) 2018.
Brian Bunting; ‘The Rise of the Afrikaner Reich’
John C.G. Röhl: ‘The Kaiser and England during the Boer War’